The other day I posted this video on social media where I’m controlling the thickness of outlines on 3D objects:
After posting this, one thing became abundantly clear… The children yearn for the (out)lines!
In this post I’m going to outline (heh) how I achieved this, but before we get into the weeds of it I want to clarify that this is not a one-size fits all solution. If you’re looking for something as simple and easy to use as highlights you’re not going to find it here. I would argue that this is a viable technique, but it will likely require premeditation and planning to use effectively.
Okay, on with the details.
To understand this technique we first have to understand a very common technique used in roblox UGC accessories to give the effect of outlines.


By using a thickness modifier with the face normals flipped we can achieve this outline effect, but it’s not quite what we want. This looks more like the lines you’d get on a cell shading effect than it does a pure outline. If I was using a cleaner mesh I could probably get a better result, but ultimately the issue would still stand.
So what can we do? Well to answer that question let’s go on a bit of a detour. There’s a really cool game you can play called TUNNELER. It does a lot of really cool stuff, but one of the more subtle things it does is scale the portal gun very small, but positioned such that it appears to be regular size on your screen.
This allows you to get really close to walls without worrying about the weapon clipping into them.
It’s really easy to emulate this technique:
game:GetService("RunService").RenderStepped:Connect(function()
	local cameraCF = workspace.CurrentCamera.CFrame
	local offset = cameraCF:ToObjectSpace(unmodifiedCFrame)
	meshPart.CFrame = cameraCF:ToWorldSpace(CFrame.new(offset.Position * scale) * offset.Rotation)
	meshPart.Size = unmodifiedSize * scale
end)
In this example, scale represents a percentage of the original size. So in the case of tunneler, you’d want to pick a very small scale value so the object is very tiny and close to the camera.
In our case we can use the technique to layer multiple objects much like how z-index works.
We want our outline mesh to be behind the outline subject so we’d want to pick a scale value that’s larger than 1. This is a careful balance though. We can’t pick too big since parts in roblox have size limits, we also can’t pick too small b/c we don’t want the objects to touch else they might still have some of those cell shading type lines.
Luckily we can solve this with a bit of trig. By using the model radius we can find the next biggest circle that would fit behind the first.

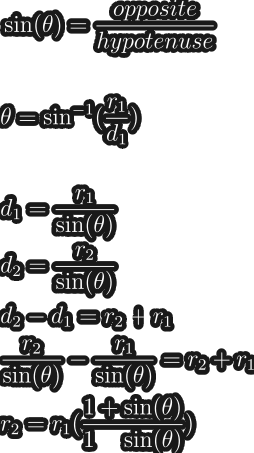
You can quite easily extend upon this equation to find the n-th radius.

We can use to this make sure we always render the outline mesh behind the subject. Awesome!
There’s still some issues with our approach though.
First, if I use this in an actual scene with other stuff there’s probably going to be stuff that my perspective scaled outline mesh clips with.


Second, if I have a transparent subject then I can see behind it and I still have a fully opaque outline mesh. This really doesn’t scream “outline” does it?

The solution to both these problems is ViewportFrames.
It quite easily solves the first problem by ensuring we’re rendering the image in a space where we’re not concerned about other objects clipping our view.
As for the second issue this can be solved with the erased vertex alpha masking technique outlined here. Seriously, read this post it’s really cool and the author clearly put a lot of effort into it!
By erasing the subject’s vertex alphas in the viewport frame we can use it as a mask and ensure nothing behind it renders.
for _, colorId in maskMesh:GetColors() do
	maskMesh:SetColorAlpha(colorId, 0)
end
So our final technique summarized is:
Have two meshes. The first is a copy of the subject mesh with the vertex alpha’s erased. The second is a copy of the mesh thickened. We put both these meshes in a viewport frame that mirrors the current camera. Then, every render step we use some math to scale the thick mesh entirely behind the erased vertex mesh.
If all this was done correctly you should have a result that looks identical to my social media post.
The only difference is that in my video I’m using editable meshes to do the thickening step on the fly. This is not likely something you’d want to do in a live game, instead I’d recommend preauthoring the thickness and erased vertex alpha meshes ahead of time. That way the only cost is a viewport frame and setting the cframe of one mesh part every frame.
Hope this was helpful! Enjoy!
