I originally wrote this as a solution for this post, but since I did spend like half my lifespan and brain cells to create this, thought I’d share it with everybody.
Let’s just start off by explaining what a raycast even is. A raycast lets you get the data of whatever is first hit when “casting a ray” from a point in a direction. Think of it like shooting a projectile from a point in a direction and getting the data of what stops the projectile. Raycasts work as long as the direction “reaches” far enough. Let me explain.
Where Does My Raycast Go?
Here is the basic syntax of a raycast:
workspace:Raycast(origin, dir, params)
For now, let’s not worry about “params”. “origin” is where you want to start, and “dir” is the direction you want to go in. Think of “dir” like a vector. If you understand vectors, raycasts would be alot easier to understand. However, if you don’t, here’s a not so quick run down.
Vectors have a direction and magnitude. Direction is pretty straight forward. You probably know what it means so I won’t explain it. Magnitude on the other hand, is just the length of the vector. I find it easy to visualize this as a triangle. For this scenario, let’s pretend that this vector is a right triangle.
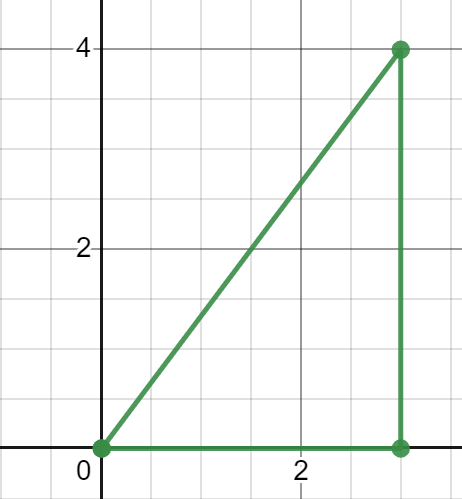
As you can see, the triangle has a height of 4 and a width of 3. Hence, we can say that the direction of the vector is (3,4). The magnitude on the other hand, would simply be the hypotenuse of this triangle (assume the triangle isn’t rotated or anything). Now what would happen if we used this vector as a direction in a hypothetical 2d raycast? Well, first off, let’s just assume that the “origin” is (0,0). When we raycast, we set the “starting point” of the vector at the origin. So kind of like this (think of the red like the ray):

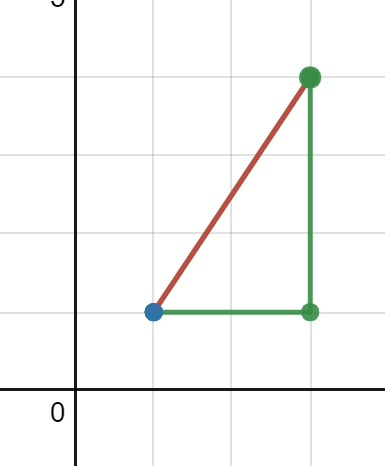
If we raycasted at the moment, what would happen?
Absolutely nothing
Why? Because there is nothing for the raycast to “hit”. Well then, what could we hit? Let’s pretend that there is a point that is on the hypotenuse of our triangle:

Now, obviously, the raycast could actually hit something and it will return the data of whatever it hits, which in this case would be the point (1,4/3). Note that in Roblox this is very different because it returns a RaycastResult. I will go through this later on.
Ok, now different example. Which point would the raycast return the data of in this scenario:

Well, it would return Mr. Blue point here. Why? Well because it is the first point the ray “hits”. Think of it like a movie theater line. The blue point is the person up next, and purple point is the person behind him. Obviously, you would serve the person next, not the person behind him. Simple enough? How about now, what would happen in this scenario?

Well. Once again, you would get Absolutely Nothing. Typically, without visualizing this vector, it would be hard to find out why your raycast code isn’t working. Most of the time, it is because although the direction is correct, the magnitude is not large enough. As you can see, although the point seems to be in line with the direction, it is not actually on the hypotenuse, so it will not be hit.
One last thing to cover. How on earth does the origin work? Well, let’s say we have an origin of (3,3). What would the raycast look like?

As you can see, the direction and magnitude don’t change. However, where the vector starts does.
Now back to 3d raycasting. It is pretty much the same thing, but with 3 dimensions. Say we want to raycast from a point 1,1,1 to a part’s position. What would we do? Well first off, we can write down what we do know:
local origin = Vector3.new(1,1,1)
local part = workspace.Part

local ray = workspace:Raycast(origin, direction)
What would we put in direction to shoot at root? Well, let’s go back to the 2d triangle again for a second. Say we have a origin of (1,1) and we want to shoot at point (3,4).

What would we do? Well, we would have to subtract the origin from the target point. Why? Well because by subtracting the origin, it generates 2 values that we could reference as a vector (which I will visualize as a triangle):
As you can see, the vector would have the width of 2 and height of 3, which happens be the target point minus the origin. Fantastic eh? Now back to where we were. We have the origin at origin and the target position at part.Position. We can simply subtract the target point by the origin to get the direction, so our code would look like this:
local origin = Vector3.new(1,1,1)
local part = workspace.Part

local ray = workspace:Raycast(origin, origin-part.Position)
Now that you sort of understand where your raycast shoots and what it really does, let’s see what the ray actually gives you.
What Does My Raycast Give Me?
Well, if you noted earlier, your raycast can give you 2 different values. If it hits something, it will give you a RaycastResult. However, if it hits nothing, it will return nil. Let me start of by explaining what a RaycastResult is. Think of it like a dictionary with some data that you can get. Here is the documentation if you want it. However, if you don’t really understand what it says, don’t worry, here’s an explanation.
Using the code we created in the section above, we can see that we store the RaycastResult in a variable named ray. Within this variable, there are 5 values. These values are Instance, the instance of the part you hit, Position, the position where you hit the part, Distance, the distance between where you hit the part and the origin, Material, the material of the thing you hit, and Normal, the normal vector of the surface you hit (more on this later). These values can be accessed by writing ray.dataname. For example, if you want to get the instance you hit, you can do ray.Instance, to get the position where you hit the part, you would do ray.Position etc. These values are kind of like what you would get from indexing a dictionary or list, so they can be assigned to variables or just straight up used. I’m not going to go down that rabbit hole though.
For a quick example, say you wanted to create a part where you raycasted. Let’s use the code we wrote earlier and develop more from there:
local origin = Vector3.new(1,1,1)
local part = workspace.Part

local ray = workspace:Raycast(origin, origin-part.Position)
if ray then
    local newpart = Instance.new("Part")
    newpart.Position = ray.Position
    newpart.Anchored = true
    newpart.Parent = workspace
end
As you can see here, we first raycast and get the ray. Now remember, if it hits nothing, it will return nil, so be careful. You first want to check if you hit something by checking if the ray is not nil. If it isn’t nil, then you can create the part and set the position.
Before I end this section, I wanted to quickly mention what “Normal” is. Those familiar with vectors will know that a normal vector is simply a vector that is perpendicular to a surface at a given point. Think of it as the vector that is perpendicular to the surface that you hit. Let me give you an example. Returning to our 2d world, here we can see that the raycast (in red) hits a surface that is represented by a line (in blue):

The normal vector would just be a vector of magnitude 1 perpendicular to the blue line at the intersection between the raycast and the surface. For this demonstration, I will put the vector’s starting point at the intersection so it is easier to see what is going on. Here the normal vector is in purple:

The reason I wanted to include this little segment was because although it may seem useless, this vector can help you achieve alot of things, blood splatters, bullet holes, spray cans etc.
Anyways, now I would recommend trying and testing the different values you can get from RaycastResult in studio just to familiarize yourself with what each thing returns. Now on to the next section.
What Are Raycast Parameters?
RaycastParams are very useful when doing raycasting. They are used to control how the raycast behaves. To start off, the basic syntax of creating RaycastParams is just RaycastParams.new(). You can store this in a variable or if you are an absolute madman you can directly plug it into the raycast.
There are quite a few parameters to RaycastParams you can play around with, but the 2 main ones I will be focusing on today will be FilterType and FilterDescendantsInstances. You can find the full list here.
It is quite easy to understand what these 2 do. FilterType basically sets the raycast to Exclusion or Inclusion mode. FilterDescendantsInstances allows you to put in an array of instances you either want to ignore when raycasting, or only hit when raycasting. Let me explain. If you set your FilterType to Exclude mode, it will be able to hit everything except the instances you placed in FilterDescendantsInstances. However, if you set FilterType to Include, it will only be able to hit stuff within the FilterDescendantsInstances. Easy right? Do note that when you add an instance to the FilterDescendantsInstances, it doesn’t just add the instance, it also includes all of the instance’s decendants (hence the name), so watch out when you add items to the array and make sure you don’t want to hit any of it’s descendants. Now that we have gotten that out of the way, let me give you a code snippet. Let’s say you have 3 parts in workspace, and you want to ignore one of them. Let’s call this part Part1. Again, let’s use the code we made earlier as a basis:
local origin = Vector3.new(1,1,1)
local part = workspace.Part

local params = RaycastParams.new()
params.FilterType = Enum.RaycastFilterType.Exclude
params.FilterDescendantsInstances = {workspace.Part1}

local ray = workspace:Raycast(origin, origin-part.Position)
Depending on how you have your testing place set up, the ray may or may not be directed at Part1. However, if you adjust the raycast so that it hits Part1, you will see that it wouldn’t hit Part1, it would actually hit workspace.Part instead. Setting the FilterType to Include should be self explanatory, so I won’t really explain it. However, if you do have questions, feel free to ask them below and I will try my best to answer them.
Hopefully this helped you or at least gave you a start on what to do. If you have any questions or find any typos/misinformation, feel free to reply or something.