Advice on Creating a clean Inventory system with the following style

Hello! I’m an intermediate scripter, and i’m not at a point where i’m a little bit out of my league… however, i’m up for this challenge!

Does anyone have any advice on creating an inventory system with this kind of functionality:

  • In the inventory, there are several different catagories (This part i have already, its simpler)
  • It is not a traditional tool equip system that for instance roblox uses in its vanilla toolbar. Instead any usable objects are drug down into the tool slot you want, and when you press the key of the slot of the tool bar(I’m assuming this would be done through binding it to the numbers) it activates the use of the item. For instance: A potion of healing, that when you press 1, it plays the anim and the action of drinking the potion(The effects and anims are not the issue, its figuring out how to organize it for many MANY different items.
  • Tools or wield-able items can be placed on an item slot on the character within the inventory. So, the item is equipped at all times instead of the vanilla click 1 and click 1 again to equip and unequipped. I would also create a keybinding like “F” or something to sheathe or unequipped whatever tool is wielded, and vise versa if one is equipped. (I have the players character showing in the inventory already through the use of view port… and it works.)
  • Clothing that the player may have can be drug into slots around the character picture in the inventory(just like the tools) and the item would be equipped.
  • A comprehensive saving system that will deliver all items in the inventory back to the player when they rejoin the game. (I have been using Data Store 2 and i love it)

Presently i am devising a custom character system that only uses custom shirts and pants that are made for the game, however there are mesh accouterments as well. I only have a vague understanding of how i might accomplish this all which is done through the use of values in the player, for instance: If the player has lets say 1 or more health potions, it will show up in the inventory. Items like that i am pretty positive would not be done through the use of tools, as i described the method earlier, that wouldnt make sense… it would be an action binded to a number on the keyboard, but the binding has to be changable depending on what the player wants in what slot.

This is the picture of the inventory so far… you see repeated of the same item only for the sake of testing, and the item isn’t actually there, i just put the “Template” in the frame many times to simulate what would happen if multiple items were detected. I also have several windows, and the windows do work: Apparel, Tools, Consumables, Intelligibles

I also need a tad of help figuring out the whole draggable thing… i know roblox use to have a draggable option, but as far as i’m aware, that has been deprecated.

I’d appreciate any and all help and advice regarding the organization of how this should be run as well. I am using Aero Game Frame Work to organize everything.

10 Likes

I’ve never made anything like this before, although if I were going to attempt to make draggable icons, perhaps it may be worth looking into changing the position of the icon to the mouse’s position while the mouse button is held down.

You could also take a look at this post here which seems to describe what you’re looking for.

1 Like

What you described would need a completely custom inventory system, but nothing that can’t be done with some work.

Stuff like potions will have everything binded to .Equipped, followed by a :Destroy() when the animation is complete.

The inventory objects would need to be custom coded as well. The way you would achieve this is by making all the icons ImageButtons. The icon would get attached to the cursor when the player holds MB1 down, and snap to the closest grid segment when released. As far as I can see, all the elements are of the same size so that will make everything easier.
Now to define the grid size for the snapping. You need to know the grid’s exact size and the start and end pixel positions of the corners. So, if the grid’s size is 5x5 and the start position is 100x100 and the end is 600x600, if the mouse is at 422x256, the held icon would snap to 400x200. The easiest way to do this is to check the grid’s absolute position and size.

2 Likes

I’m using a UI Grid layout. is that the right way to go about it?

As for the potions… i don’t need to make it a tool or anything right? the part of indexing an event to perform should be easy for me, aswell as programming what happens in it. I could just copy the potion model. Unless it is just easier to use it as a tool and then destroy it as you say.

also i’m not quite understanding how to detect the grid. Could you be a tad more specific? I appreciate your response btw.

I’m attempting to do this through a module in the “Aero Game Framework”, And when i do this in mass after creating all of the values… which btw i figured out all the item saving and indexing, so when it detects you have more than 0 in the Item_Count, it creates a icon with the amount you have in the inventory… seperated by the catagories the way i described before.


But, when i try and index to another function with each of those specific icons, with the code you provided(which works) It grabs all of them at once.

1 Like

The easiest way I can think of:

  1. listen for a .MouseButton1Click() in each of the item slots
  2. Clone the tile that was clicked
  3. While the left mouse button is down, repeatedly update the cloned tile’s position to the cursor’s position
  4. When the left mouse button input ends, do something contextually. For example, if the mouse cursor was over the character, equip the tile that was cloned

@idkhowtocode
#1 .MouseButton1Click would not be enough. Players more often use number keys on the keyboard rather than the mouse.
#2 Cloning the tile would be a horrible idea since that cloned tile or the original can get stuck for whatever reason (even well coded UIs can suffer from this).
#4 That is not what he even wanted…

@Manelin
By the grid, I meant a simple frame which will hold the icons.
Here is a little code that pretty much sums up the item dragging:

local UIContainer = --path to the man UI container here
local UIInventory = UIContainer.Inventory --the whole inventory frame/image/whatever it is
local UIItemGrid = UIInventory.Grid --the grid frame
local Mouse = game:GetService("Players").LocalPlayer:GetMouse() --getting user input, can be replaced with UserInputService, but this is good enough

--a function that helps us with snapping to the correct pixel position
local snapToGrid = function(MouseX,MouseY)
	--getting the grid frame's pixel position and size
	local abspos = UIItemGrid.Position
	local abssize = UIItemGrid.Size
	--the grid is 5x6, but all slots are squares, so we don't have to check the size for Y too
	local slotsize = abssize.X/5
	--we need to move the mouse from the screen space to the grid frame's space
	MouseX = MouseX-abspos.X
	MouseY = MouseY-abspos.Y
	--the position the button will be snapped to
	local snappos = UDim2.new(
		abspos.X+MouseX-MouseX%5, 0,
		abspos.Y+MouseY-MouseY%6, 0
	)
	return snappos
end

--run this whenever the person picks up an item
--item is just a table containing all the data
--it's specific for every item not item type, so every health potion will have its own item table, though they can share a single data table
local newItemIcon = function(item)
	local Button = Instance.new("ImageButton")
	Object.ImageId = item.IconImageId
	--the user starts dragging
	Object.MouseButton1Down:Connect(function()
		item.Dragged = true --an internal value to detect when to stop moving the button
		while item.Dragged do --a good idea to replace this with Heartbeat, but this will do for this example
			Button.Position = UDim2.new(Mouse.X,0,Mouse.Y,0)
			wait()
		end
	end)
	Object.MouseButton1Up:Connect(function()
		local abspos = UIItemGrid.Position
		local abssize = UIItemGrid.Size
		local MouseX = Mouse.X
		local MouseY = Mouse.Y
		item.Dragged = false
		--check if the dragged item is within the grid
		if (abspos.X<MouseX or abspos.Y<MouseY) and (abspos.X+abssize.X>MouseX or abspos.Y+abssize.Y>MouseY)then
			local Snap = snapToGrid(MouseX,MouseY)
			item.LastSnapUDim2 = Snap
			Button.Position = Snap
		else
			--revert the position to the last if it isn't
			Button.Position = item.LastSnapUDim2
		end
	end)
end

You will need to add a block that will resize the buttons and align them when they are just added. Also, you should track which slots are occupied to avoid overlapping and exploits.

As for the tools, I mentioned them for potions because they make animation and user input easier. They are a complete garbage if you want proper mixed animations and a custom input, but will do for your case.

1 Like

I understand this. However, this is how i have my system so far set up… and since your last message i have made progress. Understand, all of this works up to the point of snapping into the frame i want.

image

The backpack is the side tool bar setting, to bind certain items to the toolbar.

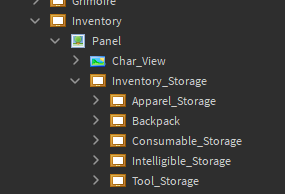
Within all of the item types is this:

so when the items refresher goes off, it detects all of the slots to find the first available one, and then adds the item to that slot… this has been working. I also have the filled slots as a physical value to help manage between the drag script, which i have been using as a basic local script within the image button itself because in the module(which is where i’d like to do it) it wasnt working right.

When you drag the item… which i have been doing with user input to activate, I am also using .MouseEntered and Leave to detect the hovered over frame, and if a frame is hovered over from any of the container frames, it should snap to the thing before you let go. This is working… except for the fact that its buggy in that MouseEntered inst registering these slots so close together, because to save time i looped through each folder to detect the frames and added the event through there, which works… but not consistently.

The image button is of a size of Udmi2.new(1,0,1,0), so its nice and easy to get into the frame and fit nicely to whatever the frames size it. And inorder to be nice and orderly i am using a UIGridlayout for the main item containers, and a UiListLayout for the Backpack. And its nice and pretty that way. All of this is working, but i’d like an alternative to mouseEntered.

	local UserInputService = game:GetService("UserInputService")
	
	local player = game.Players.LocalPlayer
	local Mouse = player:GetMouse()
	local gui = script.Parent
	
	local PlayerGui = player:WaitForChild("PlayerGui")
	local Inventory_Window = PlayerGui:WaitForChild("Bar"):WaitForChild("Inventory")
	local Inventory_Panel = Inventory_Window:WaitForChild("Panel")
	local Inventory_Storage = Inventory_Panel:WaitForChild("Inventory_Storage")
	local Backpack = Inventory_Storage:WaitForChild("Backpack")
	local Item_Select = Inventory_Panel:WaitForChild("Item_Select")


	local Apparel_Button = Inventory_Panel:WaitForChild("Apparel_Button")
	local Apparel_Storage = Inventory_Storage:WaitForChild("Apparel_Storage")
		
	local Tools_Button = Inventory_Panel:WaitForChild("Tools_Button")
	local Tools_Storage = Inventory_Storage:WaitForChild("Tool_Storage")
		
	local Consumables_Button = Inventory_Panel:WaitForChild("Consumables_Button")
	local Consumables_Storage = Inventory_Storage:WaitForChild("Consumable_Storage")
		
	local Intelligibles_Button = Inventory_Panel:WaitForChild("Intelligibles_Button")
	local Intelligibles_Storage = Inventory_Storage:WaitForChild("Intelligible_Storage")
		
	local Inventory_Folder = player:WaitForChild("Player_Inventory")
	local Apparel_Folder = Inventory_Folder:WaitForChild("Apparel")
	local Tools_Folder = Inventory_Folder:WaitForChild("Tool")
	local Consumables_Folder = Inventory_Folder:WaitForChild("Consumable")
	local Intelligibles_Folder = Inventory_Folder:WaitForChild("Intelligible")
	
	local Item_In_Question = Inventory_Folder:WaitForChild(gui.Item_Type.Value):WaitForChild(gui.Name)
	
	local dragging
	local Hover
	local dragInput
	local dragStart
	local startPos
	local startParent
	
	spawn(function()
		coroutine.resume(coroutine.create(function()
			for i,v in pairs(Backpack:GetChildren()) do
				if v:IsA'Frame' then
					v.MouseEnter:Connect(function()
						Hover = v
					end)
					v.MouseLeave:Connect(function()
						Hover = nil
					end)
				end
			end
		end))
	end)
	
	spawn(function()
		coroutine.resume(coroutine.create(function()
			for i,v in pairs(Apparel_Storage:GetChildren()) do
				if v:IsA'Frame' then
					v.MouseEnter:Connect(function()
						Hover = v
					end)
					v.MouseLeave:Connect(function()
						Hover = nil
					end)
				end
			end
		end))
	end)
	
	spawn(function()
		coroutine.resume(coroutine.create(function()
			for i,v in pairs(Tools_Storage:GetChildren()) do
				if v:IsA'Frame' then
					v.MouseEnter:Connect(function()
						Hover = v
					end)
					v.MouseLeave:Connect(function()
						Hover = nil
					end)
				end
			end
		end))
	end)
	
	spawn(function()
		coroutine.resume(coroutine.create(function()
			for i,v in pairs(Consumables_Storage:GetChildren()) do
				if v:IsA'Frame' then
					v.MouseEnter:Connect(function()
						Hover = v
					end)
					v.MouseLeave:Connect(function()
						Hover = nil
					end)
				end
			end
		end))
	end)
	
	spawn(function()
		coroutine.resume(coroutine.create(function()
			for i,v in pairs(Intelligibles_Storage:GetChildren()) do
				if v:IsA'Frame' then
					v.MouseEnter:Connect(function()
						Hover = v
					end)
					v.MouseLeave:Connect(function()
						Hover = nil
					end)
				end
			end
		end))
	end)
	
	
	local function update(input)
		print(Hover)
		local delta = input.Position - dragStart
		if Hover ~= nil and Hover.Parent == "Backpack"then
			gui.Parent = Hover
			gui.Position = UDim2.new(0,0,0,0)
		elseif Hover ~= nil and Hover.Parent ~= "Backpack" then
			gui.Parent = Hover
			gui.Position = UDim2.new(0,0,0,0)			
		elseif Hover == nil then
			gui.Parent = startParent
			gui.Position = UDim2.new(startPos.X.Scale, startPos.X.Offset + delta.X, startPos.Y.Scale, startPos.Y.Offset + delta.Y)
		end
	end
	
	gui.InputBegan:Connect(function(input)
		if input.UserInputType == Enum.UserInputType.MouseButton1 or input.UserInputType == Enum.UserInputType.Touch then
			dragging = true
			dragStart = input.Position
			startPos = gui.Position
			startParent = gui.Parent
			
			input.Changed:Connect(function()
				if input.UserInputState == Enum.UserInputState.End then
					dragging = false
					if Hover ~= nil and Hover.Parent == "Backpack" and gui.Item_Type.Value == ("Consumable" or "Intelligible") then
						gui.Position = UDim2.new(0,0,0,0)		
						Hover.Item.Visible = false
						gui.Parent = Hover
					elseif Hover ~= nil and Hover.Parent ~= "Backpack" then
						gui.Position = UDim2.new(0,0,0,0)		
						gui.Parent = Hover					
					elseif Hover == nil then
						gui.Position = UDim2.new(0,0,0,0)		
						gui.Parent = startParent
					end
				end
				startParent = gui.Parent
			end)
		end
	end)
	
	gui.InputChanged:Connect(function(input)
		if input.UserInputType == Enum.UserInputType.MouseMovement or input.UserInputType == Enum.UserInputType.Touch then
			dragInput = input
		end
	end)
	
	UserInputService.InputChanged:Connect(function(input)
		if input == dragInput and dragging then
			update(input)
		end
	end)
1 Like

MouseEnter and MouseLeave are really unreliable. Just try pressing the windows key while dragging the item and it will get stuck.

What I suggest is a single Frame for all items. The frame is the container and the boundary limiter, making you use less instances and pretty much simplifying the entire thing.

1 Like

@nooneisback Do you mean a container for each type of item aswell? Because i require the catagorized items for what i’m doing. I havent added the icons around the player yet either for equippable items, but like apparel and tools will not be draggable to the toolbar, and consumables and intelligibles will not be draggable to the character.

Id like it so that if the player drags an item somewhere else in the inventory, it moves it to that slot… and i also need them to be draggable to whatever toolbar slot they want

1 Like

If the slots themselves are part of a single image then there is no reason to use a frame for each one. You can just place a large frame on top of the slots and use image buttons. The reason is really simple, you need to get the snapping position to check which position to assign the buttons to. To avoid the scaling issues, you can just transform the pixel size to a ratio.

1 Like