Just coded a nice little painting game using EditableImage. Can’t wait to actually publish it live for everyone to play ![]()
My game relys on editable mesh and images and it hasnt come out live yet even tho they said this year can we get a release date or something i have 2k+ people waiting for the game to come out and this is delaying it all!
3 Likes
Hello, I don’t know much about meshes, but when changing the position of a vertex (SetPosition) shouldn’t the mesh change? since in my case it doesn’t. I don’t understand why (I use pre-created meshes and I use AssetService).
To ensure the mesh changes, you must load your mesh properly ( in your case you can do it with the AssetService : use the method CreateEditableMeshAsync to create an EditableMesh, then parent it to a MeshPart under Workspace and then you can modify your EditableMesh, indeed with the method SetPosition for example.
1 Like
See, I used a flat mesh and made its vertices move to simulate the movement of waves; The problem is that the mesh still looks the same (it doesn’t change how it looks). If the position of the vertices changes, since by making an attachment position itself in the same position of said vertex, the attachment does have the effect. The mesh remains the same ![]() I don’t know what to do.
I don’t know what to do.
Sorry for my English
Did you enable the “EditableImage and EditableMesh” beta feature in your studio parameters ? (So the feature is active on roblox studio)
Otherwise send pictures and we may be able to help you further
1 Like
Give me 20 minutes and I’ll show you everything.
Hello good.
The problem is that the mesh still looks the same.
-Here the mesh and the main script:


-Proof that there are no errors:
![]()
-Proof that the mesh does not change:

-Comprobante que los vertices si se mueven con una nueva linea en el codigo:


The attachments are located in the vertex position that corresponds to them
Thanks for reading and sorry for my bad English.
You might be missing to parent EM to the mesh you want to modify:
eg:
editableMesh.Parent = mesh
See the documentation
An EditableMesh is displayed when it’s parented to a MeshPart, but only the part’s appearance changes while the collision model remains the same.
1 Like
First of all, thank you for your speed in responding. Thank you very much, I didn’t know that information.
when will they possibly get collisions? just asking
This may sound very complicated and I may not even have a big enough use case for you guys to consider this, but is there any possibility that we can make ‘shared’ EditableMesh / EditableImage instances so that their edits can be buffered over an array of as many meshes / images as possible? Maybe even with the potential to store / read local instance data? A good example of this would be a procedural grass animation system that utilizes EditableMesh to create animated grass; sine waves, noise, etc based on os.clock. And as for the local instance data, the EditableMesh buffer would be reading each grass instance’s position or any relevant attribute you’d want to hook up to offset or just customize the animation. Idk if my terminology is correct but it would basically be a stripped down version of how shaders work in Unity or like literally any other game engine for example. They are able to read and write to many copies of various objects without taking away the ability for each to have unique results. I know how Roblox have said multiple times that allowing developers to produce shaders is a very tall task and maybe not even possible on Roblox, but I feel like if you could pull this off, you’d be covering a lot of the use cases people really want shaders for. And ultimately make Roblox experiences FAR more diverse and advanced.
4 Likes
It’s really sick this feature. I’m already playing with it by making a water simulation. Personnally, the only problem I see is the triangle count limit. I think it’s limiting a bit the possible creations. For example my water simulation. I already tried to make it using good old parts. But it was really slow (because there a lot of instances to be load with the collison detection). But with the editable mesh, it’s going super fast (even on a crappy computer).
any updates on this? I know there’s DrawProjectionImage but since there’s no real documentation on it, I’m assuming it hasn’t been implemented yet.
also, any updates, like in general? It’s been some time, and I don’t think editable meshes or images have been updated (to my knowledge)
DrawProjectionImage and CollisionFidelity would be really useful
To overcome that you can use multiple editable meshes and align their vertex positions so it looks continuous, same thing as with big terrain that has more than the triangle / vertex count.
I’ve found a visual glitch which is quite annoying and I cant figure out if I’m doing something wrong or if this is something to do with how it works.
The Problem
The issue is to do with EditableImages and how they are applied to EditableMesh Instances / how they are scaled up.
At the moment I am generating a grid of vertices (11x11 but this is variable), connecting the vertices to make a uniform plane, then applying an EditableImage as a texture which is generated from the code as well.
The issue is that when I run the code, the plane generates as it should and the texture too, but when the texture is applied to the mesh, around the edges of the texture you can see colours from the oposite side bleeding into that part of the texture.
I have included some images to illustrate and the code for generating as well. The bleeding is best seen on the black portion of the texture.
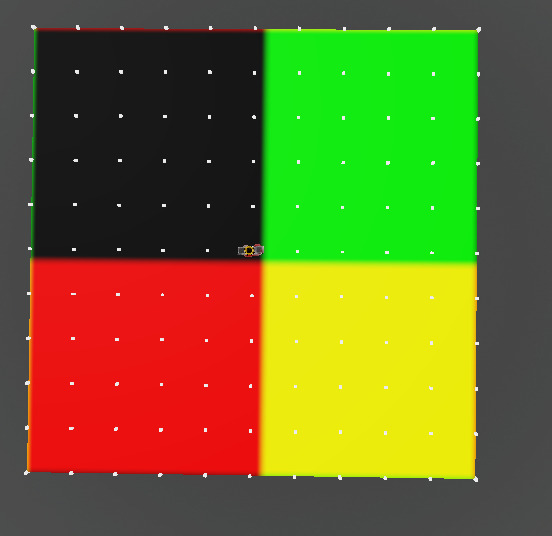

The mesh is currently 80x80 studs (each vertex is separated by 8 studs) and the texture is 40x40 pixels. I set the texture to low resolution to highlight this bleeding, but it is present even at high resolutions.
Here I set the texture to be 1000x1000 pixels. It is less noticeable but still present.


As you can imagine this is annoying when trying to tile consecutive planes together and make it look smooth.
Below is 4 of these planes next to each other with using math.nosie for colour. The textures are continuous with each other but the borders are visible due to this glitch. (switched back to low res to make it noticeable but you can see it at high res as well, just less visibly)

Code
Here is the code used to generate the plane
local TERRAIN_SIZE = 10
local VERTEX_SPACING = 8

-- Generate the tile at a specific x and z (top left of tile corner)
local function CreateTerrainTile(tile_x, tile_z)
	-- Get the starting point of the tile based on vertex spacing
	local start_x, start_z = tile_x * TERRAIN_SIZE, tile_z * TERRAIN_SIZE

	-- Create the MeshPart and EditableMesh
	local parent = Instance.new("MeshPart")
	parent.Size = Vector3.new(1, 1, 1)
	parent.Position = Vector3.new(start_x * VERTEX_SPACING, 0, start_z * VERTEX_SPACING)

	local mesh = Instance.new("EditableMesh")

	-- Generate vertex mesh (we run the loop 1 extra time to make the connecting vertices to the next tile so each tile is actually TERRAIN_SIZE + 1 in width and height)
	for z = 0, TERRAIN_SIZE do
		for x = 0, TERRAIN_SIZE do
			local v = mesh:AddVertex(Vector3.new(x * VERTEX_SPACING, 0, z * VERTEX_SPACING))

			-- Uniformly distribute UV coordinates
			mesh:SetUV(v, Vector2.new(x / TERRAIN_SIZE, z / TERRAIN_SIZE))
		end
	end

	-- Connect vertices to make triangles
	local vertices = mesh:GetVertices()
	for index, vertexId in ipairs(vertices) do
		if index > (TERRAIN_SIZE + 1) * TERRAIN_SIZE then continue end
		if index % (TERRAIN_SIZE + 1) ~= 1 then mesh:AddTriangle(vertexId, vertices[index + TERRAIN_SIZE], vertices[index + TERRAIN_SIZE + 1]) end
		if index % (TERRAIN_SIZE + 1) ~= 0 then mesh:AddTriangle(vertexId, vertices[index + TERRAIN_SIZE + 1], vertices[index + 1]) end
	end

	-- Create the texture
	local texture = createTexture(tile_x, tile_z)

	-- Parent meshs to workspace
	mesh.Parent = parent

	texture.Parent = parent
	parent.Anchored = true
	parent.Parent = game.Workspace

	return mesh
end
And here is the code to generate the texture (original checkered version):
local TEXTURE_RESOLUTION = 40 -- Pixels per terrain tile [RESxRES]

-- Create a texture for a tile
local function createTexture(tile_x, tile_z)
	-- Used for when using noise to make tileable planes
	local start_x, start_z = tile_x * (TERRAIN_SIZE), tile_z * (TERRAIN_SIZE)

	-- Decal is necessary for the parenting then reparenting to get the editable image to work. There is a post on the devforum post about this
	local decal = Instance.new("Decal")
	local image = Instance.new("EditableImage")

	image.Size = Vector2.new(TEXTURE_RESOLUTION, TEXTURE_RESOLUTION)

	local pixels = {}

	for z = 0, image.Size.Y - 1 do
		for x = 0, image.Size.X - 1 do
			local r, g, b = z > image.Size.Y / 2 and 1 or 0, x > image.Size.X / 2 and 1 or 0, 0
			-- ^ basically make checkered pattern

			table.insert(pixels, r)
			table.insert(pixels, g)
			table.insert(pixels, b)
			table.insert(pixels, 1)
		end
	end

	image:WritePixels(Vector2.zero, image.Size, pixels)

	image.Parent = decal

	return image
end
Then I just call
CreateTerrainTile(-25, -25)
And it produces the visual glitch.
Any help on this would be appreciated, and sorry for the long post, thank you.
2 Likes
Current way normals are used per vertex is weird, is that being updated? Doing flat shaded meshes becomes impossible, or so it has been proving very difficult for me, I don’t know if I am doing it correctly.
Also, is there any hope of having weight painting and assignable bones on this year’s release? That would be extremely useful for custom procedural foliage, animations, and just everything that has to do with moving the vertices you create.
Editable meshes just destroy and get parented to nil at random times

its printing the editablemesh parent
The hell is going on it happens on my plugin called RoBlend too roblox fix this
Thank you for this report and the details to reproduce it. I was able to reproduce it and filed an internal ticket to fix it.
2 Likes
Currently to do flat shaded meshes, you would need to manually duplicate vertices. So, for example, if you wanted to have a flat shaded cube, you would need 24 vertices, 4 for each side.
We’re working on an update that will make it easier to do flat shading, hopefully that will be available soon.
2 Likes