If it is performance you’re worrying about, don’t. Parts are instanced and are efficient because of it.
I’m afraid you’ll have to simplify your existing maze manually. With a maze generator you only have so many options and in return limited control over the final product, automating anything in this process will limit you in some way.
There are two things you can try to improve your workflow:
A quick-place Part generator (still tedious):
A prefabricated catalog of all the different segments you’ll be needing, the current way.
Your current palette isn’t too great, it will leave you with double walls, duplicated parts,… So I’ve cooked up a system that may help you and potentially others with this tedious process of maze building.
First you’ll need a well organized catalog:
This may not have every single segment you could be needing but these are the majority.
A summary of everything you need to know. first and foremost, everything besides the names are customizable because the script I’ll be posting below will require these exact names in order to function.
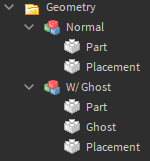
All models are on a 8 by 8 stud Grid containing the part(s) and a temporary part called “Placement” which functions as your navigational object (for rotating, moving and visual representation).
The green models are the models which contain the usable parts for your maze, and the red will be for visual representation as these will be deleted afterwards. The yellow hinges are also for visual representation, these will show you what parts of the model are “enterable”.
The way these are organized goes as follows:
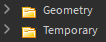
We have two folders named “Geometry” & “Temporary” located directly inside Workspace, the green models go in Geometry and the red ones in Temporary.
We have 2 kinds of green models called “Normal” and “W/ Ghost”, the “normal” models are models that have no special geometry, just regular models with parts that will be used regardless. The models called “W/ Ghost” are variants of the normal models with “Ghost” parts that will need to be removed eventually because they will align on the same axis with a part from a “normal” model.
A “Normal” model alongside the “Ghost” variant:
Why the two are different:
This “Ghost” model is connected to a model with two walls on both sides. You only want one part for each wall instead of dividing it unnecessarily, in this case the two blue “Ghost” parts will be removed at the end to make room for the parts of the connecting model.
This is how each of the 3 models are categorized:
For the two types of green models:
For the red model:
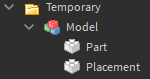
Everything named “Part” is just regular geometry that will make up your maze at the end.
With the current catalog of models shown above this is what a maze would look like arranged:
The red “Temporary” models make up anything inbetween any directional changes in your maze, they are just a visual representation of what your finished maze would look like.
After that copy & paste the code below in the command bar in Roblox Studio and hit enter.
local Workspace = game:GetService("Workspace")
local Geometry = Workspace:FindFirstChild("Geometry")
local Temporary = Workspace:FindFirstChild("Temporary")

local G_Dump = Geometry:GetChildren()
local T_Dump = Temporary:GetChildren()

if Geometry:IsA("Folder") then
	for _, object in pairs(G_Dump) do
		if object.Name == "Normal" then
			object.Placement:Destroy()
		end
		if object.Name == "W/ Ghost" then
			object.Placement:Destroy()
			object.Ghost:Destroy()
		end
	end
end

if Temporary:IsA("Folder") then
	for _, object in pairs(T_Dump) do
		if object.Name == "Model" then
			object:Destroy()
		end
	end
end
This is what your maze should look like:
(I did cheat a little because I wasn’t using the right models in some cases, but you get the idea.)
All that’s left to do is connect the parts. Set the Grid size for the resize tool to the Grid size you chose for the models and everything should align properly.
This is what the outlined now maze looks like:
From here you can start adding details like props, textures,…
I hope this will save you some time.
NOTE: Everything besides names are customizable with this format, if you do want to name things differently make sure to change their names with the corresponding names in the code as well.
Good luck.


