Projectile Motion

I’m trying to make a projectile that does this:
https://i.gyazo.com/a69c9b1286ff51d687e4f2a292902293.mp4

When you aim, the projectile ends up under your cursor, so you have to aim higher to reach your target. That’s what I want. I read Modeling a projectile’s motion - DevForum | Roblox but, EogMoose’s projectile will always travel and land exactly on your mouse.Hit.Position and it will give whatever velocity it needs to reach it in the given time. And when targeting the sky, the projectile basically disappears because of where mouse.Hit.Position is and how fast the velocity is.

In the GIF above, it doesn’t disappear when targeting the sky, and it looks like it travels at a constant speed. If you want a feel of the projectile, you can play it here Marvel: Enhanced - Roblox and test the projectile by pressing R

I messaged the owner of the game and she used BodyVelocity and for the velocity she did:

CFrame.new(StartPosition,MousePosition).LookVector * (Velocity number)

Me being new to this kind of math, did this:

My Code
tool.Activated:Connect(function()
	if not DB then
		local comet = CometVFX:Clone()
		comet.CFrame = hrp.CFrame
		comet.Parent = game.Workspace
		
		local BV = Instance.new('BodyVelocity')
		BV.MaxForce = Vector3.new(math.huge,math.huge,math.huge)
		BV.Velocity = (CFrame.new(hrp.Position,mouse.Hit.Position).LookVector * 75)
		BV.Parent = comet

		spawn(function()
			DB = false
			wait(5)
			comet:Destroy()
		end)
		
		while wait() do
			BV.Velocity = BV.Velocity - Vector3.new(0,2,0) --[makes it curve]
		end
	end
end)

This code kind of worked, since I had to aim higher to reach the target, but it fell much faster, so when I aimed at the sky, it barely even went up. It looked like this: https://i.gyazo.com/a0eed0bbbde26d424402f11691dd1be5.mp4
I can tell that what I did was very wrong lmao. So, I need help to fix this code. Thanks in advance!
1 Like

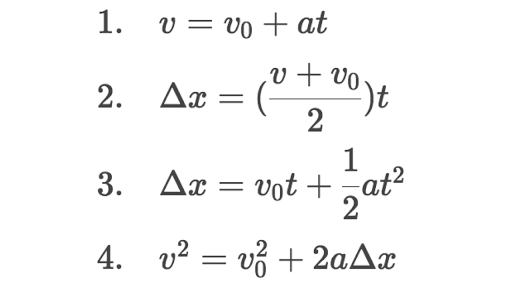
You can try using the motion formulas to achieve it.

There would be some information that you already know. The velocity when the projectile reaches the top would be 0, the acceleration would be -workspace.Gravity because it’s in freefall, the start velocity would be already set, and you want to find the distance.

m

3 Likes

FastCast is definitely what you want. It only does not make making projectiles easier, but also allows you to define “gravity” so you can achieve that just by passing a value like that

1 Like

I took physics in school. The math was easy, but applying the concepts was just something else…How would I apply those formulas to code?

1 Like

Something like this might be useful. We learned this formula, and those relative to it, in my engineering class, relating to kinematics and ballistics. Vi is initial velocity, theta represents the angle of elevation, and g, of course, is gravity. The variable x represents the horizontal distance traveled, which I think could help in your case.

image

1 Like

From what I am seeing after closely examing the video it seems it solves a quadratic formula where the vertex is the mouses position in 3d space. I’ve already done the hard for you cause I had to work for this in the past Graphing Calculator
Basically the vertex is 2 times the x value for t and the y is simply the H value. For z It’s the same thing where it’s 2 times the z value for t.

1 Like

There’s nothing wrong with the code except for the usage of body velocity which I find weird, body velocity tends to like to make the projectile go in a straight path and so you would have to use that odd work around to add gravity which is going to cause a memory leak

This piece of code will never end even when BV gets destroyed. Check out the :Destroy() article to properly destroy and cleanup stuff.

part:Destroy()
-- Don't do this:
print(part.Name) --> "Hello, world"

So yeah it might as well be better to use an impulse to set a velocity without interfering with the default Roblox gravity.

The main problem is two things, the velocity and gravity values, the velocity is set too low relative to the gravity. This prevents the projectile from going up and causes the extremely low arc as seen in the video. Here is what I tried out to attempt to mimic the above value, by playing around with the velocity and gravity values, increasing the velocity and decreasing the gravity using a body force:

local tool = script.Parent
local Players = game:GetService("Players")
local player = Players.LocalPlayer
local mouse = player:GetMouse()

tool.Activated:Connect(function()
	local hrp = player.Character.HumanoidRootPart
	if not DB then
		local comet = Instance.new("Part")
		comet.Size = Vector3.new(2,2,2)
		comet.CanCollide = false
		comet.CFrame = hrp.CFrame
		comet.Parent = game.Workspace
		
		local antiGravity = Instance.new("BodyForce")
local antiGravityFactor = 0.9--1 = gravity force counteracted, 0 = no force lol
		antiGravity.Force = comet:GetMass()*workspace.Gravity*antiGravityFactor *Vector3.new(0,1,0)
		antiGravity.Parent = comet
		local appliedVelocity = (CFrame.new(hrp.Position,mouse.Hit.Position).LookVector * 600)
		comet:ApplyImpulse(appliedVelocity)

		spawn(function()
			DB = false
			wait(5)
			comet:Destroy()
		end)
	end
end)
2 Likes

This doesn’t relate to the topic, but this could help optimise your script. You could replace spawn() with game.Debris, heres what It’ll look like

game.Debris:AddItem(comet, 5) -- Instance, Duration

What this does is basically destroy the part after the specified duration has passed. I’m not quite sure about the “DB = false” though.

1 Like

Also, you can replace this with:

game:GetService("RunService").Heartbeat:Connect(function()
	BV.Velocity = BV.Velocity - Vector3.new(0,2,0)
end)

I don’t really recommend using while wait()

1 Like

I did not even think of using Body Forces. I tried your code and it actually comes close to what I’m trying to achieve, and I actually understood what you did. But, I will need to understand how to apply physics formulas because it’s very interesting with things like making projectiles. I will mark your response as the solution.

To optimize the performance and reliability of the server-client interaction for in-game movement and collision detection, it is recommended for linear velocity to be applied on both server and client sides. This ensures smooth and consistent movement experiences for players.

Additionally, to maintain efficiency and responsiveness, a hidden hitbox should be created on the server for detection purposes, while the visual representation remains on the client side. This approach prevents server overload and potential choppiness by reducing the workload on the server.

It is crucial to manage hitbox and damage calculations on the server side, and to avoid granting network ownership of the server hitbox to any player. Utilize overlap parameters for hitbox detection on the server to maintain accurate gameplay interactions.

Lastly, to facilitate seamless integration of visual effects, develop a library of modules that can be called upon using a remote event. This allows for easy creation of effects on the client side and streamlines the process of requesting these effects from the server.

Here is a simplified list of steps to optimize server-client interactions, explained in a way that is accessible for newbies:

1. Apply linear velocity: Use this body movement method on both server and client sides to ensure smooth movement and other benefits.

2. Create a hidden hitbox on the server: This allows for server hitbox detection without overloading the server with unnecessary effects.

3. Keep visual representation on client: By doing this, you avoid server overload and potential choppiness in the gameplay.

4. Handle hitbox and damage on server: Ensures consistent and accurate gameplay interactions for all players.

5. Avoid granting server hitbox ownership: Prevents individual players from controlling or manipulating the server hitbox.

6. Use overlap parameters: Implement these on the server for precise hitbox detection.

7. Develop a library of modules on the client: Create a collection of modules that can be called using a remote event for easy visual effects integration.