thank you very much for trying to make an armor system for the armor system project, it would be so awesome if we could fix the armor system together with your new armor system ![]()
-mari
thank you very much for trying to make an armor system for the armor system project, it would be so awesome if we could fix the armor system together with your new armor system ![]()
-mari
I can do it solo but right now I don’t think I have time for that because I am also working on my own roblox project and doing coding 'n stuff. Hope you understand. In the meantime you can learn some coding or you can even search for more customizable armor systems out there.
heyyy there, while you were working on your own roblox project with good amount of care and efforts, I was still struggling with armor GUI system in the holidays, I’ve tried my best with ChatGPT and telling ChatGPT AI to do not put code descriptions in middle of code lines, but there wasn’t any luck of fixing it alone… ![]()
link to my updated conversation with ChatGPT AI about armor system
and so, I didn’t found exact problem of it but I did find this error in the output, the error shows this text.
" DataStoreService: CantStoreValue: Cannot store Dictionary in data store. Data stores can only accept valid UTF-8 characters. API: SetAsync, Data Store: PlayerItemsDataStore "
I have researched much about this through, and it turns out we cannot put literal object model and such other then strings and such into Data Store, so what I wish to do is that when player obtains armor or equips armor, it adds up some values in datastore and when player character is spawned, the registered values in datastore grants back contents that was supposed to be inside folder that were supposed to be contained in Data Store, but I do not have intelligence to create that idea into reality…
so all of it asides, here is roblox place file again incase you would need that, it was 8:48pm when I was writing this reply, so see you in tomorrow, maybe.
-mari
CodsterCoding Armor System Test game with new map(rblx studio).rbxl (753.9 KB)
One thing is, don’t rely on ChatGPT all the time, because most of the time the code will not work, and I will check out your game in the weekends
hello there, weekends has arrived now right…? I’m hoping that you could check out the roblox place file whenever you could, I’m so sorry that I literally suck at scripting so much that I made separate roblox game for test armor system that is purely written by chatGPT but yet anything in there does not work at all… (link to shared chatGPT conversation made for make armor system with only chatGPT: this link…)
(I will share you the roblox place file of test game with armor system that is purely made by ChatGPT suggestions if you want to, thanks)
thank you so much for returning to this post(hopefully), and I wish I could repay you for helping me with the armor system somehow… -mari
may i just add an armour system is a very complex first scripting task, i will add my input here that typically developers when saving inventory related chinwag it is common to use values or booleans to check what the user has and its statistics (if we have durability levels or more complex stuff)
however it can also be saved in long strings and more likely tables
im aware this isnt the most helpful comment but keep this in mind.
In my opinion your game so far looks messy to the point where I am also confused, but I will give you ideas to create your own armor system:
Create a working datastore. DataStore2 or ProfileService is recommended, but if you want to go with the basic style then go for the normal DataStore. This is needed to save your armor when the player leaves/rejoins.
Create a folder. You will need this to store your armor, weapons and stuff. When equipping armor, don’t move the items from the folder to the player’s character or EquippedArmor folder, instead clone them so you don’t lose the armor from your inventory when you rejoin. To prevent wearing multiple of the same armor at once, if the player is trying to equip the armor, first check if the same armor is in the player’s EquippedArmor folder and if it is, don’t let the player equip it, and if not, then let the player equip it.
Use ChildAdded. You will need this for your GUI inventory system. Your game has a problem where if the player resets everything in the inventory GUI will disappear, so .ChildAdded will be useful or you can even use a for loop to load armor to the GUI inventory.
For the armor equipping part, use welds. You will need welds to stick parts to the character, such as chestplates, leggings, and helmets. Here is an example code:
local Weld = Instance.new("Weld", Armor)

Weld.Name = "ArmorWeld"
Weld.Part0 = Character.Torso
Weld.Part1 = Player.Folder.Chestplate
You can also use offsets to make sure that the armor is in perfect place, so it doesn’t look like the armor is floating outside of the player when it is welded.
or TheDevKing’s scripting tutorials:
https://www.youtube.com/watch?v=BkYwRdCukZA&list=PLhieaQmOk7nIfMZ1UmvKGPrwuwQVwAvFa
These scripting tutorials are a great source of learning and help you to improve your skill in coding further. Experience is also a great way of learning.
You can also do something to learn like take out free models from toolbox, and review the script inside and find out how exactly they work. You can also try messing around, making scripts, etc. I recommend you to start off small and then advancing to more complex scripting like CFrames, Tweening and Velocity.
As a solo developer, I understand that making your own game can be a huge pain, but with enough experience and learning I was able to overcome my problems and take my next step into developing.
One more thing to say, modifying pre-made systems like Techno Studio’s is a bad practice if you don’t know what you are doing, so that’s why I encourage you to create your own armor system from scratch to avoid problems and complications.
– MikeartsRBLX
hey there, I’m sorry for interrupting you once more, but I have returned to modifying howtoroblox’s armor system, I know I was supposed to actually learn from making the codes by myself but I find myself literally so suck at scripting for the game everytime,
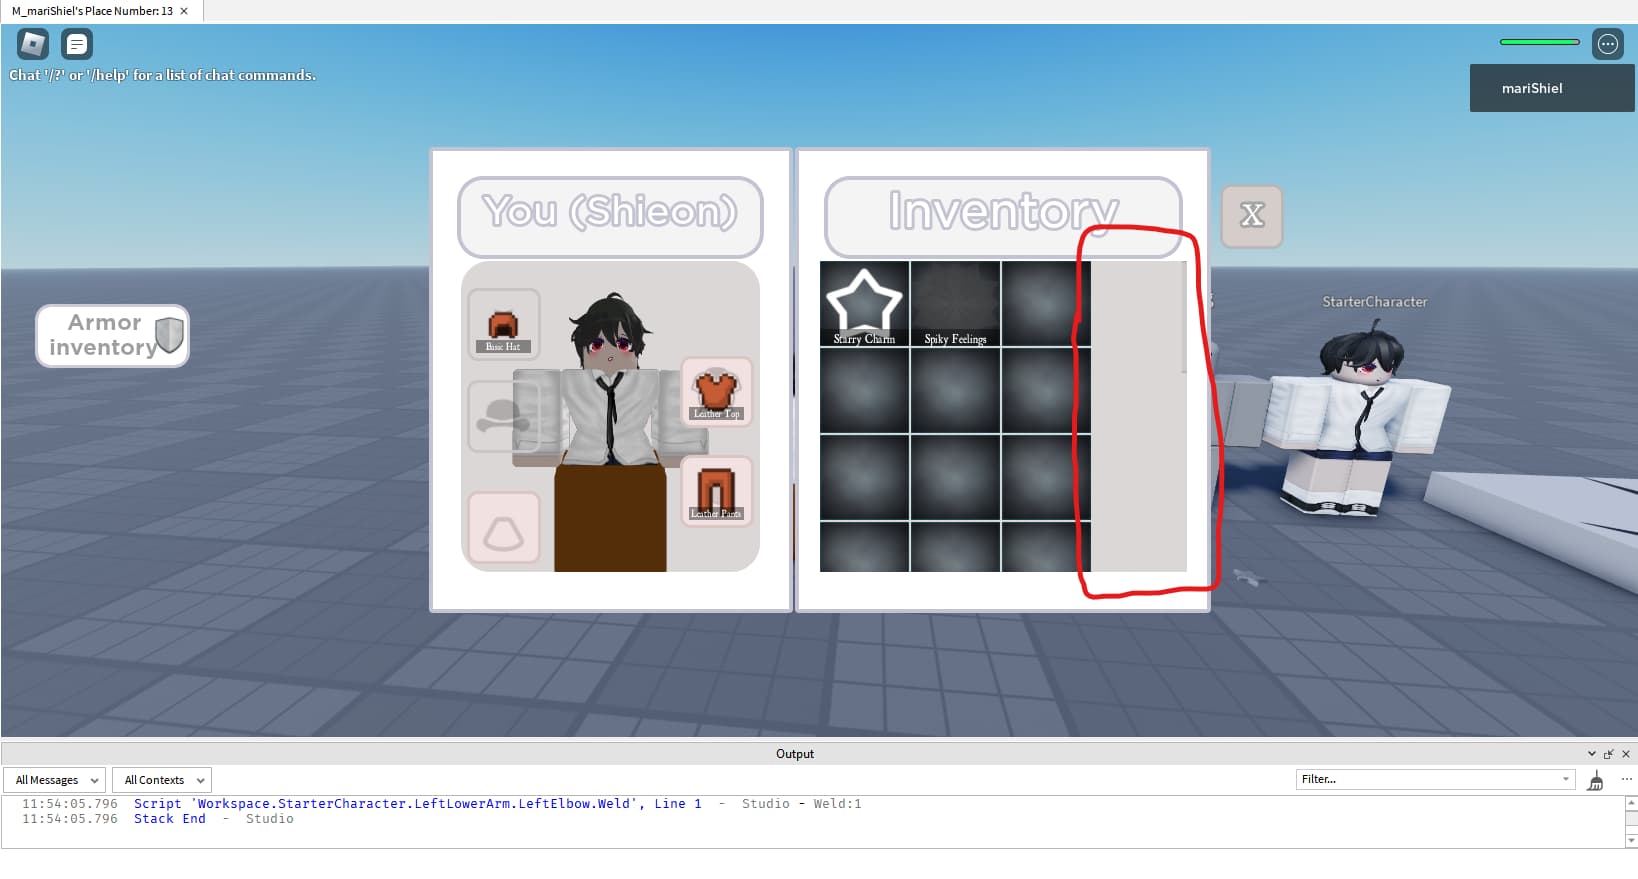
so, I’ve changed WeldConstraint to Weld and renamed the weld created for weld the armor model with player into “ArmorToPlayerBodyWeld” so it will be easier to identify, but even with my effort of not using chatGPT at that following time, I was barely able to find out that currently the script does not creates welds for torso type armor, talisman type armor, waisttalisman type armors, I couldn’t acknowledge anything at this day to fix the script, but I still want to finish the armor system someday, I have imported the roblox place file once again for somebody to take a loot at the issues, and I feel bad while posting the roblox place file in reply because I literally can’t even script despite I can make 3d models with blender and producing decent-looking arts and making other peoples in devforum to take times to check out my roblox place file with errors in their free-time ![]()
I’m sorry to bring you again into this topic, but I’ll show you the screenshot of issue and roblox place file just in case… or maybe I can pay you with robux for you to help me write script codes for my armor systems and such, contact me whenever you can if you’re interested in paid-working for my game projects ![]()
![]()
the roblox place file -
howtoroblox’s armor system R6 ported.rbxl (183.9 KB)
thank you so much for showing interests in my topic ![]()
-mari
I may have mentioned Welds earlier, they may work but WeldConstraints are actually better, more of the upgraded version, since normal Welds just break when that object is moved.
You don’t need to pay robux at all, because armor systems are actually quite easy to make. I’ll check out the file when I actually have free time. (I’m currently VERY busy with school and stuff)
hello there, sorry for being very late to reply you regarding this topic ![]()
anyways, I’m hoping you that you are currently free from your school and such, so if you have any time, feel free to check out my roblox place file whenever you could, thank you so much for these helps.
-mari
I’ll try, I’m currently drowning in homework and upcoming exams this week ![]()
hey there mikeartsRBLX, I’m wondering if you now have your own free times, I can wait for your help anytime soon, thanks for reading ![]()
-mari
Hi there, your gui is broken, perhaps you could try fixing it first so it works and so that I can view exactly what is going on with the armor system that you have here
hello there, I apologize for being to late to reply in this topic, I have fixed things with the armor GUI’s and I assumed that it was an problems with " UIAspectRatioConstraint ", so I have added UIAspectRatioConstraint for all of the possible gui objects in the armor gui, and I have one more issue other then me having problems with equipping the other armors then leggings and hats, the scrolling frame is 3 box wide instead of 4 box wide for some reasons, so it would be nice if you could help me with this issues, thank you so much for noticing my post ![]()
Assuming that you use a UIGridLayout, Try messing around with the CellPadding and CellSize. If it’s not helpful for you then try getting rid of the UIAspectRatioConstraint and use a plugin that turns the GUI’s size and position into scale or you can do it manually.
As for the Armor script, I have made a simple code that welds.
This is how I do it.
local FakeBodyPart = Instance.new("Part", Character.BodyPart) -- Any body part that you want to put armor in

FakeBodyPart.Size = Character.BodyPart.Size
local FakeWeld = Instance.new("Weld", FakeBodyPart)
FakeWeld.Name == "FakeWeld"

FakeWeld.Part0 = FakeBodyPart
FakeWeld.Part1 = Character.BodyPart -- Again, any body part you want to put armor in

local ArmorPiece -- Define the armor part here, could be the left arm, right arm, and make sure they are separate parts (not a whole union)

local ArmorWeld1 = Instance.new("Weld", Character.BodyPart)
ArmorWeld1.Part0 = ArmorPiece
ArmorWeld1.Part1 = FakeBodyPart

-- Setting the offset
ArmorWeld1.C1 = CFrame.new(0, 0, 0) -- You can put any offset here,
-- So the armor is in proper place
Tell me if this doesn’t work. You may also add boolvalues or modifications.
P.S. Make sanity checks so that your character won’t have double armors. For example:
if IsWearingHelmet.Value == false then
    WearArmor("Helmet", Name) -- Example function of equipping armor
elseif IsWearingHelmet.Value == true then
    warn("This player is already wearing a helmet!")
    return
end
why hello there again, I am sorry if I have interrupted your free time you were having with… ![]()
anyways, the reason I have replied to your recent script suggestion is that I have attempted to apply your script suggestion to Modulescript named EquipArmor inside script named armorserver which is also inside ServerScriptService, but things did not go to well again… ![]()
(also thank you for suggesting me with editing the Cellpadding and Cellsize section of UIGridLayout, it did actually worked in order and after I have fixed the scrollframe in the armor GUI, I attempted to applying the suggestion you sent in this topic ;> (the reply at the 25/26 page)
so the main problem is that there is issue with the global/local “BodyPart” shown on the script codes below, I were supposed to put any body part I want to put the armor in… but I still does not know how I can make that bodyPart section work… ![]()
…so I just put this " local bodyPart = char:FindFirstChild(armorpieces:FindFirstChild(“Torso”, “Legs”, “Head”).Name) " on the " Local bodyPart section… and now it is showing this specific error that says
" 18:42:02.011 Unable to cast string to bool - Server - EquipArmor:6 "… ;<
and the second issue is that in the original script, there was supposed to be an section of codes that gives the player an specific amount of player speed or health as the specific value that is included inside the armor that is inside an Stats Folder inside an armor model…
but the new script suggestion for an EquipArmor module script you replied to me does lack that armor stats feature…
so it would be very nice if you could spare some times to fix the EquipArmor script now gives extra stats to players based on the value inside the armor model and also having an new welding system that has FakeWeld features and setting the offsets… ![]()
I will leave this board of script codes from the EquipArmor modulescript that I tried to fix it but failed and you may try to help me improve this script whenever you could, thank you so much for helping me yet again ![]()
function equipFunc(plr:Player, armortype:string, armor:string, plrSpawned:boolean)
	local char = plr.Character or plr.CharacterAdded:Wait()

local armorpieces = game:GetService("ReplicatedStorage"):WaitForChild("ArmorPieces")

local bodyPart = char:FindFirstChild(armorpieces:FindFirstChild("Torso", "Legs", "Head").Name) -- **I want this line of script to find an body part property that each armor has on it, but I still does not know how I could manages to do it... ;-;**

local FakeBodyPart = Instance.new("Part", char.bodyPart) -- Any body part that you want to put armor in

FakeBodyPart.Size = char.BodyPart.Size
local FakeWeld = Instance.new("Weld", FakeBodyPart)
FakeWeld.Name = "FakeWeld"

FakeWeld.Part0 = FakeBodyPart
FakeWeld.Part1 = char.BodyPart -- Again, any body part you want to put armor in

local ArmorWeld1 = Instance.new("Weld", char.BodyPart)
ArmorWeld1.Part0 = armorpieces
ArmorWeld1.Part1 = FakeBodyPart

-- Setting the offset
ArmorWeld1.C1 = CFrame.new(0, 0, 0) -- You can put any offset here,
-- So the armor is in proper place

	if char and char:FindFirstChild("Humanoid") and char.Humanoid.Health > 0 then -- **beyond this point of line, I pasted some chunk of codes from the origin EquipArmor script execpt the welding one since the codes above has already done that.**
		local inv = plr:WaitForChild("ArmorInventory")
		local equipped = plr:WaitForChild("ArmorEquipped")
		local currentArmor = equipped:FindFirstChild(armortype) and equipped[armortype].Value

		if armorpieces:FindFirstChild(armortype) and armorpieces[armortype]:FindFirstChild(armor) then
			if currentArmor and not plrSpawned then
				local healthGain = currentArmor.Stats.Health.Value
				local speedGain = currentArmor.Stats.Speed.Value
				char.Humanoid.MaxHealth = char.Humanoid.MaxHealth - healthGain
				char.Humanoid.WalkSpeed = char.Humanoid.WalkSpeed - speedGain

				for _, armorpieces in pairs(armorpieces:GetDescendants()) do
					if armorpieces.Name == currentArmor.Name and armorpieces.Parent.Parent == armorpieces then
						armorpieces:Clone().Parent = inv
						break
					end
				end
			currentArmor:Destroy()
			end
		end
	end
end

return equipFunc
The weird thing is why are you defining multiple children in one variable…
local bodyPart = char:FindFirstChild(armorpieces:FindFirstChild("Torso", "Legs", "Head").Name) -- **I want this line of script to find an body part property that each armor has on it, but I still does not know how I could manages to do it... ;-;**
This will definitely error. Just run a loop to check for each bodyparts or use a table. Here it is:
local bodyPartTable = {
"Torso",
"Legs",
"Head"
}
“FindFirstChild” will only look for the first child with the name it is looking for, so defining multiple children with it will error.
You can do something like if you need to manage multiple children at the same time:
for i, v in pairs(Path:GetChildren()) do
	if v:FindFirstChild("item you are looking for") then
		--do some code
    elseif v:FindFirstChild("another item you are looking for") then
       -- do some code
	end
end
You may also use Path:GetDescendants if you want to look for children inside children, and repeat.