Introduction
Hello! Today, we’ll create a local music playlist for players in your game. As a bonus, I’ll also show you how to add in a UI that displays the name of the current song, as well as a mute button. I’ve made the scripts easy to configure, so you can personalize them to your liking.
Requirements
No scripting knowledge is required, but the code will be easier to comprehend if you have a general understanding of loops and simple object-oriented programming.
Preparation
Beforehand, you need to make sure the following windows are open:
- Explorer
- Properties
- Toolbox
You can also open the output, just in case you come across any errors.
Playlist Setup
The first thing we’re going to do is create the playlist that will contain all of the music tracks you wish to play in your game.
-
Insert a
FolderintoReplicatedStorage. You can name it whatever you like. For those who don’t know how to correctly reference a variable, I suggest naming everything the same as I do for the sake of this tutorial.Your layout should look something like this:

-
The next thing we need to do is add the songs we want into our playlist, which is the folder. Whatever is inside the folder is considered to be inside the playlist. Therefore, we need to make sure that the all of the objects inside the folder are part of the
Soundclass.To add songs, go to the Toolbox window you have open and change the filter to “Audio” so that you can search for soundtracks. Your Toolbox window should look something like this when you’ve done so:
After you get a good look at all of the soundtracks, insert your selections into the game and drag them all into the folder that we created. Your folder should now have all of your desired songs you wish to play:


Awesome! We’ve just created a music playlist!
StringValue Setup
The next thing we need to do is create a way of knowing what the current soundtrack is.
-
Insert a
StringValueintoReplicatedStorage. I’m naming it “CurrentTrack”, just so it’s easy to understand what the value is for. Leave the value’s properties as is; we’ll change them through a script later on.Your layout should look something like this (with the folder closed):


This value plays an important part when we get to scripting the name display and the mute button, so make sure you’re familiar with its location.
Scripting the Music Playlist
Obviously, the music in the folder won’t play by itself. We need to script it. I actually scripted this 2 ways, so you have 2 different formats to choose from. The first format makes the soundtracks play in a randomized loop, while the second format makes them play in an ordered loop. Both formats have their pros and cons. The first way has the chance of repeating a soundtrack twice in a row, but it’s still is unpredictable as to which soundtrack will play next. The second way plays the soundtracks in the same sequence over and over again, but none of the soundtracks will have the chance to play twice in a row.
Go ahead! Pick a format to use. Personally, I like the first one.
Format #1 (randomized loop)
Welcome to the first format! Here, your songs will play in a randomized loop.
-
The first thing you need to do is insert a
LocalScriptintoStarterPlayer>StarterPlayerScripts. You can name it whatever you want.Your layout should look something like this:
-
We can begin scripting! I have pasted the code below. Please take time to read the explanations next to each line of code, as they will help you have a general understanding of what you are doing. I genuinely don’t want y’all copy-pasting code and moving on to the next step. Learn it! Maybe then you won’t have to come looking for tutorials.

   local musicFolder = game.ReplicatedStorage.Music -- variable for the music folder
   local availableMusic = musicFolder:GetChildren() -- variable that gets all of the children, or songs, from the music folder
   local currentTrack = game.ReplicatedStorage.CurrentTrack -- variable for the string value that will hold the name of the current song

   while true do -- begins a loop that will run forever

   	  local randomTrack = availableMusic[math.random(1,#availableMusic)] -- variable for a random track selected from the availableMusic variable, which holds all of the songs

   	  currentTrack.Value = "..." -- since nothing is playing yet, we set the string value's value to be simply an ellipses (...)

   	  wait(2) -- delay before next song plays

   	  randomTrack:Play() -- plays the random track we selected

   	  currentTrack.Value = randomTrack.Name -- since a song is playing now, we set the string value's value to be the same as the name of the random track we are currently playing

   	  randomTrack.Ended:Wait() -- waits for the track to end

   end -- end of the loop
That’s it! We now have a working, randomized music playlist! You can move on to where we script the current song display.
Format #2 (ordered loop)
Welcome to the second format! Here, your songs will play in an ordered loop.
-
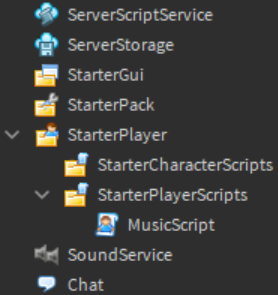
The first thing you need to do is insert a
LocalScriptintoStarterPlayer>StarterPlayerScripts. You can name it whatever you want. I’m naming mine “MusicScript”.Your layout should look something like this:
-
Now we can begin scripting! I have pasted the code below. Please take time to read the explanations next to each line of code, as they will help you have a general understanding of what you are doing. I genuinely don’t want y’all copy-pasting code and moving on to the next step. Learn it! Maybe then you won’t have to come looking for tutorials.
   local musicFolder = game.ReplicatedStorage.Music -- variable for the music folder
   local availableMusic = musicFolder:GetChildren() -- variable that gets all of the children, or songs, from the music folder
   local currentTrack = game.ReplicatedStorage.CurrentTrack -- variable for the string value that will hold the name of the current song

   while true do  -- begins a loop that will run forever

      for i, randomTrack in ipairs(availableMusic) do -- begins another loop that iterates through all the songs (each song being 'randomTrack') in order

          currentTrack.Value = "..." -- since nothing is playing yet, we set the string value's value to be simply an ellipses (...)

   	      wait(2) -- delay before next song plays

   	      randomTrack:Play() -- plays the random track that is next in order

   	      currentTrack.Value = randomTrack.Name -- since a song is playing now, we set the string value's value to be the same as the name of the random track we are currently playing

   	      randomTrack.Ended:Wait() -- waits for the track to end

      end -- end of the for loop

   end -- end of the while loop
That’s it! We now have a working, ordered music playlist! You can move on to where we script the current song display.
Scripting the “Now Playing” Display
Awesome! Now that we’re done with the main part of the tutorial, it’s time to add some decorations! Let’s start off with a fairly simple one, which will display the name of the current song. Remember how we set the CurrentTrack’s value in the previous script? That comes into play here. We’re going to use its value, and display it as text on a UI.
-
Of course, we need to create the UI first. Insert a
ScreenGuiintoStarterGui. You can name it whatever you want. I’m naming mine “MusicGui”.Your layout should look something like this:

-
Inside of that, insert a
TextLabel. You can name it whatever you want. I’m naming mine “NowPlayingText”.Your layout should look something like this:

-
Let’s design it! You don’t want your players staring at the default look of the label. Let’s be honest, it’s not that great.

I positioned mine in the top right corner, and changed the following properties:
BorderSizePixel = 5BorderMode = InsetBorderColor3 = Color3.new(0,0,0)Font = KalamTextScaled = true
Your label’s design may look different, but mine looks like this:

-
Now, insert a
LocalScriptinto the label. You can name it whatever you want. I’m naming mine “NowPlayingScript”.Your layout should look something like this:

-
Great! We can now begin scripting the label to display the name of the current song. I have pasted the code below. Like I said before, please read the explanations so you’re learning something!


    local textLabel = script.Parent -- variable for the label
    local currentTrack = game.ReplicatedStorage.CurrentTrack -- variable for the string value; this is extremely important to make this work

    if currentTrack.Value == "..." then -- the value would be "..." if nothing was playing; if that's the case, then...
	    textLabel.Text = currentTrack.Value -- we set the label's text to simply that
    else -- if the value is NOT "..." (which means the value is a song name) then...
	    textLabel.Text = "Now Playing: " .. currentTrack.Value -- we set the label's text to be the value of the CurrentTrack string value, plus a quick concantenation so the players know what the label means
    end -- end of the if statement

    currentTrack:GetPropertyChangedSignal("Value"):Connect(function() -- detects when the value of the CurrentTrack string value changes, and runs the following function
        -- this part is the same as above
	    if currentTrack.Value == "..." then
		    textLabel.Text = currentTrack.Value
	    else
		    textLabel.Text = "Now Playing: " .. currentTrack.Value
	    end

    end) -- end of the function
Congratulations! We now have a working “Now Playing” display. Almost done! The only thing left to do is make the mute button for the system.
Scripting the Mute Button
This is the last part! Are you excited? I know you’re excited. ![]()
-
Insert an
ImageButtoninto theScreenGuiwe created earlier. You can name it whatever you want. I’m naming mine “MuteButton”.Your layout should look something like this:

-
Now, input the ID of a decal you wish to be displayed when the music is umuted in the button’s
Imageproperty. I’m using the ID of 176572847, which is a simple sound icon.
-
Once you’ve done that, you can design the rest of the button. Don’t mess up the ID, though.
I positioned my button under the current song display, and changed the following properties:
BackgroundColor3 = Color3.new(0,0,0)BorderSizePixel = 0
The button now looks like this (yours may be different):

-
Now, insert a
LocalScriptinto the button. You can name it whatever you want. I’m naming mine “MuteScript”.Your layout should look something like this:

-
More scripting! Let’s program the mute button to change the volume of the current song appropriately when clicked. I have pasted the code below. I’m sure you know the drill by now. Read the explanations (some of them are a little bit longer this time), not copy-paste the code into your script.


    local muteButton = script.Parent --  variable for the mute button

    local musicFolder = game.ReplicatedStorage.Music -- variable for the music folder
    local currentTrack = game.ReplicatedStorage.CurrentTrack -- variable for the string value

    local muted = false -- bool variable that tells us whether the music is muted or not; default is false

    muteButton.MouseButton1Click:Connect(function() -- event that fires when a player has clicked the mute button

        if currentTrack.Value ~= "..." then -- if something is actually playing, then...

            local nowPlaying = musicFolder[currentTrack.Value] -- getting the song from the music folder that matches the CurrentTrack's value (which would be the song that is currently playing)

	        nowPlaying.Volume = muted and 0.5 or 0 -- takes the current sound object and applies the bool variable along with 2 volume values; the first is when the music is UNMUTED, and the second is when the music is MUTED
	        muteButton.Image = muted and "rbxassetid://176572847" or "rbxassetid://176572748" -- same thing as above except we're changing the image of the button instead of the volume of the song; the first ID is the same one for when the song is UNMUTED, and the second ID is for when the song is MUTED - make sure you put 'rbxassetid://' before the ID so that it's formatted correctly

	        muted = not muted -- flips the bool variable's value

        end

    end) -- end of the function

    currentTrack:GetPropertyChangedSignal("Value"):Connect(function() -- if the current song changes, we run this function

	    if currentTrack.Value ~= "..." then -- if something is actually playing, then...

		    local nowPlaying = musicFolder[currentTrack.Value] -- we get the sound object from the music folder that's currently playing

		    if muted == true then -- if the previous song was muted and the player hasn't touched the mute button, then...

			    nowPlaying.Volume = 0 -- we keep the next song muted

		    elseif muted == false then -- if the previous song was unmuted and the player hasn't touched the mute button, then...

			    nowPlaying.Volume = 0.5 -- we keep the next song unmuted

		    end -- end of the if statement

	    end -- end of the if statement

    end) -- end of the function
A mute button? You can check that off of your bucket list!
End Product
It’s a bird! It’s a plane! No… It’s your success! that was a bad joke-
Congratulations. You’re finished with this local music system! Have a fortune cookie. ![]()
Thanks for reading, and I hope you and your game’s players enjoy it. ![]()
Quick Poll
If you don’t mind, I’d like some feedback, as this is my first topic in #resources:community-tutorials. Rate my tutorial below. Also, if you rate it a 3 or below, please DM me and let me know what I can do better!
- 1
- 2
- 3
- 4
- 5
0 voters
 There you go, but the thing is, the music isn’t playing at all