Finally! The map I’ve been working on in blender can finally be imported! Thank you!
Pro tip:
Working on maps in blender and then generating a height map for them allows for much easier map making.
Finally! The map I’ve been working on in blender can finally be imported! Thank you!
Pro tip:
Working on maps in blender and then generating a height map for them allows for much easier map making.
Very good update, will definitely be utilizing terrain!
I really like this since making terrain by hand is a pain
Did this just get disabled? It suddenly disappeared from the terrain editor.
Yeah, I don’t see it anywhere.
Hi All,
Thanks for trying out the Heightmap/Colormap Importer and all your fun creations! Unfortunately, we found a few critical bugs that are causing issues. We are turning the feature off while we diagnose and fix.
Thanks,
GeneralRelish
This is an amazing update! I’m so glad that Roblox had added a height map importer to Roblox Studio! This is a lifesaver! For the time being, I have been using a plugin for loading in terrain using a height map by @ITBV! It was a very useful plugin for the time being before Roblox has added this to Studio. He briefly had explained how it is possible to create height maps that can be actually used to generate terrain but I want to explain this more in detail. The program I’m about to explain bellow can be confusing but after you get the basics down it will be a piece of cake! I am no expert at this yet so bear with me.
The program I will talk about is called “World Machine.” It’s a free program you can download to make Color Maps and Height Maps. Here is the link to their site (https://www.world-machine.com/)
After you have downloaded the program launch it and you should be on a new project. It should look something like this.
So let me explain the setup and what everything is. So let me first start with the tools you will be able to use. The main toolbox is located above the gray workspace.
This is where you will be able to utilize the main “nodes” in the generation of your terrain. I will get more in detail on how you can generate your terrain using this toolbox after I explain the layout. Next is the viewing of your terrain which is important of course. You can view it in 2 different places and in 5 different ways.

Camera/Movement: This is the side panel where you will be able to preview your terrain in 3D or 2D format. So the gray box you can see right now will display a preview of your terrain. Here you can use the middle mouse button to zoom in and out and the right mouse button to rotate the camera around. You can reset it or fit it by clicking the reset or fit button.
Shading: You can also select the shading of the preview flat makes it smooth without lighting and if you select shaded it will bring in a light source. You can move it around using your left mouse button. You can click and drag the light source around.
View: You can also select if you want it to be 2D or 3D. You can also choose the terrain color which gives you a few options but personally I like the Emerald Isles. You are also able to see the water level by clicking “show” and dragging the slider.
Device Navigation: The Device Navigation section is basically like workspace in Roblox Studio but a bit different. The object you select in the device navigation section will be the terrain you are viewing. If you click “Toggle Main View” it will bring you back to your workspace or also called the Device View.
Now to get on to the different ways you can view your terrain. There are 5 in total. I will mainly focus on the options in the red box.
Device View: This will show you the device’s which you are using. There is no visual and this is only the nodes you are connecting together. You can press F5 to switch to this or click “Toggle Main View” in the panel on the left side.
Layout View: This will have a map like flat visualization of your terrain. I’m not going to go too in depth on this but this will help you in selecting the terrain you want. You can press F6 to switch to this.
The 2nd row on the top is the snap, show, grid, RQ, and the Tiles. The eye is you only viewing the area selected, the 2nd option which looks like an empty box will allow you to edit how much terrain you want. You can select more area by clicking and dragging the X marks at the ends of the box to make it bigger or smaller. The last option allows you to move the terrain around using an X found in the middle.
Explorer View: This will allow you to view the terrain from a bird’s eye view and even interact with the terrain by walking, driving, flying, and even just hovering. You can press F7 to switch to this.
3D View: This will allow you to see the preview image on the side panel on the left side. The only thing different are the controls. Middle mouse button is responsible for the movement of the camera. The left mouse button is responsible for the rotation of the camera and the right mouse button is the zooming in and out. You can press F8 to switch to this.
Flat View: As from the name this will let you see the flat view of your terrain and the image you will render. The rendering of the color terrain is different and I will explain. There is not much to it and its just a flat view of your terrain and a preview to what you will render. You can press F9 to switch to this.
Randomize: The button with the die on it will randomize everything making it all random such as the seed and other settings in the nodes.
To get started make a new project by going to File > New or press Ctrl + N. I will be doing a simple island type terrain for this example.
First, go to the toolbox and then to Generator. After find the Radial Grad which looks like this.
![]()
Click and place it onto your workspace and then select the Constant which looks like this it should be the 4th option.
![]()
Then go to the toolbox and go to Combiner. After place down the combiner which should be the 2nd option and looks like this.
![]()
After you have done that connect the Radial Grad and the Constant to the Combiner. It should look something like this.
Next click and place the Advanced Perlin which looks like this it should be the first option in the section Generator in the toolbox.
![]()
Connect the previous combiner to the advanced perlin. It should look something like this now.
By this time your terrain should be in an island shape and this is the result I had.
To save the Height Map only you will want to go to the Output section in the toolbox and place in the Height Output which looks like this.
![]()
You will then want to connect the Advanced Perlin to the Height Output and it should look something like this.
Then double click the Height Output and this window should pop up.
Select the format as being PNG and then select where you want to save it by clicking “Set” at the top. You can also modify the File name at the very first option on top. After you have done that click “Write output to disk!” and it will save in the location you have set.
It will ask you if you want to build your terrain and you should click “Yes.” It will run a quick process and save a grayscale height map in the location you have selected.
This is the height map I had generated!
Saving the color map is a bit different but pretty much the same. First, you will want to go to the toolbox and to the Converter section and find the Colorizer which looks like this.
![]()
After you have placed it in then go back to the Output section and place in the Bitmap Output which looks like this.
![]()
Then take the Advanced Perlin and connect it to the Colorizer and Colorizer to the Bitmap Output. It should look something like this.
Before we save the file you first would need to select the color map you want to use. You can open the window by double-clicking the Colorizer. This window should pop up.
If you want to create a custom color map you can use the Custom Gradient provided but for the purpose of the tutorial, we will use the ones given. Go to the “Select colorizing method” drop-down menu and select the option “Import by colortable.” then go to Colorize by colortable section and select the colorization of your choice. My personal favorite is the Emerald Isles. You can also import the colorize gradient from an image that you have created. After you are done click “OK.”
If you are going to make a custom gradient color map and want to use the Roblox terrain colors use this.
Now double click the Bitmap Output and this window should pop up.
This is the same as saving the height map. Click “Specify Output File…” and select where you want to save the image. Then set the file name you desire and make sure the file format is PNG. Next click “Write output to disk!” which will prompt you to build the terrain. Click “Yes” and it will save the PNG file to the location you have set.
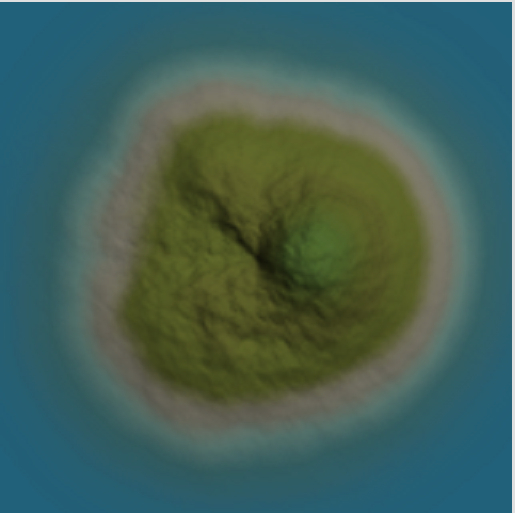
This is the color map I generated!
If you have any questions I’m all ears. There are many tutorials online on generating terrain in World Machine and there are many tutorials on many different types of terrain on youtube and other platforms. I hope this helped you!
You should make sure to scan the topic first, this is just a few messages above yours:
Oh my bad didn’t see it. Thank you for telling me
Do you have an image of how it looks in Studio?
yeah
Looks nice, maybe gonna try and import ARMA 3 heightmap ![]()
When is the feature gonna come back out? (I also have gotten no errors)
Yay! I entered studio the other day and noticed an unfamiliar Import button within the Terrain Edits tool.
![]()
This is amazing, thank you!
When they say critical errors, it is causing more than what you deem “lame errors”. They would only turn the flags off for a new feature if they have good reason.
Same, I was wondering why I still dont see this feature in terrain tools yet.
This was really great update. Perfect for beginners who use terrain, however, this can be used for funny memes, as long as it is appropriate, so you can mess around with it.
I can still use the feature using offtopic sources. Here’s some of the creations I got.
The feature was disabled in studio when I made the post due to a critical bug. I will update the reply with it attached.