There’s already a topic about this but it’s a few years old and I have an alternate way of doing it! Someone asked me about this a few days ago on Twitter and I figured I could explain it here as well. This is a very basic tutorial targeted toward beginners (you do need some basic blender knowledge though bc this is not an intro to blender tut) so don’t come for me if you alr know how to do this bc some people don’t and that’s okay.
BASICS: What are HDRI's & where can I get them?
HDRI’s are essentially image files that include lighting data, you can insert them into a scene to give more precise lighting effects & add onto them with area lights in blender etc. lots of people use them for gfx and possibly showcases for ugc concepts, overall it’s a great starter skill to know if you want to do anything modeling-wise. As far as I’ve seen the most popular place to find HDRI’s is Poly Haven (I get my HDRI’s from there too ![]() )
)
How to insert an HDRI into a scene
-
Start by setting your viewport shading option to ‘rendered’ here in the upper right corner (you can change it back to your preference later):
-
To the right of your screen, go to ‘World Properties’ (the little red earth-looking icon) and change the Color to ‘Environment Texture’


If you’ve done everything properly, it should make everything pink (lol):

- Next, to open an HDRI (the files show up as .hdr) click ‘Open’ under the color property that you just changed which will then take you to Blender File View, select the HDRI you want and click ‘Open Image’

Done! Now that you’ve opened an HDRI in blender your World Properties should look something like this:

and your viewport something like this:

How to remove the HDRI image from the background
Since your viewport shading is set to ‘rendered’ (if you followed step 1) this means that when you render the scene it will come out almost exactly as it shows in viewport currently (aka with the HDRI image in the background).
This can be fixed very easily by making the image transparent (only keeping the lighting, not the image):
-
Start by going to ‘Render Properties’
-
Scroll down to ‘Film’, and toggle ‘Transparent’


Now, if you did everything properly you should only have the lighting in the scene & on the object(s), without having the image in the background:

Quick Tips :)
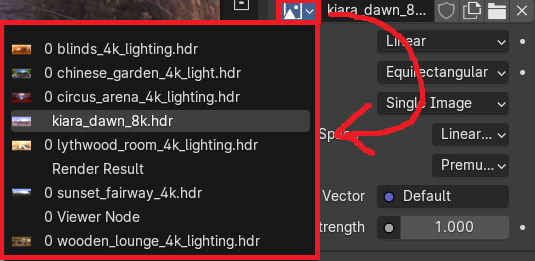
I’ve often found it difficult to tell which HDRI’s are which, especially when I haven’t used them in a while. To make looking through options easier you can click this to open another HDRI:
![]()
and this to view (& click through) all the HDRI’s you’ve opened:
If you have any further questions lmk and I’ll try my best to answer them, this is my first tut so constructive criticism is appreciated ![]()

