Were you ever playing games like PHIGHTING! [ALPHA] or Jujutsu Infinite and really liked their GUI because it was uniquely floating? Have you tried recreating their unique GUI but failed?
Well this module is an easy way to implement a uniquely floating GUI into your game!
Examples:
Creating a floating gui.
local FloatingGui = require(game.ReplicatedStorage:WaitForChild('FloatingGui'))

local Player = game.Players.LocalPlayer
local PlayerGui = Player:WaitForChild('PlayerGui')
local ScreenGui = PlayerGui:WaitForChild('ScreenGui')

local Gui = FloatingGui.new(ScreenGui, {
    -- These are all the options you can provide:

	Distance = 0.2, -- Distance in studs in between the camera and the floating gui.
	Speed = 0.9, -- Speed from 0 to 1 that represents the follow speed of the floating gui.
	Angle = 3, -- Rotation of the floating gui in degrees.
	Offset = Vector2.new(0, 0) -- Offset of the floating gui based on scale.
})
Changing an existing floating gui after two seconds.
local FloatingGui = require(game.ReplicatedStorage:WaitForChild('FloatingGui'))

local Player = game.Players.LocalPlayer
local PlayerGui = Player:WaitForChild('PlayerGui')
local ScreenGui = PlayerGui:WaitForChild('ScreenGui')

local Gui = FloatingGui.new(ScreenGui, {
	Distance = 1, -- Distance in studs in between the camera and the floating gui.
})

wait(2)

Gui:Change({
	Distance = 0.2, -- Distance in studs in between the camera and the floating gui.
	Speed = 0.9, -- Speed from 0 to 1 that represents the follow speed of the floating gui.
	Angle = 3, -- Rotation of the floating gui in degrees.
})
Removing an existing floating gui after two seconds.
local FloatingGui = require(game.ReplicatedStorage:WaitForChild('FloatingGui'))

local Player = game.Players.LocalPlayer
local PlayerGui = Player:WaitForChild('PlayerGui')
local ScreenGui = PlayerGui:WaitForChild('ScreenGui')

local Gui = FloatingGui.new(ScreenGui)

wait(2)

Gui:Remove()
Enabling and disabling a floating gui.
local FloatingGui = require(game.ReplicatedStorage:WaitForChild('FloatingGui'))

local Player = game.Players.LocalPlayer
local PlayerGui = Player:WaitForChild('PlayerGui')
local ScreenGui = PlayerGui:WaitForChild('ScreenGui')

local Gui = FloatingGui.new(ScreenGui)

Gui:Enable(false)

wait(2)

Gui:Enable(true) -- Gui:Enable(true) or Gui:Enable()
Creating multiple floating guis.
local FloatingGui = require(game.ReplicatedStorage:WaitForChild('FloatingGui'))

local Player = game.Players.LocalPlayer
local PlayerGui = Player:WaitForChild('PlayerGui')
local ScreenGui = PlayerGui:WaitForChild('ScreenGui')
local ScreenGui2 = PlayerGui:WaitForChild('ScreenGui2')

local Gui1 = FloatingGui.new(ScreenGui, {
	Distance = 0.2, -- Distance in studs in between the camera and the floating gui.
	Speed = 0.9, -- Speed from 0 to 1 that represents the follow speed of the floating gui.
	Angle = 3, -- Rotation of the floating gui in degrees.
	Offset = Vector2.new(0, 0) -- Offset of the floating gui based on scale.
})

local Gui2 = FloatingGui.new(ScreenGui2, {
	Distance = 0.2, -- Distance in studs in between the camera and the floating gui.
	Speed = 0.9, -- Speed from 0 to 1 that represents the follow speed of the floating gui.
	Angle = -3, -- Rotation of the floating gui in degrees.
	Offset = Vector2.new(0, 0) -- Offset of the floating gui based on scale.
})
A real example.
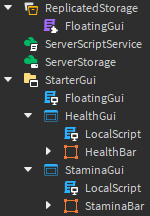
My Explorer:
My health bar and stamina bar:

My code (StarterGui.FloatingGui):
local FloatingGui = require(game.ReplicatedStorage:WaitForChild('FloatingGui'))

local Player = game.Players.LocalPlayer
local PlayerGui = Player:WaitForChild('PlayerGui')
local HealthGui = PlayerGui:WaitForChild('HealthGui')
local StaminaGui = PlayerGui:WaitForChild('StaminaGui')

local Gui1 = FloatingGui.new(HealthGui, {
	Distance = 0.2, -- Distance in studs in between the camera and the floating gui.
	Speed = 0.9, -- Speed from 0 to 1 that represents the follow speed of the floating gui.
	Angle = 3, -- Rotation of the floating gui in degrees.
	Offset = Vector2.new(0, 0) -- Offset of the floating gui based on scale.
})

local Gui2 = FloatingGui.new(StaminaGui, {
	Distance = 0.2, -- Distance in studs in between the camera and the floating gui.
	Speed = 0.9, -- Speed from 0 to 1 that represents the follow speed of the floating gui.
	Angle = -3, -- Rotation of the floating gui in degrees.
	Offset = Vector2.new(0, 0) -- Offset of the floating gui based on scale.
})
Result:
Exceptions.
local FloatingGui = require(game.ReplicatedStorage:WaitForChild('FloatingGui'))

local Player = game.Players.LocalPlayer
local PlayerGui = Player:WaitForChild('PlayerGui')
local ScreenGui = PlayerGui:WaitForChild('ScreenGui')

-- When no options are provided the floating gui will be given default options.
local Gui = FloatingGui.new(ScreenGui)
Source.
Link: https://create.roblox.com/store/asset/17170508056/FloatingGui?tab=description
(Please credit it me whenever you use it in your game, thanks!)
(Also would appreciate feedback or ideas for new features, you can message me on discord @lukanker.)

