But like, when you set the “Force” property, what calculation are you using to put there?
100,0,0. I’ll set up more to see if that works. I’m used to using body velocity so things like mass don’t come in play
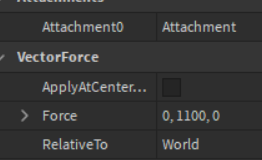
edit ok so I set it up higher, but it is super unstable:
robloxapp-20220622-1856025.wmv (669.4 KB)
I guess there is a reason of why you are using vector force, but why not just use lineforce?


![]()
For me works fine
I could use line force but I’m trying to test out vector force. Because I don’t think I can use line force for a plane. Because I wanted to use vector force in a plane system I was making.
Well then I believe the problem with your part is that the script isn’t changing quickly enough which makes the part go crazy (It goes at an angle of 50° then accelerates and out of nowhere it goes to 70° since it doesn’t change fast enough). If you are making a plane it doesn’t need to be directed but instead just “tweaked” 1 degree or so. So your plane should be fine
For making a plane I would suggest AlignOrientation. You can have an attachment (the real attachment) in the engine and a “fake” one that is the destination angle. AlignOrientation (If the Compliance values are set right)

Should smoothly align those 2 attachments to be able to make
1 Like
robloxapp-20220622-2226472.wmv (427.3 KB)
(I was out, so I can only send you this now) I made a system, and it works!
The only thing the script does is set the 2nd attachment
local gui = game:GetService("StarterGui"):WaitForChild("Plane");
while true do
	task.wait();
	workspace:WaitForChild("Engine").Attachment.Orientation = Vector3.new(tonumber(gui.X.Text),tonumber(gui.Y.Text),tonumber(gui.Z.Text));
end;
2 Likes
local function OnReachedTarget(BodyPosition)
	BodyPosition:Destroy()
end

local function MovePartToOtherPart(Part1, Part2)
	local BodyPosition = Instance.new("BodyPosition")
	BodyPosition.Position = Part2.Position
	BodyPosition.P = Vector3.new(100, 100, 100) --Change this depending on the amount of force you want to exert on 'Part1' in order for it to reach the position of 'Part2'.
	BodyPosition.ReachedTarget:Connect(function() OnReachedTarget(BodyPosition) end)
	BodyPosition.Parent = Part1
end

It’s deprecated
I’m aware, it’s just that the legacy BodyMovers tend to be easier for developers to understand. BodyMovers have no dependencies whereas constraints require attachments.
1 Like
Fair enough, but do warn them that they are deprecated or people might use them without knowing the risk
It’d be akin to warning users of the legacy mouse object’s deprecation, they’re so widely used that for the sake of backwards compatibility Roblox will maintain support for them forever.
If they break, they will be broke forever and won’t be fixed by Roblox since these are deprecated.
Sorry for the late reply, would I make the gui in the position of the mouse?
Sup, I will try to explain the best I can.
I made a very basic plane concept you can observe below:
robloxapp-20220623-2023268.wmv (3.7 MB)
I used “LinearVelocity” instead of VectorForce btw. This is because LinearVelocity controls the speed meanwhile VectorForce just adds it. (If you wish to do a spaceship for example then vector force is very good to simulate non-drag compared to a plane).
Here I will show you all the assets I used:

Antigravity is a vector force relative to the world to contradict gravity. It doesn’t do anything else.
LinearVelocity is a constant value that is set to 100.

AlignOrientation is moving the current part to the desired destination. The desired destination is a part that is:
- Transparent
- Non-collidable
- Anchored
This part simply contains an attachment that is the destination. THIS is the attachment modified by the server script.
Now with that clear let’s first check the server script code which is the simplest we have:
local engine = workspace:WaitForChild("Engine"); --This is the transparent, non-collidable part.

local remoteEvent = game:GetService("ReplicatedStorage"):WaitForChild("RemoteEvent");

local currentX, currentY = 0,0; --This is the movement value to change

remoteEvent.OnServerEvent:Connect(function(client, x, y)
--[[
    PLEASE perform a check to see if it is the actual pilot or else exploiters can abuse this by sending
    modification requests acting as the pilot which will move the plane.
]]

    currentX = x; --Set X movement
    currentY = y; --Set Y movement
end);

while true do
    task.wait();

    engine.Orientation += Vector3.new(-currentY,-currentX,0); --Here, every iteration will add to the
-- destination's attachment which we'll move ever so slightly. Btw we are negating the value in
-- Y and X since if we don't it will go inversed.
end;
Now the localscript code.
To calculate how much we should move the plane we need to do something like this:

When your mouse is near the top-right corner we add, if it is in the bottom-left corner we subtract. I guess you don’t want to read the boring code but it is essential for this.
To calculate the percentage what we do is this:
(location.X/currentCamera.ViewportSize.X - 0.5) * 2 * maxHorizontal
location.X is the mouse’s X location.
currentCamera.ViewportSize.X is the total location. By dividing these 2 we get a percentage (the black text). To get the red text we substract that value by 0.5 (0.75 → 0.25) and then multiply by 2 thus giving you the red text. (0.75-0.5=0.25, 0.25*2 = 0.5).
(Red is desired value, black is normal value).
task.wait(1);
local UserInputService = game:GetService("UserInputService");
local remoteEvent = game:GetService("ReplicatedStorage"):WaitForChild("RemoteEvent");

local currentCamera = workspace.CurrentCamera; --Current Camera of the client

local maxHorizontal = 2.5; --THIS VALUE IS THE MAXIMUM IT CAN TURN PER ITERATION
local maxVertical = 1.25; --THIS VALUE IS THE MAXIMUM IT CAN TURN PER ITERATION
UserInputService.InputChanged:Connect(function(input)
	if(input.UserInputType == Enum.UserInputType.MouseMovement) then
		local location = UserInputService:GetMouseLocation();
		remoteEvent:FireServer((location.X/currentCamera.ViewportSize.X - 0.5) * 2 * maxHorizontal, (location.Y/currentCamera.ViewportSize.Y - 0.5) * 2 * maxVertical);
--		Boring math I guess you wouldn't want to learn. What this does is get the total screen size:
--		(currentCamera.ViewportSize.X) and divide it to the current location. This will give a range of
--		0 to 1 depending on the location. (Half-way is 0.5, a quarter of the way is 0.25 etc...)
--		Then we substract this value by 0.5 so that half way instead of being 0.5 is 0.
--		Then we multiply by 2 to exagerate the values. (100% would be 1 - 0.5 = 0.5 which is wrong,
--		that is why we multiply by 2 so it is 1 again)
	end;
end);

game:GetService("RunService").RenderStepped:Connect(function() --Every render update the camera's position.
	currentCamera.CameraType = Enum.CameraType.Scriptable;
	currentCamera.CFrame = workspace:WaitForChild("Plane").CFrame * CFrame.new(0,0,20); --The actual part of
--	the plane.
end);
Join those 2 together and vualá! You have a plane system.
Another thing, I recommend you to add limitations to the orientation’s range. As you could see in the video it is good for military planes to go 100% up, but I feel that isn’t what a normal plane would do. This also can switch your perspective causing the addition to negate itself via the viewport’s orientation which would cause the perspective to shift accordingly preventing you to go back up.
Another thing, EXPERIMENT WITH THE Z AXIS! Imagine doing a barrel roll in a plane, that would be cool. As you see I am just using Y and X for movement, but you can add the A and S keys as Z movement to give barrel rolls, this will also fix the view perspective I told about above since you could do a barrel roll to change orientation again.
1 Like
Thank you so much!
Could you send me the copy of the place so I can look inside it and what not?
So I can see how everything is set up in a studio point of view, which will probably be easier for me to follow.
Sure thing, also I added more features (The Z index movement with A and D keys).
SimplePlane.rbxl (45.2 KB)
Wow you didnt need to do all of this! But thank you so much! I’ll sure study the scripts and play with it!
1 Like