Ok, for the train to move forward! You can do something similar to what Maelstorm_1973 said. I would recommend you make a base part somewhere within the train, and try something like this:
Make sure that the speed is very high, 5,000 parts would be very heavy. And of course, make sure the base part is welded, and all the parts are unanchored, or else the velocity will not take effect.
I noticed your plugin contains some dodgy code as well as a statement that checks if the user is in a specific group. I didn’t read the full script, but I assume its malware. Don’t worry, all you stole was a baseplate and 5 parts since I used it in a test world with 5 parts.
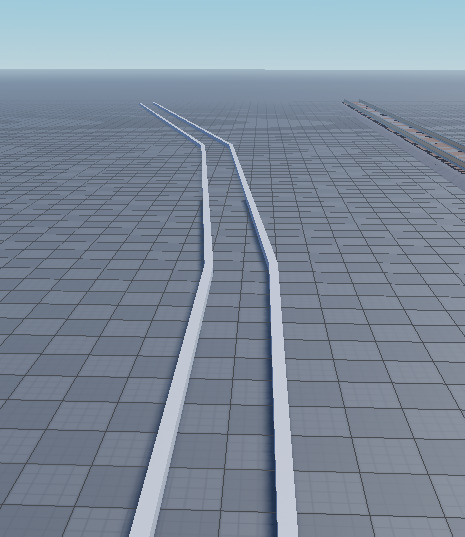
I’ve read your tutorial and attempted to replicate it with the help of 9100ryan. I have fixed welds and all of that. The issue that I am now having is that the train does move forward however the train itself doesn’t turn when it comes across a corner. See attached gif below: https://gyazo.com/fe782f500aa55602b0a9e9933b3f4ea0
For reference, the red neon block is the base part that contains the script. The train is moving at 10 studs per second using the script you premade:
	script.Parent.AssemblyLinearVelocity = script.Parent.CFrame.LookVector*-10
end
That wasn’t my script…
If you look in both of the rail cars in my train I’ve got a VectorForce set to 0,-100,0. The -100 is to provide a bit of downforce to keep the train on the rails I built. If you change the force X value to 5000 or so the train will be guided by the tracks and turn with them.
Try my model out in Test mode.
open up Explorer and look inside each of the car’s children. Select both of them and you’ll see the VectorForce Force is 0,-100,0.
Change the X value to 5000 instead of 0, the train should begin moving. I believe I had it up to 40,000 before the train actually left the tracks, but also that train doesn’t have much mass. If you go into the Model tab in Studio and in the Constraints section click on ‘Show Constraints’ and ‘View on Top’ you’ll see the VectorForce direction as a blue arrow.
If you use a train made up of a lot of Parts leave the main carriage at it’s original Density so the physics of having it attached by Constraints to all the other Parts isn’t affected. But you can make all of the ‘decoration’ Parts Massless.
You can script the VectorForce X values to change for acceleration, deceleration (braking) and staying at a constant velocity.
The vector force of the train is 5000 (x), 0 (y), 0 (z) however it still doesn’t turn. I have attached a gif and some pictures of where I placed the vector force.
The vector force is attached to the base of the first carriage. I plan to weld all the carriages together and use the first one to pull them.
As stated I put the VectorForce in both the carriages.
You can see from the blue arrow in your pictures that the VectorForce X in your case is pointing straight down. Kinda difficult for the train to move with the force pointing that way.
What do you have to keep the train on the tracks? Some kind of parts like I used in my model underneath the rails to keep the wheels from moving up, and another Part between the rails to keep the wheels from moving off the rails sideways?
You have this in the scripting forum, but it seems like every time someone has suggested a way of keeping the train on the tracks you’ve completely ignored the physics of the situation and are assuming the train will ‘follow the tracks’ by itself.
Since your client’s train has bogeys with wheels they shouldn’t be welded to the chassis, they should be on a HingeConstraint to allow the bogey to turn and follow the rails when they turn. Here’s an example of another train I did with bogeys. The center car setup in this version is not a standard one because it was built for someone who needed this setup, but the other bogeys at the end of the train cars have 2 axles and a central hinge on the bogies to allow them to steer with the rails properly.
Sorry I just have little experience in ROBLOX physics. I made this post so that people can help me understand and offer their knowledge so that down the track (pun intended) when someone else makes a similar post to this I can help them. I understand it can be frustrating for you because theres a lot of stuff I’m not understanding.
I downloaded your files and I’m attempting to replicate them with my train and I just wanted to ask what exactly is the point of having the wheel align circles under the wheels? Does the hinge keep the wheels aligned with it?
Also do the hinges on the train wheels have to connect to a specific spot on the train base (eg directly above the wheel or centre of base)?
And what exactly is keeping the wheels from falling off the train itself? Is it the hinge constraint that prevents that?
The wheels in this train are connected to each other through a cylinder and removing that cylinder is out of the question as it is a mesh part, so would I only need to weld one side?
Thank you for helping, I really appreciate it. Your replies have helped me achieve something I would have no idea how to do if you asked me to make this same project 1 week ago.
No worries.
The AlignWheels are there to keep the train from sliding off the track. In a real train the flanges on the inside of the wheels does that, but it isn’t enough for Roblox. Those red wheels keep the axles centered above the tracks so the train doesn’t derail.
HingeConstraints are just that, hinges. Think of what attaches a door to the wall IRL, it’s usually a group of hinges to spread the load over a support, but in Roblox you can use 1 HingeConstraint to do that for you.
Each Attachment of a HingeConstraint has to align with the other Attachment. The picture above would have the axle assembly (which could be one entire MeshPart on its own) try to move up along the red line to align the Attachments.
Hinges can be Attached anywhere as long as they are in the right direction. I find it’s best to put both Attachments at the center of where the load is going to be, so in your case at the middle of the axle/wheel assembly.
From the looks of your picture above you should also put both those Axles on a bogey which is pivoted to the train car vertically, like my second train example. If you set the VectorForce at about 4000 you can watch how the entire system works with the track I made by using Play mode and moving the camera to follow the train around the track, Watch the wheels/bogeys as they rotate to align around the corners. The track is very basic so the angles are 10 degrees which showcases how this setup keeps the wheels on the rails.
The VectorForce of my train is equal to 150000, 0, 100000 and it can move forward now however it still cannot do corners and instead keeps going forward. Would this be because I don’t have enough “downward” force?
Why do you have 2 large values?
I said put a small force downward (I used -100 on the Y axis because that’s how my VectorForce is aligned) and only 1 of the X or Z axis. You’re trying to push the train in the forward or reverse direction which is shown by the blue arrow of the VectorForce.
If you have a Force pushing the train by 150000 in the X axis and 100000 in the Z axis one of them is trying to derail the train.
As far as following the curves did you add the red wheels between the rails to make it curve and the ball underneath the baseplate to keep the train on the track instead of lifting up off it?
I’ve fixed up my train. I’m not sure if I’ve done it right. It still doesn’t turn properly but that could be because of the track being too sharp for the size of the train.