Plugin Tutorial made as of 02/07/2023, if you are reading this a million years in the future, this may not be accurate ![]()
Note: Some basic scripting knowledge may be required, but i’ll try to explain everything!
(Thanks for reading in advance)
Introduction
Plugins. Most of us use them. They’re little tools and gizmos that help us out with our everyday life. You want to animate? Moon Animator 2’s got you covered. You want to design UI? Well you got UI Tools to do that. The question is, have you ever wanted to make your own plugin? A plugin that automates your development? Once you get into Plugin development, you can do just that.
Part 1 - Plugin type - 🤔
Personally, I would say there are 2 types of Plugins, Static Plugins, and Non - Static Plugins.
Static Plugins do not have a User Interface, but may have a button to be activated. They primarily run in the background of your game. For example, when your run your game, it does something such as automated lighting setting, etc. These may only run once, or may run constantly. These aren’t very common and are only used for personal use.
Non - Static Plugins do have a User Interface usually, with buttons. Each button has an action, and the plugin is usually activated through the Plugins tab in studio. Some plugins may start up automatically, but Non - Static Plugins require User Input for the functionality.
Overview
Overall, Static plugins are used for personal systems, such as a custom studio template or custom script presets, and Non - Static plugins are used for more interactive plugins, and they are way more common.
For this tutorial we will be making a Non - Static plugin.
Part 2 - Setting up your plugin workspace environment - 🌍
Now, you need to setup your Plugin Environment. Here, i will not use Rojo, however if you wish, you may try to follow along.
For development, i would say you have 2 choices. Either use VS Code, or the in - built ROBLOX editor. Again, for this tutorial, i will be using the ROBLOX editor.
VS Code Roblox Tip
Whilst using VS Code, i recommend using this extension!
If you haven’t already, create a new place in ROBLOX Studio. This can be done by navigating to New in the ROBLOX Studio Start-up menu. Then, follow to create an empty ‘Baseplate’ Project.

In the Workspace, and remove “SpawnLocation” and “Baseplate”.

Scroll down to ServerScriptService (Or ServerStorage) and create a Folder for your Plugin, preferably named after your plugin.
![]()
This is just a personal preference, however I usually create 3 other Folders too.

Overview
You have managed to setup your Plugin workspace Environment, now it’s time to gets scripting ![]()
Part 3 - Scripting a simple Plugin - 🔌
Now that you have setup your plugin environment, Open up your main folder, and make a script named “Server”. This will serve as our Main script. We will be making a plugin that Spawns A Part.

Now in the script, we are going define some variables. Variables can be defined using the ‘Local’ keyword. Name each object in your Plugin appropriately.

Now, using the ‘plugin’ keyword, lets start creating our plugin. First of all, we need a Plugin Toolbar. A plugin toolbar may consist of numerous buttons, or even one. This is what will allow the Button to be seen.

To create a Toolbar, we use the :CreateToolbar() method, which works like this:
![]()
It has one argument which is a string, which is the name of your toolbar.
Now it is time to create your button. To create a plugin button, we use the CreateButton() method. An example of this is:
- Button Name is the name of the button. (String)
- Button Tooltip is shown when your mouse hovers over the button. (String)
- ID is the image ID of your button, (e.g rbxassetid://9087232887) (String)
- Toolbar is which toolbar it is in. (PluginToolbar)
If you would like the button to be clickable when the viewport is not visible (the main window), you should also add the following line:
Now, we need to add functionality to your button. Create a new function.

This code will be ran when the button is clicked. In this case, we are making a ‘Part Spawner’ plugin, so use Instance.new() to create the part.

Anchor our part…

We’re nearly there! Now we just need to make it so when the Button is clicked, the function is called.

Close the script, and Right click on the main folder, and select Save as local plugin.


Click, save, and go to your plugins tab in studio.

Your plugin should now appear in your Plugins Tab.
Now click the button, A part appears!

Overview
You have created a simple Plugin that creates a part! Well done : )
Part 4 - DockWidgetGuis - 🪟
Now that you have learnt the basis of Plugin development, we are going to create a DockWidget, which is a Studio window, that we can put UI elements into.
Firstly, setup your environment like so.

Start your plugin script like this, so this creates a Toolbar.
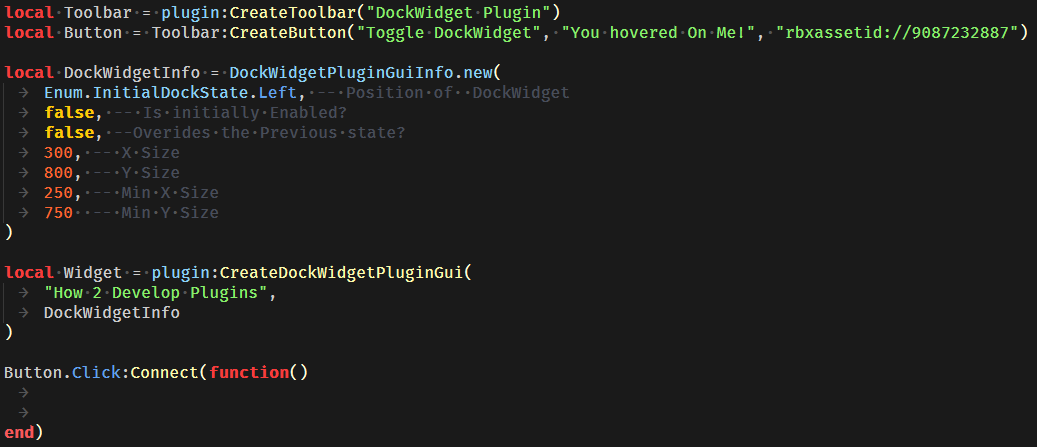
Dockwidgets can be made like this, using DockWidgetPluginGui.new().

Now that we have the info, let’s create the Widget by using CreateDockWidgetPluginGui(). This can be done like this:

Now, we can make a function that will run when Clicked.

Your code should look something like this:
To give a title, (Name), use the following line:
![]()

Now, when the Button is clicked, let’s make it so the Widget is toggled.

The keyword Not reverses a boolean, and since Enabled is a boolean (a true or false value), we can toggle it like that.
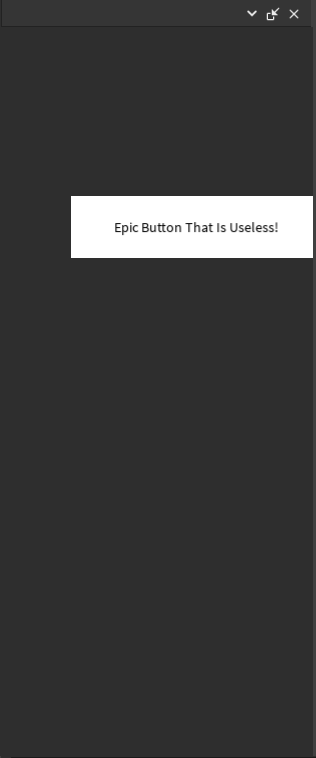
Saving this plugin and running it, we have successfully created a DockWidget!

But how do we put Gui inside of it? ![]()
Create an Assets folder in your plugin Environment.

Create a quick Gui, and place it in that folder. (It can’t be a ScreenGui).
Make sure the Gui is the same size as Your DockWidgetGui!
Now in your script, all you have to do is reference your Gui, and parent it to the Widget:

Save and reload your Plugin, and now you’ve got a Gui!
Now your plugin will have a Title.
Scripts can be placed within the UI, allowing you to create useful plugins that do things!
Part 5 - Publishing Your Plugin - 📢
When you feel like you’ve made a good plugin that achieves something you feel hasn’t been done yet (I must warn you nearly everything has been done ![]() ), you are ready to publish your plugin. Right click the environment and click Publish As Plugin.
), you are ready to publish your plugin. Right click the environment and click Publish As Plugin.

Now fill in some info about the plugin.
Make sure to enable Distribute on Marketplace!


Part 6 - Open Sourcing Your Plugin - 🌌
Now that you have Published your plugin, you could possibly open source it and show it on the Developer Forum.
Firstly, Go to Github. If you haven’t already, create an account. Create a new Repository.
![]()
Make sure to make it public!

I also recommend adding a ReadMe file, and a lisence.

Now, you can upload your Files onto Github!

If you want to go even further, you can even publish a post on the Developer forum in #resources:community-resources!
Part 7 - Updating and listening to the Community - 👂
If your plugin becomes popular, you probably should start updating it and fixing bugs!
You may not want to, but the community (basically your client) will ask for features. As it is your plugin and you decide where you want it to go, you could completely ignore them, but if the Plugin is made for the community mostly, i would listen to them ![]()
Conclusion
This is just the basics of Plugin Making. There are many other things to cover such as saving data, etc. If you would like me to create a more advanced version, Vote in the poll below. If you’ve found ANY spelling mistakes, please tell me! If i’ve got anything wrong, or you need help with anything, PM me or reply to this post. Thank you for reading, Bye ![]()
------------------------------------------------------------------------------------------
- Make a more advanced version!
- I’ll stick with the Basics for now!
0 voters
