Hello fellow Robloxians! Today I will be showing you a simple and easy to follow tutorial on how to model a simple low poly house!
For this tutorial you will need:
- Basic knowledge of blender
- Basic knowledge of shortcuts
Sooo let’s get started on the model!
Step 1: Choosing your palette
- Prepare a colour palette for your model. It is actually easy, open any editing software, choose an image size, pick the colours you want and use the square tool and then put your colours next to each others! (For the blue I added some white stripes to make it look like reflections.)

*Step 2: The Modeling
- Open up blender, select the default cube then press TAB to open up edit mode.

- Then scale the cube to your liking by pressing S (You can also use a robloxian for scale!)

- After you have done that, press CTRL + R to create a loop cut, then press 4 on your keyboard. You should have 4 loop cuts ready. Then left click and immediatly right click after that. The loopcuts should be in the middle now.

- First select those edges and then press S and scale them down.

- Then select the other edges and make them smaller than the other ones.

Congrats! We’re getting there!
- Now to make the model look more smooth, Click on the “smooth” button on the toolbox. If you do not have a toolbox do not worry! Press T then it will appear. After that click on the auto smooth button as such.

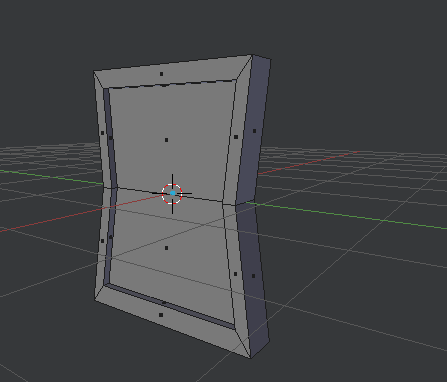
- Now go into edit mode, select the edges then click on CTRL + B to bevel the edges. Scroll up once then move your mouse to scale the bevel into your liking.

- You can also mess with the auto smooth settings to modify the smoothness (If that’s a word). I put it on 20 but you can put it at any value.

- Then select the top part of the model and press SHIFT + S and press CURSOR TO SELECTED.

- After that unselect the model, press Shift + A and then add a cube.

- Enable snap to element and change the element to “Faces” so this way if you move the cube by pressing G then Z and hovering your mouse down, it will automatically snap into the face. Left click when the cube snaps to the top.

- You can now disable the snap element.
![]()
- Then scale the cube to the X axis and Y axis until you are satisfied with the proportions.

- Go onto edit mode and make your roof. I have already made mine but there are so many ways to customize your roof but only choose the ones that you are satisfied with.

- It is time to make the windows! First open a new layer then SHIFT + S and select cursor to center then add a cube.

- Make the cube thinner by scaling it on the X axis and taller by scaling it on the Z axis.

- Now go to edit mode, make a single loop cut by clicking on CTRL + R and placing the loop cut in the middle. Then scale the loop cut on the Y axis until you are satisfied.

- Now go select the faces on the front, press E, right click and then scale the new faces inward and then press E again and insert the faces inside the model.
- Then add another loopcut thats cuts through the first loop cut we made and then scale the loop cut on the Z axis.

- There are many ways to make your window! Here are some examples:

- Then copy (CTRL + C) the window you would like to use then go on the first layer and paste the window (CTRL + V) and start filling your house with windows!

Our house is taking shape, we are almost there!
- It is time to make the front door, follow my previous steps and make your door. (Tip: Make tons of curves for a more cartoonish style)

Aaaaand, Voila!
We are now over with the modeling part of this tutorial, so now we are moving to the texturing part! (You can always add fillers to your home and decorate it more)
Step 3: The Texturing
- First, Have an extra window for the UV unwrapping. You can do this by clicking and dragging this button. Then click on the icon and click “UV/Image editor”


- Click on the import image button and then locate your texture file and insert it.

- Click on the main house model then add a new material then click on the dot and replace it with “Image Texture” then insert your image. (Do it with every other part of the house too and also rename your materials so you can reuse them later.)


- Now go onto edit mode, press A to select the entire house then click on W and then “unwrap”

“What is this weird thing on the UV screen?” you may ask. It is very simple, hover your mouse to the UV screen then press A to select everything. Now scale the UV and press G and grab it to the desired texture colour.

Congratulations! Now this part is red. (Go onto texture mode to see it)

- I have done the same thing with the roof.

“Wait, how did you put 2 different colours on the same model?” you may probably ask. It is very simple, go onto edit mode, select what you want to be another colour, then place it into the desired colour. (I have a mirror modifier already to cut work time by half.)

- Do the same with the rest and then VOILA! Your nice and stylish cartoony house is now done! All you have to do is import the house into roblox and upload the texture as a decal!
Final Result
Your house now looks awesome! (I scaled the house a bit)

I hope you found my tutorial helpful and now be able to create your own beautiful home! Thank you all for reading through my tutorial!
English is not my native tongue so I am trying to be as understandable and straightfoward as possible.
Make sure to leave your feedback in the replies and possibly show me what you have done with the tutorial!