+---+ TOWER DEFENSE GUIDE +---+
As stated in the title, this resource will aid the readers with developing their games focused on tower defense. This tutorial will cover the fundamentals of a classic tower defense game. From tower placements, as well as the upgrading system, this material will definitely benefit readers. Let’s begin.
CONTENTS
This resource will cover the following:
-
Path & Spawning System ←
-
Tower Placement, Functionality & Upgrades
-
Wave Implementation
-
Lobbies & Matchmaking
-
Effects??? (Still undecided)
PATH & SPAWNING SYSTEM
- To start of, let us create a rig for the enemies that will spawn, as well as a simple path for them to walk on.
Here is a sample enemy rig that we will use:

And here is a sample path for the enemies to walk on:

- Now that that’s done, we’ll move on to the actual path positions that the enemies will be moving to. To get started, place 1x1 parts on the starting and ending point of the path, as well as on every intersection of the paths you’ve made. You can place the parts 1 stud above. Like so:

Also, make sure that the 1x1 parts are facing the parts before them. It will come in handy later. Like this:

To achieve this, open up CustomizeQuickAccessToolbar, which is the arrow bar before the Home tab, then click Customize, search Show Orientation Indicator and then click Add. Once added in, click on each of the 1x1 parts and rotate them to the desired rotation, which you can easily do using Ctrl + R.
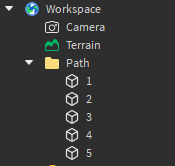
- After that, rename all the 1x1 parts in numerical order depending on which 1x1 part you want the path to start. Place them in a folder in the
Workspacenamed “Path”
- Lastly, place the enemy model inside a folder named “Enemies” located inside the
ReplicatedStorage

Now we move on the the scripting part of the path system. First of, create a module script inside the ServerScriptService and name it EnemyHandler. This is the script for the EnemyHandler module. This code contains a function named Spawn that will take in two parameters. EnemyName which is the name of the enemy model to spawn, and SpawnCFrame which is the CFrame that the enemy model would be positioned after spawning. The function checks whether the first parameter, EnemyName, is a valid and existing model inside the Enemies folder, and not a nil and nonexistent object. Then if it passes through the if-statement, the enemy model would be cloned and shall be positioned based on the SpawnCFrame parameter.
Additionally, once cloned, another function would run. This is the Init_Scripts function. This function takes in a parameter named EnemyModel and first checks if the parameter passed is existent. If it passes, it loops through a folder inside the module named EnemyScripts, and it checks whether the object it has found is a script. If it is a script, it clones it, enables it, and places it into the enemy model.
local EnemyHandler = {}

local Enemies = game.ServerStorage:WaitForChild("Enemies")

local function Init_Scripts(EnemyModel:Model)
	if EnemyModel then
		for _,item in script:WaitForChild("EnemyScripts"):GetChildren() do
			if item:IsA("Script") then
				local clone = item:Clone()
				clone.Parent = EnemyModel
				clone.Enabled = true
			end
		end
	end
end

function EnemyHandler.Spawn(EnemyName:string, SpawnCFrame:CFrame)
	if Enemies:FindFirstChild(EnemyName) then
		local EnemyClone = Enemies:FindFirstChild(EnemyName):Clone()
		EnemyClone:SetPrimaryPartCFrame(SpawnCFrame)
		Init_Scripts(EnemyClone)
		EnemyClone.Parent = workspace
	end
end

return EnemyHandler
Now let’s get to the folder inside the module, specifically the EnemyScripts folder. But first, go ahead to your enemy model and put in an ObjectValue named TargetWaypoint, as well as an Animation object named Walk. You may choose to insert an AnimationId into the Animation object now, or leave it blank.
Now, create a folder named, you guessed it, EnemyScripts inside the module. Then, create 2 scripts with the first one being named Move and the other one being named Animations.
The Move script handles the enemy’s movement through the pathways. It has a function named MoveToWaypoint which is the function that actually moves the enemy. It uses the built-in Humanoid function called MoveTo, which takes in a Position and moves the enemy to that specified position. Then, the function has a MoveToFinished event, which is also built-in into the Humanoid. This MoveToFinished event runs whenever the Humanoid has successfully reached the target position within 8 seconds. If it succeeds, it returns true, and false if not. If the function detects that it got true, it would disconnect the event and move on to the next waypoint. If not, then the function would return the same MoveToWaypoint function in order for the Humanoid to successfully reach the target position. Then the script has a for loop that loops through the path waypoints and runs the MoveToWaypoint function on each iteration on each path.
local Path = workspace:WaitForChild("Path")

local TargetWaypoint = script.Parent:WaitForChild("TargetWaypoint")
local Humanoid = script.Parent:WaitForChild("Humanoid")

local ReachedCurrentWaypoint = false

local Finished = nil

local function MoveToWaypoint(point)
	Humanoid:MoveTo(point)
	Finished = Humanoid.MoveToFinished:Connect(function(reached)
		print(reached)
		if reached == false then
			Finished:Disconnect()
			return MoveToWaypoint(point)
		else
			Finished:Disconnect()
			ReachedCurrentWaypoint = true
			return
		end
	end)
end

for i=2,#Path:GetChildren(),1 do
	ReachedCurrentWaypoint = false

	local CurrentPath = Path:FindFirstChild(tostring(i))
	TargetWaypoint = CurrentPath
	local DesiredPosition = (CurrentPath.CFrame * CFrame.new(0,0,1)).Position

	MoveToWaypoint(DesiredPosition)

	repeat task.wait() until ReachedCurrentWaypoint == true
end
Lastly, the Animations script basically just plays and loops the Walk animation it found within the enemy model. You may change the number between the parenthesis on the Play() so that the animation speed matches the enemy’s walking speed.
local Humanoid = script.Parent:WaitForChild("Humanoid")
local WalkAnimation = Humanoid:WaitForChild("Animator"):LoadAnimation(script.Parent:WaitForChild("Walk"))

WalkAnimation:Play(1) --// Change this value to match the enemy's walk speed
WalkAnimation.Looped = true
TESTING
We can test the system we’ve made by creating a Script inside ServerScriptService. You could name it to anything you want since it will only be used for testing. The script requires the EnemyModule that we’ve scripted and it uses it to run the Spawn function for every iteration of the for loop. You can also see that we used the first 1x1 part as the spawn position of the enemies. You may change the value of the NumberOfEnemyToSpawn as well as the value of the SpawnDelay. Note that the SpawnDelay is in seconds.
local EnemyHandler = require(script.Parent:WaitForChild("EnemyHandler"))
local Path = workspace:WaitForChild("Path"):GetChildren()
local NumberOfEnemyToSpawn = 5
local SpawnDelay = .75

task.wait(5)

for i=1,NumberOfEnemyToSpawn do
	EnemyHandler.Spawn("Enemy", Path[1].CFrame)
	task.wait(SpawnDelay)
end
VIDEO TEST
REFERENCES & DOCUMENTATION