Any way to convert a Roblox Studio model into a Mesh?

Hello devs, I was curious if there was any way I could convert a model I made in Roblox Studio into a mesh?

I ask because I am attempting to submit a creation I made to a game developer to have it added into the game, but it has to be a mesh, and I don’t have the time nor the blender skills to recreate it in blender.

4 Likes

Ok, so this is the way I convert my models to meshes:
So I right click the model I want to export, then I go down towards the bottom of the menu that just popped up and I select “Export Selection” Next, I select the destination on the computer I want to put the model in (I usually put exported models in my documents with a folder called “Exported”). Make sure to name it!

Then I open up Blender (the software). On the pop-up menu when you first open it, I select “General” which is under the “New File” category. Once you opened it up, go to the top left of you screen, click “File”, select “Import” and then select in the sub-menu “Wavefront (obj.)” Then find where you put your exported model on your computer. Select it and double click to insert it.

Now, the model won’t show up at the origin (0,0,0) (unless you exported you model from Roblox Studio at the position 0,0,0) so to get it to the middle, deselect your imported model, then select it again and right click, go to “Set Origin” and then select “Geometry to Origin”
Now there are plenty of videos on how to import and export the models from blender to Roblox studio, so if you didn’t understand what I said, you could look it up!

Hope this helps!

6 Likes

There is a plugin that does this:

Hi there Thorize! In order to do this, you must import your parts into a modeling software, merge them all into one object, export from the modeling software and reimport into Roblox. This gets complicated w/ textures, but I will sum it up in a bullet point step by step:

Step by step process:

  • Select everything you wish to import into Blender (to merge into one mesh).
  • Export from Roblox.
  • Import into 3d modeling software.
  • Select all objects you wish to merge into one.
  • Merge your objects. If using blender, this will be the shortcut Ctrl + J.
  • In blender, under Object > Set Origin select Origin to 3d Cursor. Note: Your cursor must be at 0,0,0 in order to work properly. You can reset the cursor by using the hotkey Shift + C.
  • You now want to set your pivot point at the object’s center as well as the world’s center. To do this, under Object > Set Origin, select Geomery to Origin. You should now see your 3d mesh object at 0,0,0.
  • This bullet point is not required. I like to make my mesh optimized before importing into studio. You can either use the decimate modifier, limited dissolve, or both. This will mess with you UV maps, so you will either have to UV map after this process or skip it altogether if you find its not necessary.
  • Export from Blender by selecting your Mesh Object, going to File > Export, and hitting Export. You can either export as an OBJ or FBX. I recommend OBJ to keep the scale of your object smaller with less steps, but you can adjust the scale of your FBX import as well. Either works! I recommend staying organized and having a dedicated folder for your project as well, so it is easier to find (both now and later down the line if you decide to go back to this project).
  • Use the asset manager or new Roblox Import tool to import your mesh object.
  • Done!

When it comes to maintaining the texture on your object, that is something that would have to be done after setting your object to the 0,0,0 point and within Blender itself. My recommendation is keeping it all one texture file on the mesh object itself for optimization reasons (or not using the texture file at all, also for performance reasons). What I would do (if it is simle smooth plastic w/ color differences):

  1. Create a 512x512 color map containing all color shades you were using. Import this into Blender and apply it to your mesh object as a material.
  2. Move individual UV islands to specific sections of your UV map to color them properly.
  3. Done! It will import with your mesh object if you use the new Importer.

You can also use Vertex Painting, which is a more optimized method than using a texture file. This leads to less accurate ways of painting your model, but may be worth considering if your object is smooth plastic, straightforward and simple.

I hope this helps!

I would leave it as a model w/ different parts inside (when exporting from studio into your modeling software)

There’s already a lot of good replies here, but I just want to add that Roblox is really weird with materials and verts in Blender.

Here’s 3 things I always have to do once I export something out of Roblox.

Merging Split Verts
Select the object once it’s in Blender
Go into edit mode
Vert Select
Select everything
Press M to merge, merge by distance

Merging verts fixes small cracks you may see on your mesh.

Fixing the weird lighting
example,

Select the object stay in object mode
on the right panel click the green triangle(object data properties)
click Geometry Data
Clear Custom Split Normals

I made a guide on how to fix lighting if you need help here,

Separating materials into different object groups
Go into edit mode of the object
face mode
select everything
right click anything
separate > by material

I personally cannot get Roblox’s materials that are automatically exported to work properly in blender, so I clear them manually and just replace them with custom materials.

Does your object contain more than one color/material?
If so separate the material as I described above and when exporting as a LEGACY OBJ select the following,
image
Once you get the obj file import it into Roblox and it’ll split it into different individual meshes based on the object groups.

If your object was split correctly, it’ll look something like this when bulk importing.
image

Once every object group finishes importing select all of the meshes that appear in your asset manager, right click, and insert with location.

If materials or colors don’t work on your meshes after importing, you may need to clear the Texture ID field on the mesh properties.

If you have any other questions feel free to ask. I have a lot of experience in optimizing Roblox made models in Blender.

Is there any way to have texture on it without doing all that stuff at the bottom?

All depends on how complex your texture is. If you can get away with one color/roblox material you do not have to worry about it, but if it is several you can do the following:

  1. Upload as separate meshes and color them the way you had them colored in studio.
  2. Create a texture image file, UV map your object in your 3d modeling software, and upload into Roblox.
  3. Vertex Color

In terms of what is most performant, number 3 would be the top, with 2 following and 1 coming in last. I would recommend that if you are going to be building on the platform for other companies, it is important to learn how to texture your objects properly. It is also a good skill to have for any of your portfolio work and anything you create off-platform. :slight_smile:

If you have a complex model in mind, once you learn how to use Blender it’s way more time efficient and will give you a much more customizable result if you build it from scratch with Blender tools rather than using Roblox to make meshes.

If you don’t want to learn Blender, you can use the “Export Selection” after right clicking your model then import it with the Asset Manager. You can use this plugin alongside the Studio exporter to retain your color/material groups. Though, this might not be what you’re looking for since this method won’t end with a single mesh. The plugin will sort the models into groups so they can be exported and reimported as separate meshes. This is basically the same solution @okayendo gave but using a plugin to group the objects rather than splitting them in blender. You may end up needing to use blender if there is weird geometry that needs to be cleaned up or if you have to reduce the triangle count before importing it back into Studio. If you are working with models with extreme details, it’s only going to increase your triangle count. (Again, it’s a lot easier to fix meshes made within blender rather than fix up exports from Studio)

With this method you can clear the mesh textures and use custom materials/colors from Studio if you want to change it’s appearance down the line. It’s a lot easier and more adaptable to create a texture through the Material Manager for general mesh use rather than mapping textures specific to each mesh, in my opinion.

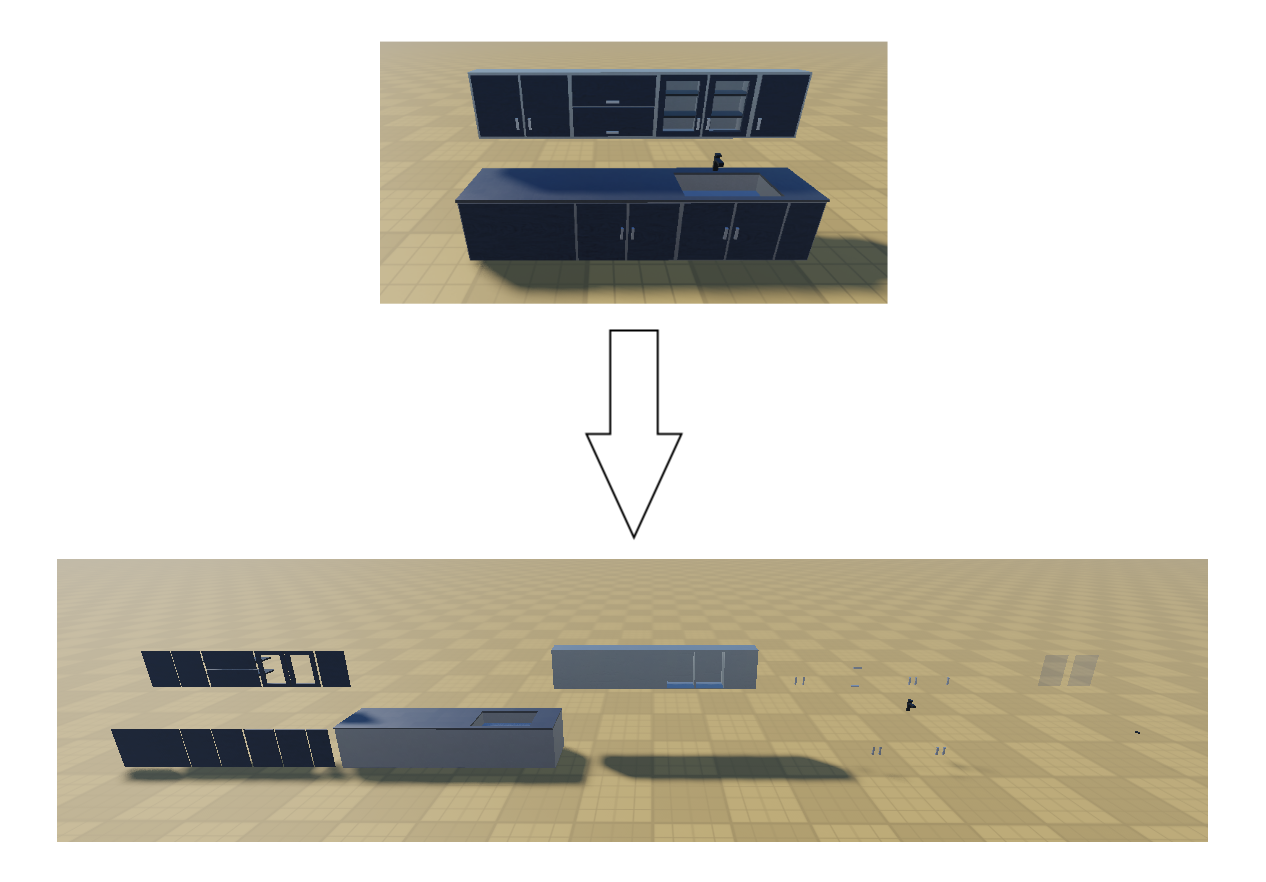
This is how a model would look separated:

Sorting and Exporting a Model:

After Importing Each Mesh:

Screenshot_4097
Make sure “Import file as a Single Mesh” is checked when importing, otherwise the import tool can sometimes recognize the .obj as multiple splits if you didn’t group them in Blender and you can accidentally end up importing every part as an individual mesh.

1 Like