The problem
Players use a variety of input types, including keyboard & mouse, gamepads, and touch. Sometimes we need to change how our game looks so that it matches up with what input the player is providing. For example, we want to show keyboard controls for players using a keyboard, and we want to show gamepad controls for players using a gamepad.
The particular input type a player is providing does not always correspond with the expected device that they are playing on. For example, a PC player might be using a gamepad or even a touch screen monitor. Because of this it is important to check the actual input type the player is providing, rather than what device they are on.
Lastly, the input type a player is providing might change during the game. For example, a PC player who starts playing your game using their keyboard and mouse might plug in a gamepad and start using that instead.
In this tutorial
In this tutorial, I will help you create and program a UI in a way that solves the aforementioned problems; Input types may differ and change during gameplay. This tutorial will not go over detecting device types. To follow along you are expected to know how to make UIs in Roblox and how to do programming at an intermediate level.
The method applied in this tutorial is to make your UI in such a way that you can simply set the visibility of certain UI elements to true or false to adjust it to the player’s current input peripherals. We will be writing two scripts: Our first script will detect what input type the player is using, and it will also detect when this changes. Our second script will use this information to update our UI to reflect the current input type, both at the start of the game when the player joins, and whenever the input type changes during the game (e.g. a PC player switching from keyboard to gamepad).
Detecting the input peripheral
Let’s start with our first script which will detect your type of input and any input type changes. We will need a LocalScript for this, which we will call DisplayLayoutHandler. Let’s also add a BindableEvent inside of it called LayoutChanging and a BindableFunction called GetLayout. Put your LocalScript in StarterPlayerScripts. Your StarterPlayerScripts should now look like this:

The LayoutChanging BindableEvent will be broadcasting a signal whenever the user switches peripherals that require changes in the UI display. GetLayout will be returning the current type of input.
Now, let’s fill in the LocalScript. Here follows the full code that we will be using:
------------------------[[ = VARIABLES = ]]------------------------

local UIS = game:GetService("UserInputService")
local currentInputLayout = "Unidentified"


------------------------[[ = INPUT IDENTIFIERS = ]]------------------------

if UIS.MouseEnabled then
	currentInputLayout = "MouseKeyboard"
elseif #UIS:GetConnectedGamepads() > 0 then
	currentInputLayout = "Gamepad"
else
	currentInputLayout = "Touch"
end

UIS.LastInputTypeChanged:Connect(
	function(UIT)
		local previousLayout = currentInputLayout
		if string.find(UIT.Name, "Gamepad") ~= nil then
			currentInputLayout = "Gamepad"
		elseif UIT.Name == "Keyboard" or string.find(UIT.Name, "Mouse") ~= nil then
			currentInputLayout = "MouseKeyboard"
		elseif UIT.Name == "Touch" then
			currentInputLayout = "Touch"
		end
		if currentInputLayout ~= previousLayout then
			script.LayoutChanging:Fire(currentInputLayout, previousLayout)
		end
	end
)


------------------------[[ = API = ]]------------------------

script.GetLayout.OnInvoke = function()
	while currentInputLayout == "Unidentified" do -- wait in case this script has not yet been initialized!
		game:GetService("RunService").Heartbeat:Wait()
	end
	return currentInputLayout
end
At the beginning of the INPUT IDENTIFIERS header we have a couple if-statements to check which peripherals are connected
- If a mouse is connected we can assume that the player is playing with a mouse and keyboard.
- If that’s not the case but a gamepad is connected, we can assume that the player is using a gamepad.
- Otherwise, chances are the user is relying on touch inputs for controls.
We save the currently detected input peripheral in the variable currentInputLayout and update it during runtime when the user switches peripherals. To detect this change we listen to the UserInputService’s LastInputTypeChanged event. Whenever that event is triggered we will check if the new input type if of another input scheme, which we do by checking the name of the new input type for specific strings. If so, we update our variable and fire the LayoutChanging BindableEvent. That way we can broadcast this detected change to other scripts as well!
Finally, we program our GetLayout BindableFunction to return the currently detected peripherals, in case other scripts do not have the time to wait for a change in input type.
Initializing the UI
For the UI the idea is to create tags for the different peripherals the user might use. Then, we will assign those labels to different UI elements which should only be shown for specific peripherals! So when the user switches peripherals, we will hide the UI elements corresponding to the old input type and we will show the UI elements corresponding to the new input type. For this tutorial I have created 3 different tags, called GamepadUI, MouseKeyboardUI and TouchUI. I have also created a simple example UI that looks as follows:

The structure as seen in the explorer will look like this:
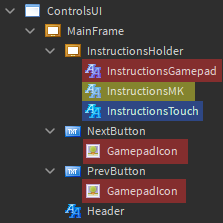
The model can be found here. Feel free to use it to follow along, or make your own!
The elements highlighted in red have the tag GamepadUI attached to them. Yellow has MouseKeyboardUI attached and blue has TouchUI assigned. Note that the example UI has the visibility all of those highlighted elements set to false. This will make programming easier in a bit. Here is what the UI looks like if we were to toggle the visibility of the different highlight colors individually, in the order red, yellow, blue:

Notice how the left UI has two extra images (called GamepadIcon in the picture of the explorer) and each UI has different instruction labels. The next step is to automatically toggle the visibility of those UI elements by using the DisplayLayoutHandler LocalScript we wrote earlier.
Automatically updating the UI
Now that we have a way to identify input type changes and we have a UI, it is time to write the code to actually update the UI. Let’s add a LocalScript to the ControlsUI object (the ScreenGui) and call it Display. We will be adding the following code to this LocalScript:
------------------------[[ = VARIABLES = ]]------------------------

local Collection = game:GetService("CollectionService")
local DisplayLayoutHandler = game.Players.LocalPlayer.PlayerScripts:WaitForChild("DisplayLayoutHandler")

-- a dictionary with as keys the layout as returned by DisplayLayoutHandler
-- and as value the name of the CollectionService tag corresponding to that layout
local LayoutToTag = {
	["MouseKeyboard"] = "MouseKeyboardUI",
	["Touch"] = "TouchUI",
	["Gamepad"] = "GamepadUI"
}


------------------------[[ = INITIALIZATION = ]]------------------------

local inputLayout = DisplayLayoutHandler.GetLayout:Invoke() -- get the current type of inputs to display in the UI
local tagFromLayout = LayoutToTag[inputLayout] -- get the name of the tags that need to be shown

-- then, show those UI elements!
local uiToToggle = Collection:GetTagged(tagFromLayout)
for i = 1, #uiToToggle do
	uiToToggle[i].Visible = true
end


------------------------[[ = UI UPDATE EVENT = ]]------------------------

DisplayLayoutHandler.LayoutChanging.Event:Connect(
	function(currentInputLayout, previousLayout) -- when your input peripheral changes, update the UI to the right layout!
		-- hide the previously shown labels
		tagFromLayout = LayoutToTag[previousLayout]
		local uiToHide = Collection:GetTagged(tagFromLayout)
		for j = 1, #uiToHide do
			uiToHide[j].Visible = false
		end

		-- show the right, new labels
		tagFromLayout = LayoutToTag[currentInputLayout]
		local uiToShow = Collection:GetTagged(tagFromLayout)
		for k = 1, #uiToShow do
			uiToShow[k].Visible = true
		end
	end
)
We have 3 variables defined at the top.
- Collection which is a shorthand for the CollectionService that we will need to find objects with certain tags
- DisplayLayoutHandler which is a reference to the LocalScript we wrote earlier. We will be listening to its BindableEvent called LayoutChanging for input type changes, and we will also read the initial peripheral from it during initialization.
- LayoutToTag which is a dictionary to convert a given input type name from the DisplayLayoutHandler to its corresponding tag, since those have different names!
At the start our UI is not showing any toggleable UI elements, so we will need to detect which UI elements to show. We do this by asking the DisplayLayoutHandler which input type the player is using and then setting the visibility of corresponding UI elements to true. This is what the code under the INITIALIZATION header does.
Just setting the visibility of elements upon initialization is not enough however, because the player can also switch peripherals during gameplay! This is why we connect a function to LayoutChanging’s Event. In that function we read the previous type of input, get the corresponding tag name and hide all of the UI elements with that tag. Then, we read the new type of input, get its corresponding tag name and show all of the UI elements with that tag. And that’s it!
When you run your place file your UI should now automatically update when you change inputs. Here is a quick demonstration of me switching between mouse & keyboard and an XBox controller. Notice how the gamepad buttons appear when I move with my gamepad, but disappear as soon as I move my mouse:

If done correctly, this method will apply to all future UI you create as well as long as you tag your UI elements correctly!
Final Notes
Note that the :GetTagged() method of CollectionService returns objects that are also parented elsewhere! So if you have UI elements elsewhere that are tagged but should not have its visibility updated, make sure to add an extra check to exclude those objects! If you are working with multiple ScreenGui objects, it might also be best to reparent your Display LocalScript elsewhere.
Also a big thanks to @sircfenner, @Mullets_Gavin and @ChipioIndustries for proofreading and helping me revise this tutorial!