IMPORTANT
Some stuff may be in a foreign language, I’ll try to explain it as good as possible. Apologies for the inconvenience.
Hello, everyone! When you hear “GFX” you’re probably thinking of picture editing applications such as Photoshop and modeling apps such as Blender. But is it really required to use one of those advanced apps to make GFX? The answer is no. I discovered an easy way to make GFX which doesn’t require you to install any advanced/paid software in your device!
For this tutorial, you’ll need:
- Roblox Studio
- Windows 10 (sorry macOS users) with the 3D Viewer app being installed (it’s preinstalled on most devices)
You may also need the following plugins:
I don't have the 3D Viewer application installed!
In case, you haven’t installed 3D Viewer, click this link.
Anyways, let’s start now!
Part 1: Preparing the environment
First of all, we must create the environment. Let’s say I will make a GFX for a random obby game. Open Roblox Studio and then choose any Roblox place to edit (preferrably the one you want to make a GFX for).
The environment can be whatever you want. You can build it yourself, or choose some parts that are already made. For now, this is what I made:
yes, it’s trash like me on building
Inserting characters
Another important (but not required) thing is to insert some characters. I have already linked a free character insertion plugin at the beginning of the topic. It will make your GFX feel more alive. In order to insert one, follow these simple steps:
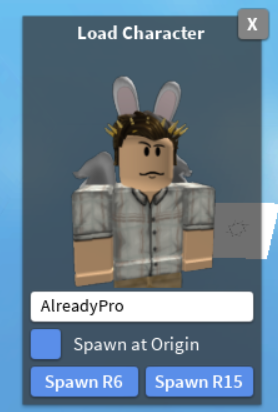
Then, this menu should open:

You may type a username and then choose Spawn R15. Ticking the “Spawn at Origin” box is not required.
Now, I have inserted my avatar. You can move the avatar you inserted around. You can also move, rotate or scale selected parts of the character. It’s also recommended to remove the overhead title by removing the model’s name (you can only do this through the Properties tab).
TIP:
It’s important to choose “Spawn R15” so you have more avatar rigs and you can focus on even more details.
Now, that I am done with the character, this how my place looks like:
Part 2: Exporting the selected environment
After setting up the environment, we have to export it as an .obj file. In order to do this, we select the parts that we want to add in the GFX:
TIP:
In case, you don’t know how to insert a character like mine, please click the dropdown menu above in Part 1.
After we have chosen all those parts, in the Explorer tab, we right-click them, so this menu appears:
Choose Export Selection. After that, this menu should appear (it’s recommended to create a new folder for those, since it’s going to be at least 2 files):
Now, we are done! After saving the files, you may close Studio.
Opening 3D Viewer
Now, you’ll have to go the place you saved those files. After you’ve found it, click the .obj file:
This must open 3D Viewer.
A random app like Blender is opening the file instead!
In case this has happened, click the file once, and then, follow these steps:
The preview hasn’t loaded yet, lol
Once the model has been fully loaded, you may edit the lightning:
You may also add more stuff from the Library 3D.
After you’re done, you should focus somewhere. The camera can be moved like in any other 3D Viewing application (Roblox Studio, Blender, etc.). Once you’ve found the best focusing place, press Ctrl + E or do the following:
Then, the picture preview should appear. You may still be able to move your camera in this window. You have to select a file extension (for example, PNG) and the size and quality (recommended to use HD 1080 (16:9)).
Don’t forget to enable the “Transparent” option, too. Once you’re done, choose Export.
I'm randomly kicked out of the app!
If you’re kicked out of the 3D Viewer application, try killing useless processes via the Task Manager. You may also try closing applications you don’t need to use.
Part 4: Editing the picture
And we are almost done! Now, you have to use some photo editing software. However, you may also use a website for this, such as Pixlr, like I will do!
Now, you have to edit the picture. Choose “Create New”. Then, you can change the size and other stuff. If you want, enable the Background option and choose a color! Choose “Create” once you’re done.
After that, you should see something like this:
Choose this:
Then, select “Image”. Choose your image, and, once you’re done, move it around and size it. This is how my image looks like now:
After that, you may want to add some Text. It could be the title of the game. Follow these steps in case you want to do this:
Then, a new text field will appear. You may edit the text, the color of the text and the position of the text from here:
After that, you more likely are done! We can now save the picture! Follow these steps in order to do this:
The picture should be saved now.
Did you like this tutorial?
I spent at least 1 hour in order to compose this topic. I’d be pretty happy to learn that this helped you get started! Following the steps of this tutorial will help you make profile pictures, thumbnails, game icons, etc. There is only one limit: your imagination. In case you encountered an issue while following those steps, tell me. I tried to make the tutorial as descriptive as possible.
Good luck, anyways and have a nice day!


