Introduction
We’ve all heard of Bezier Curves — Curves defined by several control points linearly interpolating with one another to create a curve shaped by these points. Although these curves are extremely useful, there are some limitations that come along with them. For instance, what if you want create a smooth curve that goes through the control points rather than being shaped by them?
An easy fix to this is to create a smooth enough polynomial that goes through the given control points. Sounds easy enough, right? Well, how exactly do we do this?
The solution is a Catmull-Rom Spline, otherwise known as a Cubic Hermite Spline. This is a curve defined by a polynomial that smoothly passes through given control points. The purpose of this module is to make it easy to create Catmull-Rom Splines, make it easy to calculate points within the created Catmull-Rom splines, and make it easy to tween parts through the curve created by the Catmull-Rom Spline. With this module, it is possible to create things that look like this, for example:
Derivation of the Algorithm
Derivation of the Algorithm
Reference: https://www.cs.cmu.edu/~fp/courses/graphics/asst5/catmullRom.pdf
A basic, smooth polynomial we can make travel through the given points is a cubic polynomial. Cubic polynomials are simple to construct, and they are a polynomial of a degree large enough to have both a maxima and a minima within the same curve, something a quadratic polynomial cannot achieve.
This being said, let’s consider a single Catmull-Rom segment p(t). Suppose it is defined by four control points pᵢ₋₂, pᵢ₋₁, pᵢ, and pᵢ₊₁. We know that this segment will be a cubic polynomial, so we can write this segment in the form:

These Catmull-Rom Segments put together would have an end effect that looks like this:
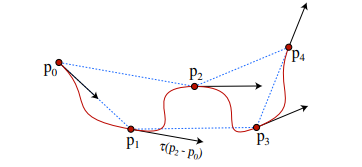
Along with this, we will also have a user-defined constant 𝜏, which represents the tension of the Catmull-Rom segment. The effect of the constant 𝜏 is exemplified in the following image:

Now we can define some constraints for the Catmull-Rom Segment. Let’s take a look at this image:

To connect several Catmull-Rom Segments together and make them continuous and differentiable within every segment where t is a real number in the interval [0, 1], we must make the following constraints:
![]()
![]()
![]()
![]()
We set the derivatives of p(t) at t=0 and t=1 to these values because at these values, the cubic polynomial should be going in the direction of these two vectors at the end and at the beginning of the curve to ensure its smoothness. With these constraints, we can now combine the definition of a cubic polynomial with them.
![]()
![]()
![]()
![]()
You can see that when we take the derivative of the definition of a cubic polynomial, we can apply the constraints we set to get the values of the constants in the cubic polynomial function. Now let’s begin to solve for the constants in the cubic polynomial by getting equations in terms of c₂ and c₃. We can substitute the values for c₀ and c₁ into the other equations to get:
![]()
![]()
Now, by subtracting the two above equations, we can get equations to solve for every constant in the cubic polynomial equation:

With these equations, we can create a basis matrix to calculate a vector for given user input values, but for the algorithm we really only need the constants.
Now what if we want to get equidistant points with an input t in the interval [0, 1]? To do this, we have to approximate the arc length of the cubic polynomial made. It is ideal to calculate the exact arc length by getting a general formula, but this is not yet possible with arbitrary coefficients. An approximation is the best way to go:
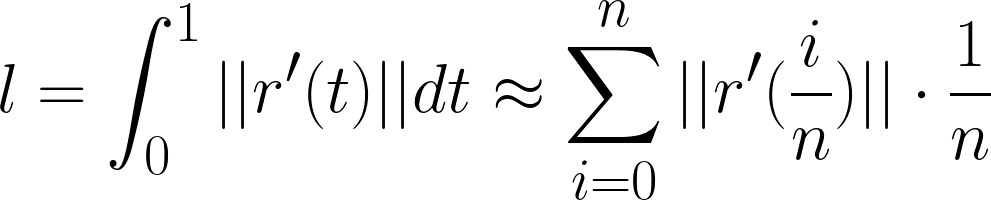
where r in this case is the polynomial function p(t).
Usage
Usage
Don’t worry, I am taking the time to make a github repository and page for the usage of this module, but I haven’t gotten the chance to.
With this module, it’s very easy to create Catmull-Rom Spline objects and calculate points within the created curve. The following is the documentation of the functions and properties of the Catmull-Rom Spline object and constructor.
Constructor
Requiring the module returns a CatmullRomSpline constructor, which has the following functions
local CatmullRomSpline = require(script:WaitForChild("CatmullRomSpline")
CatmullRomSpline.new(points: {number} | {Vector3 | BasePart} | nil, tension: number?): CatmullRomSplineObject
function CatmullRomSpline.new(points, tension)
--// creates a new CatmullRomSpline object, starting with the given points and the given tension
--// 'points' must be a table of numbers, or a table of BaseParts and/or Vector3s
--// if points is nil, this will create a CatmullRomSpline object without points
--// points must be a list of at least 4 points for the CatmullRomSpline object to be able to return a point
--// 'tension' must be a number or nil
--// if tension if nil, the tension will be 0.5 by default
CatmullRomSplineObject Properties
CatmullRomSplineObject.Tension
print(CatmullRomSplineObject.Tension)
--// this is the tension of the CatmullRomSpline segment
--// this property is read only, but can be changed using
--// CatmullRomSplineObject:ChangeTension()
CatmullRomSplineObject.Points
print(CatmullRomSplineObject.Points)
--// this is the table containing the points inside of the segment
--// this property is read only
CatmullRomSplineObject.Length
print(CatmullRomSplineObject.Length)
--// this is the length of the CatmullRomSplineObject and all of its connected splines
--// added together (total length)
--// this property is read only
CatmullRomSplineObject.LengthIndeces
print(CatmullRomSplineObject.LengthIndeces)
--// this is the table that contains the cache of the length iterations of the
--// CatmullRomSplineObject
--// this is updated every time the spline is changed
--// this property is read only
CatmullRomSplineObject.LengthIterations
print(CatmullRomSplineObject.LengthIterations)
--// this is the number of iterations the algorithm will go through to calculate the lenght of the
--// CatmullRomSplineObject
--// the more iterations there are, the more accurate the length of the curve will be
--// this property can be changed
CatmullRomSplineObject.ConnectedSplines
print(CatmullRomSplineObject.ConnectedSplines)
--// this property is a table that contains
--// the splines connected to the CatmullRomSplineObject
--// the length of these splines is added to the total length
CatmullRomSplineObject Functions
The following code creates a CatmullRomSpline object with the points p1, p2, p3 and p4.
local CatmullRomSpline = require(script:WaitForChild("CatmullRomSpline")
local CatmullRomSplineObject = CatmullRomSpline.new({p1, p2, p3, p4}, 0.75)
CatmullRomSplineObject:ChangeTension(tension: number): nil
function CatmullRomSplineObject:ChangeTension(tension)
--// sets the tension of the CatmullRomSpline object to the given tension
--// this is the correct way to set the tension of the CatmullRomSpline object
CatmullRomSplineObject:ChangeAllSplineTensions(tension: number): nil
function CatmullRomSplineObject:ChangeAllSplineTensions(tension)
--// sets the tension of the CatmullRomSpline object and all connected CatmullRomSpline objects
--// to the given tension
--// this is the correct way to set the tension of the entire CatmullRomSpline object
CatmullRomSplineObject:AddPoint(p: number | Vector3 | BasePart, index: number?): nil
function CatmullRomSplineObject:AddPoint(p, index)
--// adds a point to the CatmullRomSpline object
--// if the amount of points is at 4, this function will error
--// will error if not given a vector3 or basepart
--// optional index parameter for including the index where the point will be added in the catmull-rom spline
CatmullRomSplineObject:RemovePoint(index: number): nil
function CatmullRomSplineObject:RemovePoint(index)
--// removes a point from the CatmullRomSpline object at the given index
--// if index is not given, this will error
CatmullRomSplineObject:GetPoints(): {number} | {Vector3 | BasePart}
function CatmullRomSplineObject:GetPoints()
--// returns the points of the catmull-rom spline in number or vector3 form
--// important to use because points given to the CatmullRomSpline object can be
--// numbers, baseparts or Vector3s
CatmullRomSplineObject:ConnectSpline(spline: CatmullRomSplineObject): nil
function CatmullRomSplineObject:ConnectSpline(spline)
--// connects a CatmullRomSpline object to the current CatmullRomSpline object
--// if the given spline does not match the type of points in the main spline object,
--// the splines cannot be connected
--// can only connect splines that are connected to eachother via 3 control points
--// example of connected splines:
--// spline1: {p1, p2, p3, p4} spline2: {p2, p3, p4, p5}
CatmullRomSplineObject:GetSplines(): {CatmullRomSplineObject}
function CatmullRomSplineObject:GetSplines()
--// returns a table with all the splines associated with the current CatmullRomSpline object
--// this table is returned in order
CatmullRomSplineObject:GetSplineAt(t: number): (CatmullRomSplineObject, number)
function CatmullRomSplineObject:GetSplineAt(t)
--// returns the spline associated with the t value
--// when connecting splines, the t value still ranges from 0 to 1, but the splines remain separated
--// this function must return the spline associated with the t value, and a transformed t value associated with the position t in the entire curve
CatmullRomSplineObject:UpdateLength(): nil
function CatmullRomSplineObject:UpdateLength()
--// updates the length and length indeces of the CatmullRomSpline object
--// only works if there are enough points in the CatmullRomSpline object to calculate position and derivative
--// this function does not need to be called, this will be called automatically as the curve
--// is updated
CatmullRomSplineObject:CalculatePositionAt(t: number): Vector3 | number
function CatmullRomSplineObject:CalculatePositionAt(t)
--// this function returns a point within the curve created by the catmull-rom spline as long as t is a number
--// for expected results, try to keep t within the interval [0, 1]
CatmullRomSplineObject:CalculatePositionRelativeToLength(t: number): Vector3 | number
function CatmullRomSplineObject:CalculatePositionRelativeToLength(t)
--// this function returns a point inside the catmull-rom spline as long as t is a number
--// unlike CatmullRomSpline:CalculatePositionAt(), this function is relative to the length of the spline
--// and t acts as the percentage of the length of the spline
--// for expected results, try to keep t within the interval [0, 1]
CatmullRomSplineObject:CalculateDerivativeAt(t: number): Vector3 | number
function CatmullRomSplineObject:CalculateDerivativeAt(t)
--// this function returns the tangent vector of the catmull-rom spline at the point where t is the given number
--// if t is not a number, this function will error
--// for expected results, try to keep t within the interval [0, 1]
CatmullRomSplineObject:CalculateDerivativeRelativeToLength(t: number): Vector3 | number
function CatmullRomSplineObject:CalculateDerivativeRelativeToLength(t)
--// this function returns a tangent vector at the given t the catmull-rom spline as long as t is a number
--// unlike CatmullRomSpline:CalculateDerivativeAt(), this function is relative to the length of the spline
--// and t acts as the percentage of the length of the spline
--// if t is not a number, this function will error
--// for expected results, try to keep t within the interval [0, 1]
CatmullRomSplineObject:CreateTween(instance: Instance, tweenInfo: TweenInfo, propertyTable: {string}, relativeToSplineLength: boolean?): Tween
function CatmullRomSplineObject:CreateTween(instance, tweenInfo, propertyTable, relativeToSplineLength)
--// creates a tween for the given instance in the given property
--// this function will error if the given property is not a numerical value of some sort that can be tweened
--// this function has an optional relativeToSplineLength argument that judges whether the tween
--// should tween relative to the Catmull-Rom spline's length, or just as t goes from 0 to 1.
--// the propertyTable should be a table containing strings
--// for example: {"CFrame"} or {"Position"}
Examples
Examples
Let’s start with an extremely basic case. Let’s say we have 4 BaseParts in the workspace named P1, P2, P3, and P4. Now with this module, let’s create a very simple CatmullRomSplineObject using these four control points. Remember, in order to create a path with a CatmullRomSplineObject, you need at least 4 control points to begin with!
local CatmullRomSpline = require(script:WaitForChild("CatmullRomSpline")
local points = {workspace.P1, workspace.P2, workspace.P3, workspace.P4}
local newSpline = CatmullRomSpline.new(points, 0.5)
The code above created a CatmullRomSplineObject with the given 4 points, and with a tension of 0.5! Since the CatmullRomSplineObject now has 4 points in it, we can calculate positions within the path created by this CatmullRomSpline. To visualize this, I went ahead and created a script that makes a path with parts:
local CatmullRomSpline = require(script:WaitForChild("CatmullRomSpline")
local points = {workspace.P1, workspace.P2, workspace.P3, workspace.P4}
local newSpline = CatmullRomSpline.new(points, 0.5)


local PointBillboard = script:WaitForChild("BillboardGui")
local BezierFolder = Instance.new("Folder", workspace)
local PointsFolder = Instance.new("Folder", BezierFolder)
local TangentsFolder = Instance.new("Folder", BezierFolder)
local LinesFolder = Instance.new("Folder", BezierFolder)
BezierFolder.Name = "Bezier"
PointsFolder.Name = "Points"
TangentsFolder.Name = "Tangents"
LinesFolder.Name = "Lines"


local NumPoints = 100


local DefaultPoints, EquidistantPoints = {}, {}
for i = 1, NumPoints do
	local TargetPart = Instance.new("Part", PointsFolder)
	TargetPart.Size = Vector3.new(0.85, 0.85, 0.85)
	TargetPart.Color = Color3.fromRGB(255, 15, 159)
	TargetPart.Transparency = 1
	TargetPart.CanCollide = false
	TargetPart.Anchored = true
	TargetPart.Locked = true
	TargetPart.Name = "Default" .. tostring(i)
	local point = PointBillboard:Clone()
	point.Parent = TargetPart
	point.Frame.BackgroundColor3 = Color3.fromRGB(255, 0, 0)
	point.Enabled = false
	table.insert(DefaultPoints, TargetPart)
end
for i = 1, NumPoints do
	local TargetPart = Instance.new("Part", PointsFolder)
	TargetPart.Size = Vector3.new(0.85, 0.85, 0.85)
	TargetPart.Color = Color3.fromRGB(255, 15, 159)
	TargetPart.Transparency = 1
	TargetPart.CanCollide = false
	TargetPart.Anchored = true
	TargetPart.Locked = true
	TargetPart.Name = "Equidistant" .. tostring(i)
	local point = PointBillboard:Clone()
	point.Parent = TargetPart
	point.Frame.BackgroundColor3 = Color3.fromRGB(33, 255, 114)
	point.Enabled = true
	table.insert(EquidistantPoints, TargetPart)
end
local Tangents = {}
for i = 1, NumPoints do
	local TargetPart = Instance.new("Part", TangentsFolder)
	TargetPart.Size = Vector3.new(0.25, 0.25, 0.25)
	TargetPart.Color = Color3.fromRGB(200, 144, 255)
	TargetPart.Transparency = 1
	TargetPart.CanCollide = false
	TargetPart.Anchored = true
	TargetPart.Locked = true
	TargetPart.Name = tostring(i)
	table.insert(Tangents, TargetPart)
end
local Lines, ControlLines = {}, {}
for i = 1, NumPoints - 1 do
	local TargetPart = Instance.new("Part", LinesFolder)
	TargetPart.Size = Vector3.new(0.55, 0.55, 1)
	TargetPart.Color = Color3.fromRGB(33, 33, 40)
	TargetPart.CanCollide = false
	TargetPart.Anchored = true
	TargetPart.Locked = true
	TargetPart.Name = tostring(i)
	table.insert(Lines, TargetPart)
end
for i = 1, #points - 1 do
	local TargetPart = Instance.new("Part", LinesFolder)
	TargetPart.Size = Vector3.new(0.55, 0.55, 1)
	TargetPart.Color = Color3.fromRGB(194, 194, 234)
	TargetPart.Transparency = 0.95
	TargetPart.CanCollide = false
	TargetPart.Anchored = true
	TargetPart.Locked = true
	TargetPart.Name = tostring(i)
	table.insert(ControlLines, TargetPart)
end


local function UpdateBezier()
	for i = 1, NumPoints do
		local t = (i - 1) / (#DefaultPoints - 1)
		local p1 = newSpline:CalculatePositionAt(t)
		local d1 = newSpline:CalculateDerivativeAt(t)
		local p2 = newSpline:CalculatePositionRelativeToLength(t)
		local d2 = newSpline:CalculateDerivativeRelativeToLength(t)
		Tangents[i].Size = Vector3.new(Tangents[i].Size.X, Tangents[i].Size.Y, 0.5 * d2.Magnitude)
		Tangents[i].CFrame = CFrame.new(p1, p1 + d2)
		DefaultPoints[i].CFrame = CFrame.new(p1, p1 + d1)
		EquidistantPoints[i].CFrame = CFrame.new(p2, p2 + d2)
	end
	for i = 1, #Lines do
		local line = Lines[i]
		local p1, p2 = DefaultPoints[i].Position, DefaultPoints[i + 1].Position
		line.Size = Vector3.new(line.Size.X, line.Size.Y, (p2 - p1).Magnitude)
		line.CFrame = CFrame.new(0.5 * (p1 + p2), p2)
	end
	for i = 1, #ControlLines do
		local line = ControlLines[i]
		local p1, p2 = points[i].Position, points[i + 1].Position
		line.Size = Vector3.new(line.Size.X, line.Size.Y, (p2 - p1).Magnitude)
		line.CFrame = CFrame.new(0.5 * (p1 + p2), p2)
	end
end
UpdateBezier()


local LastChangeTick = tick()
for _, controlPart in pairs(points) do
	controlPart.Changed:Connect(function()
		if tick() - LastChangeTick > 0 then
			LastChangeTick = tick()
			UpdateBezier()
		end
	end)
end
Running this in studio, we get the following:
You can see that as the control points move, the shape of the path also changes. The big thing is that the path changes to go through the control points.
Notice that the path starts from P2 and ends at P3. This is the natural behavior of Catmull-Rom Splines. The control parts P1 and P4 are meant to describe the direction at the ends of the Spline path. This is how the Spline is able to connect more splines and look seemingly smooth.
Now let’s say we want to add more points to the Catmull-Rom Spline. Well, doing this is extremely simple. All you have to do is add more points to the points table, and done! Let’s try it out!
Let’s add a few more parts to workspace and label them P5 through P8, now let’s add them to the points table:
local points = {workspace.P1, workspace.P2, workspace.P3, workspace.P4, workspace.P5, workspace.P6, workspace.P7, workspace.P8}
local newSpline = CatmullRomSpline.new(points, 0.5)
Now, let’s run this changed script in studio! The result should look like this:
And just like that, we have a path going through 6 control parts! It also keeps the 2 parts at the beginning and ends of the spline (P1 and P8).
Now let’s try to tween something through this path. Tweening is also very simple. If we want to tween a part’s CFrame through the part, we can use the CatmullRomSplineObject:CreateTween() function! Let’s place two parts in the workspace called GlowPart1 and GlowPart2. Now let’s tween these parts’ CFrames through the path.
local GlowPartTweenInfo = TweenInfo.new(5, Enum.EasingStyle.Sine, Enum.EasingDirection.InOut, -1, true, 0)
local Tween1 = newSpline:CreateTween(workspace.GlowPart, GlowPartTweenInfo, {"CFrame"})
local Tween2 = newSpline:CreateTween(workspace.GlowPart2, GlowPartTweenInfo, {"CFrame"}, true)
Tween1:Play()
Tween2:Play()
GlowPart1 will tween through the regular parameterization of the Spline, while GlowPart2 will tween through the parameterization depending on the length of the spline! The result should look like this:
Creating paths and tweening has never before been easier!
Updates
Updates
January 10, 2022
- Added compatibility with Vector2 values
- Fixed bug that occurred when calculating the length of a Catmull-Rom Spline object composed of number values
- Changed the way objects are created so that the Catmull-Rom Spline object does not have the ability to create Catmull-Rom Spline objects like the constructor
- The constructor no longer has the functions that belong to the Catmull-Rom Spline object
Summary
This module is completely open source, you can get it here!
Want CRSplineModules v2.0.0? It’s also open source, you can get it here on github! I also documented it for all of you who wanna use it :V
Would you like to play around with the place seen in the examples? Well here you go!
Catmull-Rom Spline Module.rbxl (47.4 KB)
I would like to give a special thanks to @IlyasTawawe for giving me the idea to create a module for this algorithm. It’s a very nice alternative to Bezier Curves, and makes it a lot easier to create paths for camera manipulation, and any of the likes.
If you would like more information on the math of Catmull-Rom Splines, check out this website:

