I’m trying to work on my Blender modeling skills, and I’m creating this sort of pipe that I want to connect one end to another. However, it seems that no matter where I put the 3D cursor to pivot around, it never reaches. Screenshots are below so it make more sense, and I used spin to make the curve.
I searched for multiple solutions, and found no answer.


You could take the upper half and mirror it to make a full loop.
1 Like
One method is what was said above, but there is another method.
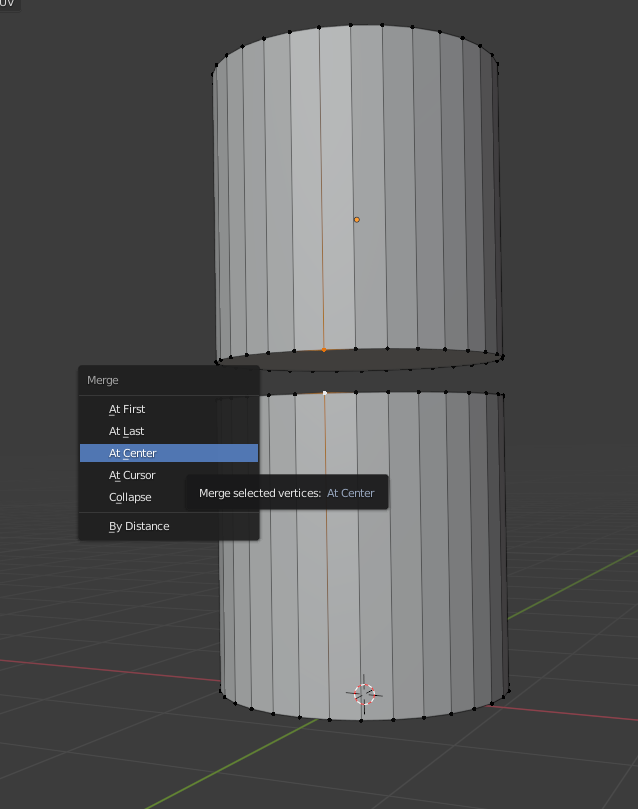
Position it so the two end of the pipe line up (making sure to select the whole thing and do ctrl + j if theyre separate objects). Then, select two adjacent vertices from both ends, and press M, then ‘at center’. This joins the vertices into 1, joining the meshes together.
Here’s what I mean:
Selecting Vertices:

Pressing M and Merging “at center”
The vertices join together

Repeating until meshes are fully joined up


1 Like
@DevourerOfBread Could you add a little more detail to that? I’m not quite sure what you mean by that, and I’m not too familiar with how to use the mirror modifier like that.
@DragonessAnimations I can see how that would work, but how do I rotate it to face the other part, and will it still make a pipe shape?
I’m very slightly new to modeling, but I know how to use the interface and basic modeling very well.
(Sorry for the late response I didn’t get back on blender for a bit)
I came up with this by rotating the pipe, and just creating the other part from the pipe, but what if I were making a mesh where I couldn’t move the goal?

Is there another place that I can ask questions relating to blender problems? It seems nobody that’s read knows enough.
Hello.
The reply by @DragonessAnimations is one way to do it, but personally, I would use the vertex/edge/face align feature that blender provides.
Here’s how I would do it.

Since both pipe ends have 16 verts, I know that I can not worry about if they fit together correctly.
First I would align the pipes the best I can manually, by using the 3D cursor, and moving it to the beginning section of the pipe, and rotating around the 3D cursor on the X-axis so that I can rotate the whole bent pipe.

Piviot selection can be found here:

The shortcut to move 3D Cursor is Shift S
Once the pipe is bent in the general direction of the other end of the pipe, (for me it looks like this)

Now I need to extend the pipe so that it’s close to the other pipe.
Select an edge on the pipe which is oriented more or less fittingly for the job. You can see what I mean in the image. After selecting the edge, you can go to the transformation orientations drop-down box, and click the little +, this will add the edge’s axis as an orientation that all transformations will use as long as that mode is selected. You can switch back to global mode any time you want or need to.

From here, select the side of the pipe which is not connected to a base, and move it towards the other pipe fitting. This should get you quite close but not quite there.


So now that both ends are quite close, you can use vertex or edge align.
Use Ctrl J to join both parts together, and use Alt RMB to select the edge loop that you will move.

The edges may not be lined up perfectly due to the prior rotation, but that’s no biggie. Change the transformation pivot point to the bounding box, and rotate the edges so they more or less match up.

So now, enable vertex snapping and make sure the little button with a magnet symbol on it is off. If it’s on, it will snap automatically which can lead to some problems, if it’s off, you will have to hold ctrl to snap, which in my opinion is way way more useful.

Now, with all the edges you intend to move selected, press G and hold Ctrl and move your mouse over a vertex, and the selection will snap to it. make sure it looks good, and then you can click the left mouse button to move the selected faces to the snapped position.

Now they are more or less aligned but are still not connected and ugly. So now you can go to the mesh tab, find clean-up, select merge by distance, and set the distance to a small enough value that nothing unintended gets modified, but big enough that the verts get connected. Make sure both rings are selected to indicate that those are the vertices you want to be “merged by distance”.

The value that worked for me was 0.01, but you will have to test and see what merges all the vertices for you. If all went well, you should see a blue box saying that N vertices were removed. If the number is equal to the number of vertices one of the pipe loops has, then it most likely hasn’t removed anything you didn’t want it to.

My initial pipe had 16 vertices, so since it removed 16 vertices, everything went well.
I hope this helps you.
Good luck with whatever it is you are making.
1 Like
So sorry, forgot to go back to this post and try it out! Anyways, what does edge transform orientation do? It sounds like it should be in the context, but I don’t quite get it.