You (not) once saw kind of health bar in most beat em up games like this:

or this (pay attention to enemy’s health bar):

You would like to have that in your own game, but did not know how to make or could not find any helpful thread about it. So I decided to make this tutorial, which is adapted from my old creation. Now, let’s get started from step to step.
Step 1: Create a base health gui
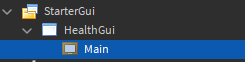
- First of all, add a new ScreenGui instance under StarterGui, and name it “HealthGui”. Next, insert a Frame with the name “Main” to it, like this:
- Now, set its BackgroundTransparency to 1 and resize to {0.25, 0},{0.1, 0} (this is a placeholder, so you may tweak it after tutorial).
- Then, create another Frame inside main frame with the name “Container”,

and set its BackgroundColor to [50, 50, 50] and resize to {1, 0},{1, 0} (we will treat this like a background). - Eventually, we need that container for two contents, “Bar” and “LifeBar” frames. So, insert a “Bar” frame first, change BackgroundColor to [255, 0, 0], BorderSizePixel to 0 and its size to {1, 0},{1, 0}. Then duplicate “Bar” frame, rename it “LifeBar”, and set BackgroundTransparency to 1. We now have this:


Note: make sure LifeBar’s ZIndex is higher than Bar’s.


Step 2: Create a script
- In order to make thing work, we need to script. Now, insert a LocalScript to HealthGui.

Then copy “Bar” frame and paste under the script, and rename to “BarClone”, like this:

- We also need a text to indicate amount of lives before script. So add a TextLabel named “LifeLabel” into main frame,

change BackgroundTransparency to 1, TextColor to [255, 255, 255], resize to {1, 0},{1, 0}, set TextScaled enabled and leave the text blank. - We can now proceed to scripting part. Open the script we inserted, you will see it nothing inside but print(“Hello World!”), delete that line and write these


local Players = game:GetService("Players")

local Player = Players.LocalPlayer
local Chatacter = Player.Character or Player.CharacterAdded:Wait()
local Humanoid = Chatacter:WaitForChild("Humanoid")

local HealthGui = script.Parent
local Main = HealthGui.Main
local Container = Main.Container
local Bar = Container.Bar
local LifeBar = Container.LifeBar
local LifeLabel = Main.LifeLabel
- After this, we will add a configuration which is used to customize, and a few variables. Now write this down.
local Configurations = {
	HealthPerLife = 100;
	ColorPattern = {
		[1] = Color3.fromRGB(255, 0, 0),
		[2] = Color3.fromRGB(255, 255, 0),
		[3] = Color3.fromRGB(85, 0, 127),
		[4] = Color3.fromRGB(0, 255, 0),
		[5] = Color3.fromRGB(0, 0, 255),
		[6] = Color3.fromRGB(245, 203, 184),
		[7] = Color3.fromRGB(238, 97, 178),
		[8] = Color3.fromRGB(115, 194, 255),
	};
}

local ColorId = 1
local MaxColorIds = #Configurations.ColorPattern
local CurrentLife = 0
Note: the configuration contains only two things, “HealthPerLife” and “ColorPattern”. “HealthPerLife” is used to check how much health (not max health) for a life, so if character’s current health is above “HealthPerLife” will have life increased by one, and repeat, yet vice versa. “ColorPattern” is used to indicate current life with ordered/stacked color bars, from index 1 to index n (lowest to highest), if life value is higher than total indexes, the next bar will be added with index 1 and repeat.
- Moving on to function part, we will write this one first.
function UpdateMaxHealth(Health, MaxHealth)
	-- Clean up existing life bars
	LifeBar:ClearAllChildren()

	-- Do not clone bars when either current Health or MaxHealth is infinite
	if (Health ~= math.huge or MaxHealth ~= math.huge) then
		ColorId = 1
		if MaxHealth > Configurations.HealthPerLife then
			for i = 1, math.floor(MaxHealth / Configurations.HealthPerLife) do
                -- Increase ColorId value
				ColorId = ColorId + 1
				if ColorId > MaxColorIds then
					-- Reset ColorId when it exceeds MaxColorIds
					ColorId = 1
				end
				local BarClone = script.BarClone:Clone()
				BarClone.Name = i
				BarClone.BackgroundColor3 = Configurations.ColorPattern[ColorId]
				BarClone.Parent = LifeBar
			end
		end
	end

	-- Resize when MaxHealth is below HealthPerLife
	Container.Size = UDim2.new((math.min(MaxHealth, Configurations.HealthPerLife) / Configurations.HealthPerLife), 0, 1, 0)
end
- Then, write the second function.
function UpdateHealth(Health, MaxHealth)
	-- Calculate current life
	CurrentLife = math.floor(Health / Configurations.HealthPerLife)

	if (Health ~= math.huge or MaxHealth ~= math.huge) then
		Bar.BackgroundColor3 = Color3.fromRGB(255, 0, 0)
		if Health < Configurations.HealthPerLife then
			-- Additional statement to avoid bar scaling weirdly
			if MaxHealth < Configurations.HealthPerLife then
				Bar.Size = UDim2.new((Health / MaxHealth), 0, 1, 0)
			else
				Bar.Size = UDim2.new((Health / Configurations.HealthPerLife), 0, 1, 0)
			end
		else
			-- Current Health is above HealthPerLife. So fill the bar up
			Bar.Size = UDim2.new(1, 0, 1, 0)
		end
		for _, v in pairs(LifeBar:GetChildren()) do
			local Len = tonumber(v.Name)
			-- Set visible enabled/disabled to each life bar for the sake of performance
			if Len == CurrentLife then
				--print((Health - (CurrentLife * Configurations.HealthPerLife)).." - "..((CurrentLife / CurrentLife) * Configurations.HealthPerLife))
				v.Size = UDim2.new(((Health - (CurrentLife * Configurations.HealthPerLife)) / ((CurrentLife / CurrentLife) * Configurations.HealthPerLife)), 0, 1, 0)
				v.Visible = true
			else
				if Len > CurrentLife then
					v.Size = UDim2.new(0, 0, 1, 0)
					v.Visible = false
				else
					v.Size = UDim2.new(1, 0, 1, 0)
					if Len == CurrentLife - 1 then
						v.Visible = true
					else
						v.Visible = false
					end
				end
			end
		end
	else
		-- Fill up and recolor bar when either current Health or MaxHealth is infinite
		Bar.BackgroundColor3 = Color3.fromRGB(255, 170, 0)
		Bar.Size = UDim2.new(1, 0, 1, 0)
	end

	-- Indicate current life
	LifeLabel.Text = (Health ~= math.huge or MaxHealth ~= math.huge) and (Health > Configurations.HealthPerLife and CurrentLife > 0 and "x"..CurrentLife or "") or "x∞"
end
- Finally, we will add last fews functions for humanoid.
Humanoid:GetPropertyChangedSignal("MaxHealth"):Connect(function()
	UpdateMaxHealth(Humanoid.Health, Humanoid.MaxHealth)
	UpdateHealth(Humanoid.Health, Humanoid.MaxHealth)
end)

Humanoid:GetPropertyChangedSignal("Health"):Connect(function()
	UpdateHealth(Humanoid.Health, Humanoid.MaxHealth)
end)

Humanoid.Died:Connect(function()
	UpdateMaxHealth(0, Humanoid.MaxHealth)
	UpdateHealth(0, Humanoid.MaxHealth)
end)

UpdateMaxHealth(0, Humanoid.MaxHealth)
UpdateHealth(0, Humanoid.MaxHealth)
Note: don’t forget to call two update functions at the end. Otherwise you won’t see it working at the start.
Step 3: test it yourself
- We have finished the health gui. Now only thing to do is to test its functionality. Let’s take a look.
Awesome! It works.
Conclusion:
- And that’s it, this is how you make a stylized health bar gui. If you feel lazy to do from step to step, you can download this template:
health bar tutorial.rbxl (35.1 KB) - Also, this is my very first tutorial to be posted here. So feedbacks are welcome. And have fun on your development.
