Creating an Admin Commands System
Hey everyone! This is still my 2nd tutorial on the platform so please cut some slack if it’s not that great.
In this post I’ll be explaining how you can make your own chat admin commands system for controlling your Roblox game. Let’s get started!
Setup
For our setup all we need is 3 things. A script for handling chat events, a module script for handling commands and a placeholder item for some miscellanious things (Called “Config” below). I’ve also put all of it into a folder called AdminCommands
It should look like this:

After creating our items, let's define a prefix for our commands. This tells us it's a command and not a chat message. I'll be using a "/" for this.
Add a string attribute to the config item called “Prefix”. It’s value doesn’t really matter,
Command Handler
Next, let’s make a system that handles all of the checks and string handling. Let’s do this in the one named MainScript
We can start off by referencing the Commands ModuleScript and our Configs:
local CommandsModule = require(script.Parent:WaitForChild("Commands"))

local Config = script.Parent:WaitForChild("Config")
local Prefix = Config:GetAttribute("Prefix")
After doing this, let's add some functionality by detecting when a player sends a message. To do this, we first detect when one joins the game and then we connect them to a chat event.
game.Players.PlayerAdded:Connect(function(InvokedPlayer)
	InvokedPlayer.Chatted:Connect(function(Message)
		-- Rest of our code goes in here
	end)
end)
Next, we handle the detected message by doing the following:
1. Checking if it is a command or message using the prefix
We’ll use string.match to see if the message starts with a prefix, returning a result of true/false. We then put this into an if statement
local MessageStartsWithPrefix = string.match(Message, "^"..Prefix)

if MessageStartsWithPrefix then
	-- Rest of code runs here
end
2. Splitting the message into various parts, making it easier to use
We can remove the prefix as it is no longer useful to us:
local Message = string.split(Message, Prefix) -- ["/", "CmdName Arg1 Arg2"]
Then let's further split this into the command name and its arguments:
local SplitString = string.split(Message[2], " ") -- ["CmdName", "Arg1", "Arg2"]
Finally, we’ll format the command name (1st item in array) to make it start with an uppercase letter and continue with lowercase ones
local CommandName = SplitString[1] -- ["CmdName"]
local CommandName = string.upper(string.sub(CommandName, 1, 1))..string.lower(string.sub(CommandName, 2, -1)) -- ["Cmdname"]
3. Passing on the command along with its arguments
Now that all the string modification is done, we just need to make sure this is a real command and if so, trigger it in our Commands module script.
Let’s start by confirming its existance:
if CommandsModule[CommandName] then
	-- This command exists
end
Then we can make an array of arguments by cloning SplitString and removing the 1st item (Command name)
local CommandArgs = SplitString
table.remove(CommandArgs, 1)
And finally, move all this (plus the command sender) to our Commands module script:
CommandsModule[CommandName](InvokedPlayer, CommandArgs)
Making Commands
Onto the fun stuff! Creating your custom commands!
To do this, hop into your Commands module script and rename the generic word Module in local Module = {} and return Module to CommandsModule.
For this tutorial I’ll only be making one command (/levitate), but the possibilites are endless!
First, create a function by doing
function CommandsModule.Levitate(Player, Arguments)

end
(Replace Levitate with the name you would like the command to be called)
In there, reference the Player’s humanoid (We’ll make them levitate by modifying their hipheight)
local Humanoid = Player.Character.Humanoid
Finally, set their hipheight to the 1st argument they gave (making sure it's a number):
if tonumber(Arguments[1]) then
	Humanoid.HipHeight = tonumber(Arguments[1])
end
And you're done! To use this command do /levitate [number]
Assigning Admins
SURPRISE! We aren’t done just yet. (I promise this is the last part)
Most importantly, we need to restrict this to admininstrators only. Although most tutorials will use arrays for this, I prefer to use a DataStore instead.
First, reference the DataStoreService and a DataStore named AdminsDataStore in your Commands Handler script along with everything else, like so (this should be in the first couple lines):
local DataStoreService = game:GetService("DataStoreService")
local AdminsDataStore = DataStoreService:GetDataStore("AdminsDataStore")
Next, inbetween the Player.Chatted event and if MessageStartsWithPrefix then, make a check to see if the player is in the AdminsDataStore
InvokedPlayer.Chatted:Connect(function(Message)

	local MessageStartsWithPrefix = string.match(Message, "^"..Prefix)

	local PlayerIsAdmin, ErrorMsg = pcall(function()
		AdminsDataStore:GetAsync(InvokedPlayer.UserId)
	end)

	if MessageStartsWithPrefix then
Finally, modify the if statement to also check for this condition
if MessageStartsWithPrefix and PlayerIsAdmin then
To add yourself to the AdminsDataStore, run the following command in the Studio command line. Using your UserID instead of [YOURUSERID].
game.DataStoreService:GetDataStore("AdminsDataStore"):SetAsync([YOURUSERID], true)
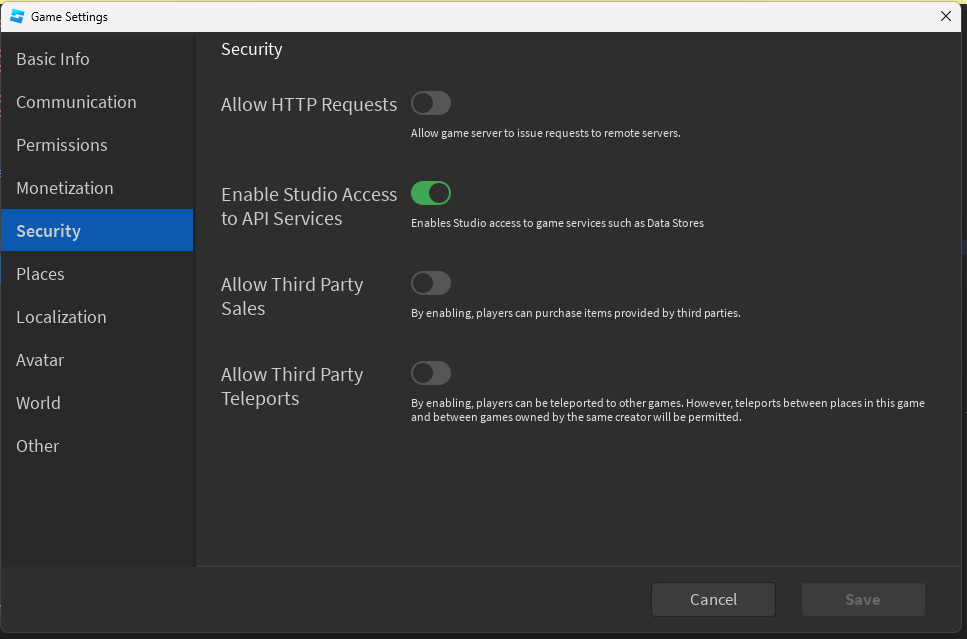
If you want to test this out in Studio, make sure to on the Enable Studio Access to API Services in game settings.
Thanks for reading! Hopefully this made sense and was informational for you.
If there’s any errors make sure to read your code carefully! If there’s still some, drop a comment and I’ll try to help.