What Is Crosshair Service?
Crosshair service is a module with a goal. That goal is to make creating dynamic crosshairs easy. Whenever I would scrub the developer forum It would always come to my attention that there were not many / no competent crosshair-related resources out there. This is the reason why I created Crosshair Service I want a competent crosshair-related resource that the developer community can benefit freely from.
Why Should I Use Crosshair Service
-
Performant
Crosshair Service is highly performant this is because Crosshair Service only uses renderstepped to update the mouse position and uses Tween Service for animating the crosshair. -
Easy To Use
Crosshair Service is easy to use because of the fact that it is designed from the ground up as an object-oriented module. Furthermore, it is easy to use because it has a simple versatile API. -
Efficient
Crosshair Service is efficient because of the fact that it allows developers to spend their time on other things instead of creating a crosshair system/module. -
Third Person Support
Unlike other crosshair related resources, Crosshair Service supports the third person. This can be important if you are making a first/third-person framework or a strictly third-person framework. -
Open Source
Crosshair Service is fully open source. This means that anyone has the right and ability to completely modify our code to their needs. Furthermore, this ensures that developers can trust Crosshair Service as a safe nonmalicious module as they have full access to the source code.
Getting Started (Important)
-
How Can I Obtain Crosshair Service
The only current and official source to obtain Crosshair Service is the Roblox toolbox. Crosshair Service - Roblox -
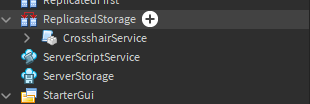
Step #1: Put The Module Instead Of Replicated Storage

-
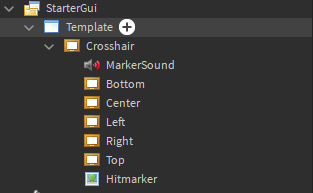
Step #2: Use The Template ScreenGUI
Note: The Template ScreenGUI was borrowed from FE GUN KIT.
It is important that you study or use the template ScreenGUI this is because of the fact that the template ScreenGUI that contains the crosshair is structured in a way that is compatible with Crosshair Service. In this example I will be adding the template ScreenGUI to StarterGUI.

API (Important)
CrosshairService.new(MainFrame : Frame, Radius : number, EasingStyle : Enum.EasingStyle, EasingDirection : Enum.EasingDirection, Lerp : number) -- This function is for creating a new crosshair object

CrosshairService:Set(Radius : number, Can_Animate : boolean, EasingStyle : Enum.EasingStyle, EasingDirection : Enum.EasingDirection, Lerp : number) -- This function is for setting the radius of the crosshair
CrosshairService:Shove(Radius : number, EasingStyle : Enum.EasingStyle, EasingDirection : Enum.EasingDirection, Lerp : number) -- this function is for shoving the crosshair to a specific radius

CrosshairService:Freeze() -- This function is for freezing the crosshair's position
CrosshairService:UnFreeze() -- This function is for unfreezing the crosshair's position

CrosshairService:Enable() -- This function is for enabling the crosshair object
CrosshairService:Disable() -- This function is for disabling the crosshair object
CrosshairService:Destroy() -- This function is for destroying the crosshair object
Notes
-
When creating a new crosshair with Crosshair Service call the enable function for it to take effect.
-
It is important that if you want to remove a crosshair you call the destroy function
Examples
Script Example
local ReplicatedStorage = game:GetService("ReplicatedStorage")
local UserinputService = game:GetService("UserInputService")
local CrosshairService = require(ReplicatedStorage:WaitForChild("CrosshairService"))
local Mouse = game:GetService("Players").LocalPlayer:GetMouse()

-- Crosshair
local Crosshair = CrosshairService.new(script.Parent.Crosshair, 10)
Crosshair:Enable()

Mouse.Button1Down:Connect(function()
	Crosshair:Shove(Crosshair.Radius * 3.5)
end)
Misc
-
I will be answering replies to this post for support on implementing Crosshair Service.
-
I will be implementing feature requests.
-
Stay tuned for more modules in the future.


