Demonstration
Overview
Before continuing, note that:
- This tutorial only covers pathfinding in grid-based and single-layered maps
- A prerequsite knowledge of floodfilling is reccomended
- A prerequsite knowledge of OOP is reccomended
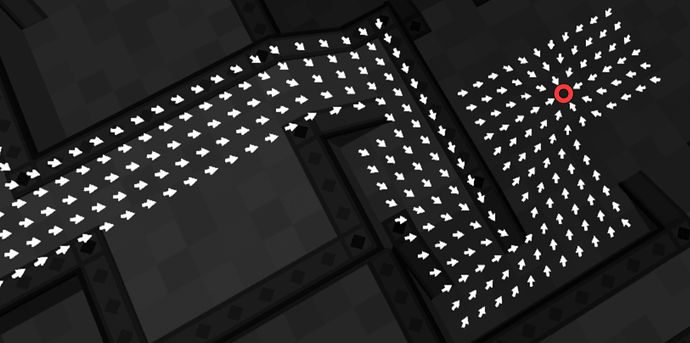
Roblox’s built-in pathfinding service is great for the general use case. However, in RTS or zombie games, running the pathfinder for each individual unit can quickly become inefficient. A common solution is to use a flowfield, which tells units what direction to move when given their location:
Regardless of how many units we move to the target, the flowfield only needs to be generated once, making it great in cases where a swarm is drawn to a single static goal.
Part 1: 8-Directional Flowfields
First, we'll need some useful module scripts (Grid and Queue)
To avoid annoying nil indexing errors, we’ll use a grid module script that collapses a 2d grid into a 1d table. Note the available coordinates range from (-size, -size) to (size, size).
local grid = {}
grid.__index = grid

function grid.New(size)
	local newGrid = {}
	newGrid.Offset = Vector2.new(size, size)
	newGrid.Width = size*2 + 1
	newGrid.Grid = {}

	setmetatable(newGrid, grid)
	return newGrid
end

function grid:SetCell(pos, value)
	pos += self.Offset
	self.Grid[pos.X*self.Width + pos.Y] = value
end

function grid:GetCell(pos)
	pos += self.Offset
	return self.Grid[pos.X*self.Width + pos.Y]
end

function grid:ForAllCells(funct)
	for i, value in self.Grid do
		local x = math.floor(i/self.Width)
		local y = i - x*self.Width
		funct(Vector2.new(x, y) - self.Offset, value)
	end
end

return grid
We’ll also want a queue module for all the floodfilling we will do. Push() will add a coordinate to the end of the queue, and Pop() will remove and return the coordinate at the start.
local queue = {}
queue.__index = queue

function queue.New(tbl)
	local newQueue = {}
	newQueue.List = tbl or {}
	newQueue.Min = 1
	newQueue.Max = #newQueue.List + 1

	setmetatable(newQueue, queue)
	return newQueue
end

function queue:Push(value)
	self.List[self.Max] = value
	self.Max += 1
end

function queue:Pop()
	local value = self.List[self.Min]
	self.List[self.Min] = nil
	self.Min += 1
	return value
end

function queue:Len()
	return self.Max - self.Min
end

return queue
To keep things organized, we will also make a module script containing objects for pathfinders and paths. A pathfinder will be constructed from a grid representing the walls of the map, and a path will contain a flowfield and the functions for using it.
This architecture is useful for implementing a diverse movement system. For example, some units may be able to jump over short walls, which we can reflect by making a new pathfinder object with a modified wall grid.
Here’s a template containing the immediate functions we must implement:
local scripts = game:GetService("ServerScriptService")
local gridModule = require(scripts.Grid)
local queueModule = require(scripts.Queue)
local constants = require(scripts.Constants)

local neighbors = {
	Vector2.new(1, 0),
	Vector2.new(0, 1),
	Vector2.new(-1, 0),
	Vector2.new(0, -1)
}
local function inBounds(point, maxCoord)
	return math.abs(point.X) <= maxCoord and math.abs(point.Y) <= maxCoord
end

local pathfinder = {}
local flowfield = {}

pathfinder.__index = pathfinder
flowfield.__index = flowfield

function flowfield.New(goal)
	local newPath = {}
	newPath.Flowfield = gridModule.New(constants.maxCoordinate)
	newPath.Distances = gridModule.New(constants.maxCoordinate)
	newPath.Distances:SetCell(goal, 0)

	setmetatable(newPath, flowfield)
	return newPath
end

function flowfield:GetDirection(pos)

end

function pathfinder.New(walls)
	local newPathfinder = {}
	newPathfinder.Walls = walls
	newPathfinder.Size = walls.Offset.X -- the maximum coordinate allowed

	setmetatable(newPathfinder, pathfinder)
	return newPathfinder
end

function pathfinder:GetPath(goal, path)

end

return pathfinder
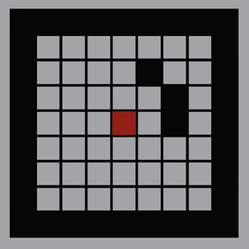
Now suppose we want to generate a flowfield to reach the red cell at (0, 0):
We can execute a simple BFS floodfill from the red cell, marking each visited cell with the total distance traveled:
function pathfinder:GetPath(goal)
	local toVisit = queueModule.New({goal})
	local newPath = flowfield.New(goal)

	while toVisit:Len() > 0 do
		local pos = toVisit:Pop()
		local dist = newPath.Distances:GetCell(pos)

		for _, dxy in neighbors do
			local newPos = pos+dxy
			local isWall = self.Walls:GetCell(newPos)
			local isVisited = newPath.Distances:GetCell(newPos)

			if (not isWall) and (not isVisited) and inBounds(newPos, self.Size) then
				toVisit:Push(newPos)
				newPath.Distances:SetCell(newPos, dist+1)
			end
		end
	end

	return newPath
end
What's a BFS floodfill?
A queue stores the cells we want to visit. We first put the goal cell into the queue, and then:
- Visit the cell at the start of the queue (and remove it from the queue)
- For all the cell's neighbors that aren't walls or already visited:
- Add them to the end of the queue
- Assign their distance to be the current cell's distance + 1
- Repeat until the queue is empty
The floodfill propagates throughout the grid like a wave. Here’s a visualization:

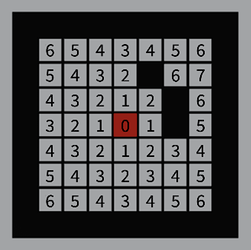
Here’s a visualization of the distance values after executing the floodfill:
There are two options for obtaining the desired direction to move in for any given cell:- Move toward the neighbor marked with the least distance.
- Start with a zero vector and “push” it away from each neighbor depending on its distance value.
Preemptively generating the flowfield for the entire grid will be expensive with either option. Rather, we will generate the flowfield on demand, calculating and caching values for cells as needed.
Given our current distance grid, there’s no obvious benefit to using either method over the other. However, as we make improvements to our floodfilling, the first method will only ever allow up to 8 possible directions of movement, while there are no such limits for the second method.
Let’s implement the second method:
function flowfield:GetDirection(pos)
	local dir = self.Flowfield:GetCell(pos)

	if not dir then
		local center = self.Distances:GetCell(pos)
		dir = Vector2.zero

		if center then
			for _, dxy in neighbors do
				local dist = self.Distances:GetCell(pos+dxy) or center + 1
				dir -= dxy * dist
			end
		end
		self.Flowfield:SetCell(pos, dir)
	end

	return dir
end
Note that when a neighbor is a wall (or out of bounds), we assign them the distance value of the center plus one, so the flowfield goes parallel to the wall.
Here’s the result:
This is definitely usable! However, there are quite a few improvements we can make. We'll start with increasing the number of directions of movement.Part 2: 16-directional Flowfields
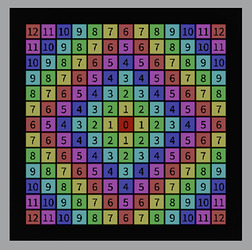
Let's take a closer look at how the floodfill assigns distances. We'll run our algorithm on a large, flat plain and color each cell based on its distance value.
Notice the diamond-shaped equipotentials.
What's an equipotential?
An equipotential line is a line along which the marked distance is constant.
Also note that the flowfield always points perpendicular to the equipotential. Since there are 4 sides and 4 corners on a diamond, we have 8-directional movement. If we had octagonal equipotentials instead, we’d have 16-directional movement. Let’s aim for that.
While floodfilling, we mark each cell with a distance. However, we can think of this distance as representing the length of a stored path. When we spread the floodfill to a neighbor, we’re simply appending a line segment to that path.
Here's a diagram
In the diagram, we've chosen two cells on the floodfill frontier (blue), drawn their stored paths (red), and drawn the line segments they will append by spreading to unvisited cells (blue).Of course, we can’t actually store these paths - there are multiple for each cell - we can only store their constant length. But the important takeaway from this thought experiment is that since the floodfill only spreads to neighbors horizontally or vertically, these paths only consist of horizontal or vertical segments.
As a result, our equipotentials are diamonds:
Here, we're only shifting the bending point of the string, so the line connecting the points is an equipotential. It's angled at 45 degrees, forming one side of the diamond:The core issue here is that the string can’t bend diagonally. So let’s allow it to bend diagonally and see what happens:
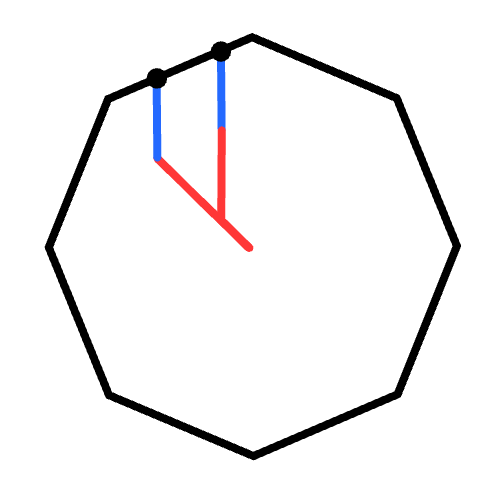
Here's how to prove mathematically that the shape is an octagon
Turn an infinitesimal length of the diagonal red segment to a vertical segment, and show that the point shifts with a slope of tan(22.5 degrees). Then, mirror the arrangement for all 8 sides (the blue segment is not always vertical when we minimize the “octagonal distance”).
For the string to bend diagonally, we’ll need to allow the floodfill to spread to diagonal neighbors. That’s all it takes for 16-directional movement! Of course, there are still some details to work out in implementation.
Here’s the final result:

