1 - Introduction

Hey guys it’s my first post on here.
So basically I made a module that can allow you to replicate the look and behaviour of the default Name and Health Bar above humanoids.
The module can be found here
Supports Humanoid properties including: NameOcclusion, HealthDisplayType, DisplayDistanceType, NameDisplayDistance, HealthDisplayDistance
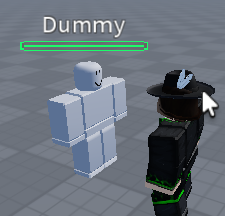
Images and videos


Roblox Default
My rendition
2 - How to use
Inside of a local script, create the default roblox display
local display = require(script.CustomDisplay) --Require the module

--Search the workspace for characters
for _, character in pairs(workspace:GetChildren()) do
	if character:FindFirstChild("Humanoid") then
		local display = display.createDisplay(character) --Create a display for the character
	end
end
It should end up looking like this:
Create a display with gradients
--To create a configuration, make a table and put properties inside of it.
--Example:
local config = {
	healthGradients = ColorSequence.new{
		ColorSequenceKeypoint.new(0, Color3.fromRGB(28, 251, 106)),
		ColorSequenceKeypoint.new(1, Color3.fromRGB(0, 229, 255)),
	},
	nameGradient = ColorSequence.new{
		ColorSequenceKeypoint.new(0, Color3.fromRGB(28, 251, 106)),
		ColorSequenceKeypoint.new(1, Color3.fromRGB(0, 229, 255)),
	},
}

CustomDisplay.createDisplay(character, config) --Second argument is used for configuration
Creates this cool looking gradient

3 - Properties
By the way, the third argument in .createDisplay is used for if you want to use team color as the name color. e.g. createDisplay(character, nil, true)
How to use Properties:
healthBar, background, name
For these properties, you can set them as a Color3 to change their default color.
And for the healthBar and background, they can change color by Health %.
Example:
local config = {
    healthBar = {
        --Create a table with the percentage as the first index, and the color second.
        {0, Color3.fromRGB(19, 181, 251)},
        {100, Color3.fromRGB(255, 174, 0)},
    },
}
healthBar - Changes the Health Bar’s ImageColor3
background - Changes the Background’s BackgroundColor3
name - Changes the CharacterName’s TextColor3
healthGradients, backgroundGradients, nameGradient
For these properties, you can set them as a ColorSequence to change their gradient color.
And for healthGradients and backgroundGradients, they can also change color by Health %.
Example:
local config = {
    healthGradients = {
        {0, ColorSequence.new{
            ColorSequenceKeypoint.new(0, Color3.fromRGB(19, 181, 251)),
            ColorSequenceKeypoint.new(1, Color3.fromRGB(255, 0, 221)),
        }},
        {100, ColorSequence.new{
            ColorSequenceKeypoint.new(0, Color3.fromRGB(28, 251, 106)),
            ColorSequenceKeypoint.new(1, Color3.fromRGB(255, 174, 0)),
        }},
    },
}
All of these properties will change their respective UIGradient’s Color
healthOffset, nameOffset
healthOffset - changes the UDim2 position of the Health Bar and Background
nameOffset - changes the UDim2 position of the CharacterName
nameProperties
nameProperties - Pass a table with any properties you want the CharacterName to have
Example:
local config = {
    nameProperties = {
        Font = Enum.Font.Gotham,
        TextStrokeTransparency = 1,
    }
}
onDamaged, onHealed
For these properties, you need to set them as functions for what you want to do when the humanoid gets damaged or heals.
Also, the function’s parameters are in order: the display’s frame, the humanoid’s old health, new health, and max health.
Example on how to make a simple health depletion indicator, also tweening the bar when the player’s health increases:
local tweens = {}
local function onDamaged(display, oldHealth, newHealth, maxHealth)
	local background = display.Background
	local healthFrame = display.Health
	local healthBar : Frame = healthFrame.Bar
	local ratioNew = newHealth / maxHealth
	local ratioOld = oldHealth / maxHealth
	local oldClone = background:FindFirstChild("clone")
	if oldClone then
		oldClone:Destroy()
	end
	local clone : Frame = healthBar:Clone()
	clone.UIGradient:Destroy()
	clone.Name = "clone"
	clone.ZIndex = 1
	clone.ImageColor3 = Color3.fromRGB(255, 255, 255)

	local healthBarPixelSize = background.Size.X.Offset - 6
	local difference = healthBarPixelSize * (ratioOld - ratioNew)
	local sizeNew = UDim2.new(0, healthBarPixelSize * ratioNew, 0, healthBar.Size.Y.Offset)
	local sizeOld = UDim2.new(0, difference, 0, healthBar.Size.Y.Offset)
	healthBar.Size = sizeNew
	clone.Size = sizeOld
	clone.Position = UDim2.new(0, clone.Position.X.Offset + healthBarPixelSize * ratioNew, 0, 0)
	clone.Parent = background

	local tweenInfo = TweenInfo.new(1, Enum.EasingStyle.Quad, Enum.EasingDirection.Out)
	local tween = TweenService:Create(
		clone,
		tweenInfo,
		{Size = UDim2.new(0, 0, 0, healthBar.Size.Y.Offset)}
	)
	tween:Play()
	if tweens[display] then
		tweens[display]:Cancel()
	end
	tween.Completed:Wait()
	clone:Destroy()
end
local function onHealed(display, oldHealth, newHealth, maxHealth)
	local background = display.Background
	local healthFrame = display.Health
	local healthBar : Frame = healthFrame.Bar
	local ratioNew = newHealth / maxHealth
	local ratioOld = oldHealth / maxHealth
	local oldClone = background:FindFirstChild("clone")
	if oldClone then
		oldClone:Destroy()
	end

	local healthBarPixelSize = background.Size.X.Offset - 6
	local sizeNew = UDim2.new(0, healthBarPixelSize * ratioNew, 0, healthBar.Size.Y.Offset)
	local sizeOld = UDim2.new(0, healthBarPixelSize * ratioOld, 0, healthBar.Size.Y.Offset)
	healthBar.Size = sizeOld

	local tweenInfo = TweenInfo.new(1, Enum.EasingStyle.Quad, Enum.EasingDirection.Out)
	local tween = TweenService:Create(healthBar, tweenInfo, {Size = sizeNew})
	tween:Play()
	if tweens[display] then
		tweens[display]:Cancel()
	end
	tweens[display] = tween
end

local config = {
    onDamaged = onDamaged,
    onHealed = onHealed,
}
It should end up looking like this:
onDamaged - Fires when the humanoid’s health decreases
onHealed - Fires when the humanoid’s health increases
Advanced Stuff
Here’s the more advanced part.
You can set these properties:
- healthBar
- healthGradients
- background
- backgroundGradients
with properties of their own.
Better explanation in code:
local config = {
    healthBar = {
        ImageColor3 = Color3.fromRGB(255, 255, 255),
        ImageTransparency = 0.5
    },
    healthGradients = {
        Color = ColorSequence.new{
			ColorSequenceKeypoint.new(0, Color3.fromRGB(251, 240, 28)),
			ColorSequenceKeypoint.new(1, Color3.fromRGB(255, 0, 221)),
		},
        Transparency = NumberSequence.new{
			NumberSequenceKeypoint.new(0, 0),
                        NumberSequenceKeypoint.new(0.5, 0),
			NumberSequenceKeypoint.new(1, 1),
		},
        Rotation = 0,
    }
}
 Make sure the property name is correct! The Health Bar is composed of ImageLabels so you would need to set ImageColor3 and ImageTransparency, while the UIGradients use Color and Transparency. Be aware that the Background is composed of frames, not ImageLabels.
One more thing, you can also use Functions to set properties.
name and nameGradient works with this too.
The Health Bar is composed of multiple ImageLabels, and the Health Gradients are all UIGradients inside of those ImageLabels. To make it easier to set values, inside healthBar and healthGradients’ functions I have included a parameter containing a function that can set properties. See the example below for usage.
Example:
local config = {
    healthBar = {
        ImageColor3 = function(changeHealthBar) --changeHealthBar is the property set function
            local color = Color3.fromRGB(200, 100, 0)
            changeHealthBar("ImageColor3", color) --First argument is the property, second is the value
            --return color --Inside of this function you can choose to return a color which will set the color of the health bar to the color
        end
    },
    name = function()
        return Color3.fromRGB(200, 100, 0)
    end
}
Properties you probably won’t need but I added anyway:
barAlignment - Changes the Health Bar alignment, you can set this to ‘left’, ‘right’, and ‘middle.’
nameHidden - Hides the CharacterName TextLabel
useHealthAsBackground - Uses Health Bar properties like healthBar and healthGradient as background and backgroundGradient
defaultLength - Changes the default pixel length of the health bar, Roblox uses 54
4 - Methods
CustomDisplay:updateConfig(newConfig) - Updates the configuration with a new one.
CustomDisplay:removeDisplay() - Deletes the display.
5 - Rainbow Gradient 
Rainbow cool.
How to make!
local gradient
task.spawn(function()
--copied from https://devforum.roblox.com/t/rainbow-uigradient/528762/5
	local previous = time()
	while true do
		local t = 1
		local range = 7

		local loop = tick() % t / t
		local colors = {}
		for i = 1, range + 1, 1 do
			z = Color3.fromHSV(loop - ((i - 1)/range), 1, 1)
			if loop - ((i - 1) / range) < 0 then
				z = Color3.fromHSV((loop - ((i - 1) / range)) + 1, 1, 1)
			end
			local d = ColorSequenceKeypoint.new((i - 1) / range, z)
			table.insert(colors, #colors + 1, d)
		end

		local delta = time() - previous
		previous = time()

		gradient = ColorSequence.new(colors) --Update gradient to rainbow gradient
		RunService.RenderStepped:Wait()
	end
end)
local config = {
	healthGradients = {
		Color = function(changeHealthGradient)
			return gradient -- Return the rainbow gradient
		end,
	},
	nameGradient = function(changeHealthGradient)
		return gradient --Return the rainbow gradient
	end,
}
6 - End
Ok thats all guys. Have fun with the module.
If you have any questions or find any bugs you can comment below.