So if you’re wondering how to make blur behind certain ui objects like a lot of popular games do (refer to the bottom of the topic to see what I mean), then you’ve found the right place, this is a very simple tutorial, all you need to have is access to figma or photoshop, for simplification I’ll be showing you how to do it on figma, as photoshop isn’t beginner friendly in any way.
-
Open a new Figma file
-
Insert a square object into the design board (make it’s dimensions 1:1, ex: 100x100)
MAKE SURE TO KEEP THIS AS A WHITE OBJECT, SO YOU CAN RE-COLOR IT IN STUDIO ACCORDING TO YOUR NEEDS!
-
Add an effect to the object, then click the effect’s name and select layer blur.
-
Click the sun icon to the left of the name after selecting “Layer Blur”, and then change the blur value to 100, here you can fiddle with this to your liking, as I only have tested with 100, any values above should add more of a blur effect, so make sure to see how you like it.
-
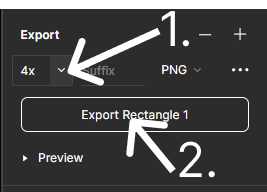
Click the plus button that is to the right of “Export”, located right below the effects we previously worked with, here you will see multiple options, what I want you to do is leave the export file type as png, it will automatically be set so, then afterwards click the button that the #1 arrow is pointing towards, then select 4x for the best results, afterwards click the export button that the #2 arrow is pointing at and save it anywhere on your pc.
-
Now that you have the file downloaded, head over to Roblox Studio, here we will upload the image as an image label, set the zIndex to -1 or anything to hide it behind the object you’re trying to add a dropshadow to.
-
Once you have the ImageLabel parented and zIndexed however you like it, upload the image how you would any other image into an image label, once done you might not notice the effect at first, this is because you need to resize it so the blur actually appears since the effect doesn’t reach the outer-bounds of the image we exported, the image label will need to be a bit bigger, in this example the button was offset as 100x100, and the drop shadow image is 135x135, uiCorners also work with this method, making it even better for rounded object uses.
-
Here’s an exaggerated size example so you can see it in works a bit more clearly.


I hope you reading this, yes you, found this helpful and can utilize this in your own works to increase the quality.
Remember, you can change the color of the dropshadow by changing the ImageColor in the properties of the image label ![]()
Link to Figma