**  Introduction:**
Hello! Welcome to GFX Editing 101, I’m jxyvzz, a GFX Designer and Artist on the ROBLOX Platform! This is a rather short but very useful tutorial. Today, I’m going to be teaching you how to properly add color corrections to your GFX.
 What are Color Corrections?
Color Corrections basically is a way to fix color on any piece of art on a GFX icon or thumbnail. It gives the GFX more light, color, and properly fixes the saturation and brightness on it also.
Now that you know what it is, let’s begin!!
App Used: "Photoshop 2020"
Step 1: Finding the Brush:
So for this tutorial, I’m going to be using a piece of work of mine. To find this hit “B” on your keyboard to access it.

As you can see in the photo, the coloring on the rig seems a bit plain, and off. This is why we color correct it.
After you open up your brush tool you’re going to see at the top bar, settings for your brush.
On the top left, you’re going to click the icon with the arrow and pick the brush “Soft Round Preasure Size”
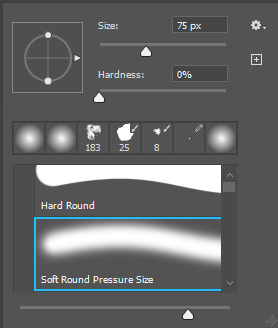
Now after you’ve done that, put the hardness on 0%. Exit out of that and go to your top bar again where all of your brush settings are Here’s what I recommend for the brush settings. Opacity- 100%
Flow-100%
Smoothing- 0%
Step 2: Adding the Corrections on the GFX:
After you fixed the settings of your brush, make a new layer by hitting the “+” in your “Layers” tab. For the sake of this tutorial, I"ll name it “corrections”. You don’t have to name it, it’s your choice.
After that go to the color tab which is on the top left and pick a color that’s lighter than your original color on the rig. Since mine is yellow, I’m going to pick a yellow that’s brighter than the original color.
Now since, your done with that, you can now paint your character! If some parts are different then others, then do the same thing, expect to find colors that are brighter than the original color on the different parts. If you need to size the brush, then click on the arrow again, and drag the size up and down until you find one that suits you best.

Don’t mind my critique ark skills, but now we’ve finished painting our character! Were almost done with the process! If the brush passed by any areas outside to rig, go to the brush tool below it and click on any areas that you’ve missed.
Step 3: Finishing Corrections:
Horray! Were almost done with the corrections! The final step is to go to your “Layers” tab and hit the arrow on top where it says “Normal”. Scroll down and click “Overlay”.
Congratulations! You’ve now properly Color Corrected your rig! As you can see, there is a major difference in the color in the rig.
Before:
After:

Conclusion:
Thanks to everyone who read this tutorial. I hope that this helped beginning and advanced GFX Designers on the ROBLOX Platform! Stay safe, and have a good day/night! 
Feedback:
How Well Explained was the Tutorial?
- Great!
- Good, but needs more explaining.
- Didn’t understand it at all.
0 voters
Did this tutorial help you?
- Yes!
- No.
0 voters
Will you use any of these methods in this tutorial?
- Yes.
- Yes, but in the future.
- No.
0 voters