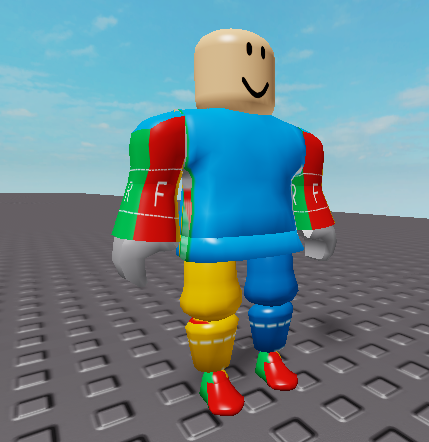
This is my first time making custom body parts for a rig. I have always been drawn to using the default “R6” and “R15” body parts. I spent the last week creating the meshes in Blender; UV-mapped, and everything. I exported it all to Roblox, made it a rig, and then added a “Shirt” and “Pants” only to find out that my UV map layouts were not matching up with the Roblox shirts and pants textures.

As you can see, only the Roblox body parts were mapped correctly.
I exported out the model from Studio and imported it to Blender to see what was going on. Opened up the UV map, and found out that Roblox shrunk my UV and moved it into the top left corner…
Well if you look at Roblox’s UV layout you can see that they have a specific spot for your UV to go. For proof just check out what it looks like when I select one of Roblox’s default body parts in Blender…
If you look at default body part you can see that it fits perfectly where it should. That makes legitimate sense, so I figured I could rearrange my UV so that it fits with this Roblox one…
Re-uploaded it, and everything. Only to find out that Roblox again just moved it all to the exact same spot…

Roblox’s default body parts were able to stay stationary, yet mine got moved to the corner. At the moment, I am out of ideas. I went to the devforum, and searched as much as I could online. Only a few people touched on the subject and no real answers came out of it yet. I would love to hear your guys opinions about this. It would be a huge help if there was legitimate answer to keep the UV’s in the right position and matched up with the shirts and pants on Roblox. If not, I completely understand. Thank you for your time!


