Help with learning GFX?

So, I’m relatively new to making GFX and, while I have made some that I am pleased with, I feel that most of my previous work has been lacking some of the professional “polish” that I would rather it have.

Previous Examples


IronFistNetflixLogo
RMCUFFHLogo

As you can see, most of my work turns out plain-looking and kind of bland. My questions are,

  1. How do artists like crackop add so many amazing lighting effects?
  2. How do people bend the limbs of characters so cleanly?
  3. How do people add effects such as explosions and fire and still have it look right?

Yeah, and the only programs I have right now are Blender and paint(dot)net.

Any information would be very helpful!

3 Likes

The art designs are clearly about the technique. Keep in mind with these four points:

  • Learning – basic knowledge of art can give you a slight edge
  • Inspiration – other arts are impressive, study the details
  • Technique – how the art creation is executed, programs and effects
  • Experience – the time you’ve spent on working with GFX allow you to create higher quality over time

To answer you questions:

  1. First, the lighting is Blender-wise and then you’ll edit the effects into the lighting for extra impressions.
  2. Bending is easy. For R6, I usually subdivide enough times(make sure auto-smooth is disabled) and then select half of the faces and bend them, using elbow as the “anchoring point”.
  3. Technique is applied in this area. Effects are clean due to the ability to blend the colors and contrasts well enough that it is seamless.
1 Like

Thank you for the tips. Would you happen to know any decent tutorials for doing the lighting in blender?

Blender Guru happens to be one of the best on the tutorials.

3 Likes

Is really helpful

5 Likes

As a fellow blender and paint .net user, most effects can be easily done in post if you don’t want to do it in the render, even with a program as simple as the one we use.

1:Lighting

Lighting effects can be done in either blender or paint .net; usually I do both. I’ll have a lighting setup in blender that will be fairly mediocre, then in paint, I edit it so that areas I want to be brighter are as such, and vice versa with dark areas. For example:

Say you have the following render (one of my older ones).


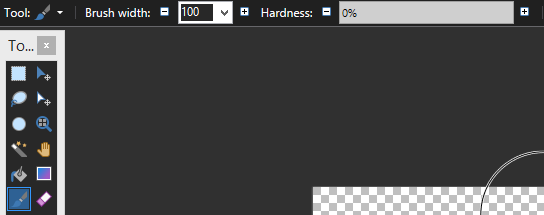
If you wanted to make the areas around him more orange, what you would do is open up your editor and use the magic wand to select the transparent areas (see picture).


Press ctrl + i to invert the selection so you’re only selecting the render. Add a layer, change its blending mode to overlay, go to your paintbrush and set the hardness to something low, like 0

image
image

In your second layer, while only the render is selected, draw over the render with your brush set on something orange-y. For me, I used RGB(211,164,116).

Post editing:

Not exactly perfect, but its just a quick edit that saves a lot of time.

2:Bends

Bends can be done in two ways; rigs and hard bending. Rigs refer to setting a skeleton to a character, complete with bones and armatures, such that by moving one part of the rig, it moves that part of the character, bending it however you want. Hard bending refers to literally just going into edit mode in blender, selecting the parts of the limb you want to bend, and rotating it (press R, click when you’re satisfied, then press G to move it). I personally hard bend since I never got into using rigs, but I’d recommend using them since they allow for easier posing.

3:Post-effects

They’re easily done with stocks, like these:


You can use any of these stocks by pasting them on another layer over your render, and setting the blending mode of that layer to screen.

For example:
Using the stock below nets the following result.


Hope this helps you out!

16 Likes

well hey thats my tutorial! one thing i will note is for that tutorial you need a basic knowledge of blender

1 Like

I would try getting Adobe Photoshop. It will help you more than paint.net in my opinion. But to answer your questions:

  1. Brushes and packs. There is a lot of things in photoshop to play around with.
  2. Blender (or Cinema 4D) you use this “bone rig”. There is plenty of YouTube videos about both programs.
  3. Brushes and packs. I use packs for this. If you still are using paint.net, I’d go to google and find a transparent fire or etc. background and then select the “Screen” option in Blending Options.
1 Like