Help with TweenService

I’m having some issues with my script, I’m not very good with TweenService and I’m not sure why this issue is happening. The script is supposted to slide the UI out of the screen but let the button be visible on the edge on the screen.


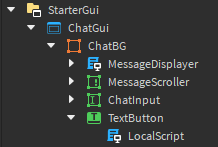
image_2023-06-14_003838662

My code

local button = script.Parent -- Reference to the TextButton
local frame = button.Parent.Parent:FindFirstChild("ChatBG") -- Reference to the Frame representing the chat window

local isOpen = false

local TweenService = game:GetService("TweenService")
local frameStartPosition = UDim2.new(2, 0, 0.5, 0)
local frameEndPosition = UDim2.new(0, 0, 0.5, 0)
local tweenInfo = TweenInfo.new(0.5, Enum.EasingStyle.Quad, Enum.EasingDirection.Out)

button.MouseButton1Click:Connect(function()
	isOpen = not isOpen
	if isOpen then
		local slideInTween = TweenService:Create(frame, tweenInfo, {Position = frameEndPosition})
		slideInTween:Play()
	else
		local slideOutTween = TweenService:Create(frame, tweenInfo, {Position = frameStartPosition})
		slideOutTween:Play()
	end
end)
2 Likes

Something that will simflify your life a lot is copying the entire frame and duplicating it inside itself. Then make the outer frame transparent and use it as a reference point. Make the inner frame’s size 1 to 1 scale. Change the frame that you are tweening to the inner one, then set the UDim2’s to the following:

local frameStartPosition = UDim2.fromScale(0, 0)
local frameEndPosition = UDim2.fromScale(-1.1, 0)

And that should do it.

1 Like

After testing it I can see that it does not move as it should.

Please send your code and your GUI elements.

What is your desired end result for this UI? What do frameStartPosition and frameEndPosition represent? I may need some more information in order to help you to the best of my abilities. :smile:

It’s supposted to slide in and out when the button is pressed.

Do you want the frame to slide in and out solely on the left hand side of the screen?

Yeah, that’s the plan but not sure how to implement it as I never work with UI’s.

Here you go!
ChatUI.rbxm (15.7 KB)

Is this what you’re looking for? I can try and explain some of the foundations about developing UI if this is what you’re trying to achieve.

That’s exactly what I’m trying to achieve.

Perfect! Here’s a small break-down of what I did to achieve this, and why I did those steps. For ease of understanding, I will be referring to ChatGui.ChatBG as ‘main frame’. If anything I’ve explained is unclear, feel free to ask me to elaborate!

• 1. I set the AnchorPoint of the main frame to 0, 0.5. This places the the anchor point here

With the anchor point placed here, we can place the UI precisely in the center of the screen by setting Size.Y.Scale to 0.5. This means the main frame will be positioned at 50% of the height of its parent element. In this case, that element is a ScreenGui, which will be your entire viewport.

Then I set the X value of the position to 0, 10. This places the main frame at 10 pixels from the border of the screen.

The final position value now reads 0, 10, 0.5, 0. This is our Open position

• 2. I changed the value names frameStartPosition and frameEndPosition to frameOpenPosition and frameClosePosition respectively. This improves readability a little bit in case you need to come back to this code at a later date.

• 3. I changed the frameOpenPosition by copying and pasting the current Position value from the main frame.

• 4. I determined the desired position for the main frame when it’s closed. Since an X-position of 0, 10 places it at 10 studs to the right relative from the left-side edge of the screen, I wanted the closed position to be to the left relative to the edge of the screen. (This would be off-screen). The exact position would be an inverse of the X-scale of the main frame. In this case, the X-scale is 0.353, 0, so the desired X-position when the main frame is closed is -0.353, 0.

In order for our code to automatically adapt to any future changes to the UI’s size, I’ve opted to determine the closed position variable like this:

local frameClosePosition = UDim2.new(-frame.Size.X.Scale, 0, 0.5, 0)

• 5. After a first test run, I noticed that the background image of the main frame is in fact scaled past its own borders, making the main frame stick out on the left side. I solved this by giving the closed position variable a small offset of -4.

• 6. I also noticed that the open/close button was clipping with the rest of the UI a little bit.

I fixed this by giving the button a small offset of 2 pixels on its X-position.


The final result can be seen in the video I posted previously!
This is a small message that drops down from the top waits a bit then jumps back up and out of the screen. I just put the GUI where I wanted it and wrote down the numbers for each spot …
Not totally what you asked for but your answer is in there …

task.wait(2)
local paws, mess = 5, script.Parent
game.ReplicatedStorage.SendMessage.OnClientEvent:Connect(function(msg)
	mess.Text = msg
	mess:TweenPosition(UDim2.new(0.05, 0, 0, 0), "Out", "Sine", 1) task.wait(paws)
	mess:TweenPosition(UDim2.new(0.05, 0, -1, 0), "Out", "Sine", 1)
end)

This is smooth as glass, different technique used to tween a display movement.
TweenPosition

This topic was automatically closed 14 days after the last reply. New replies are no longer allowed.