Help with vector3 position

Hi, if you look at the gif, check out how the ball curves when facing the right side, but when i face forward it seems different from when facing left, curving wise. how can i make it so the position of vector3 is like a “world-view” so regardless of where i view it will always be the same curve?

https://gyazo.com/5d63ede1e3177e997b9a8cbc81d28f68

Script:

local function lerp(a, b, c)
			return a + (b - a) * c
		end

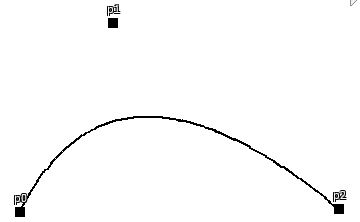
		local function quadBezier(t, p0, p1, p2)
			local l1 = lerp(p0, p1, t)
			local l2 = lerp(p1, p2, t)
			local quad = lerp(l1, l2, t)
			return quad
		end
		
		local Volley = PartObjects.Bezier:Clone()
		Volley.CFrame = HRP.CFrame * CFrame.new(math.random(-2,2),math.random(-2,2),-2) * CFrame.Angles(math.rad(math.random(-5,5)), math.rad(math.random(-5,5)), 0)
		Volley.Parent = workspace.Effects
		Debris:AddItem(Volley, 5)
		for i = 1,35 do
			local t = i/35
			local updated = quadBezier(t, HRP.Position, Mhit.Position + Vector3.new(0,20,30), Mhit.Position) --quadBezier(t, HRP.Position, HRP.Position + Vector3.new(0,20,0), Mhit.Position)
			Volley.Position = updated
			wait(0.01)
		end

The issue is that the 30 in the Z axis is there to put the point p1 in the “middle” of the two points is static. As seen in this image from the bezier curve article p1 is “between” the points p0 and p2 then raised a certain amount on the y axis.

Using a value of 30 only applies when facing front at -Z axis and hence doesn’t work when you rotate it.

The better solution would be to use the mid point formula to exactly get the mid point between HRP and mouse hit.

local midpoint = (HRP.Position+Mhit.Position)/2
local aboveMidPoint = midpoint + Vector3.new(0,20,0)-- this should be the new p1

thank you, how would i apply the +30 curve on the z axis with this method (so it doesn’t only apply when facing -z axis, but also when rotated)?

This is the effect of doing +30 on the Z axis when you are looking forward in the -Z axis direction as seen by the red vector from point 2 as that’s what happens when you do vector addition on a point.

image

To replicate this you can do this:

local mouseHitToHumanoidRootPart = HRP.Position - Mhit.Position
local moveUnitsInRedVectorDirection = 30*mouseHitToHumanoidRootPart.Unit

That will move it 30 units in the direction of mouse to HRP. Keep in mind it can go behind the character idk what you want to do. Something like this:

image

Just draw out the diagram until you can figure it out, (or you can draw it in your head if you are advanced enough).

my apologies if i wasn’t clear, please check this vid out Magma Ability / Skill | Roblox Studio - YouTube (you see how the projectiles sometimes might curve left or right, how can i achieve this sort of effective (how would i implemented this into the bezier curve formula please?)

Oh, for this one method you can use is this one vector trick of generating an axis using that is to the “Right” of the direction from humanoid root part HRP position to mouse hit position using cross product.

One way to do this is to use cross product to find a right vector in the proper direction!

Let vector a-> be the vector from HRP to mouse hit

local humanoidRootPartToMouseHitVector = Mhit.Position - HRP.Position

Vector b will be the world’s up vector Vector3.new(0,1,0). By doing the cross product we can obtain a perpendicular vector which is similar to an X axis.

A built in method which does this is CFrame.lookAt which also uses cross product to generate the axis given a direction to look at from point A to point B

local midpoint = (HRP.Position+Mhit.Position)/2
local rightVectorGenerated = CFrame.lookAt(HRP.Position,Mhit.Position).RightVector -- already unitized
local aboveMidPoint = midpoint + Vector3.new(0,20,0)-- this should be the new p1
local makeItGoRight = aboveMidPoint  + rightVectorGenerated*20 --move 20 studs "right"

Cross product method is below:

1 Like