I wrote a whole topic tutorial as a post, please “bear” with me.
I was working on a terminal for a group before, I believe it’s something simple to do. The process of making the terminal can depend on whether you want the terminal to respond and be executed in the client’s environment, the server’s environment, or maybe even both. Before you do read this, though, you should research these:
-
TextBox.ReturnPressedFromOnScreenKeyboard—There’s no documentation on this one, but it’s basically an event that fires when you press enter whilst focused on a text box.
Setting-Up
The client part of the scripting would consist of you having a UI that consists of two major parts:
-
The OutputText/InputText (TextLabel) for the past inputs and any output text, would ideally be above the player’s input TextBox.
-
The InputLine (TextBox) for them to input the command, no-brainer element.
-
The Window/Container (ScrollingFrame) to store all of these UI elements together.
The rest is completely up to you. If you need a reference, I just used the command prompt from windows to best demonstrate the interface. (1 = Blue, 2 = Red, 3 = The Container/Window)

Note: 1 and 2 in your set-up process is for visual purposes and to make a reference. You will be creating these via script, and not by hand.
Hierarchy
The first two elements would be parented to the ContainerFrame. This is where you’ll have the text be aligned to create the effect of text being stacked and sent into the terminal. (The inputted commands and the output of those commands) To make that effect, you can simply add an UIListLayout within the container with these main properties:
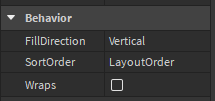
SortOrder would be primarily used for having the earliest and latest lines be shown in a descendant order. In your terminal module/script that would be handling the UI, you should have a counter as to what text line they’re currently on. Outputs would also count as a line as well.
To better see what I mean, set the TextContainer and InputLine's layout order 2 and 1 respectively, like so:
Even a better example of how this would look when it’s done correctly can be described in this image.
The settings for the first two elements is really just a matter
Now, with that out of the way, we can actually start scripting it.
Coding The UI Terminal
Note: This code should be taken as a reference for sake of learning purposes.
Within your script, you should connect to the ReturnPressedFromOnScreenKeyboard event for the InputLine. This is so that you can detect when the player is ready to submit their command. Primarily, so that you can replace their InputLine with an InputText. Any output text would also be created afterward. Then, all you got to do is make the InputLine visible again, and set the LayoutOrder to the new current line.
Here’s a code for demonstration:
-- Like I said before, you would take note of their current line in the script
-- for the ContainerFrame's SortOrder.

InputLine.ReturnPressedFromOnScreenKeyboard:Connect(function()
	local InputText = Instance.new("TextLabel")
	InputText.Text = InputLine.Text
	InputText.TextWrapped = true
	InputText.Size = UDim2.fromScale(1, InputLine.TextBounds.Y / ContainerFrame.AbsoluteSize.Y)
	InputText.Parent = ContainerFrame
	InputText.LayoutOrder = CurrentLine
	InputText.BackgroundTransparency = 1
	InputText.Font = InputLine.Font

	InputLine.Visible = false -- hide the textbox for now

	CurrentLine += 1

	-- Just for sake of example, we're going to emulate the ouput text
	task.wait(2)

	local OutputText = Instance.new("TextLabel")
	OutputText.Text = string.format("Your inputted text is shown below: \n\n%s", InputText.Text)
	OutputText.TextWrapped = true
	OutputText.Size = UDim2.fromScale(1, OutputText.TextBounds.Y / ContainerFrame.AbsoluteSize.Y)
	OutputText.LayoutOrder = CurrentLine
	OutputText.BackgroundTransparency = 1
	OutputText.Font = InputText.Font
	OutputText.Parent = ContainerFrame

	CurrentLine += 1
	-- show the InputLine again.
	InputLine.Visible = true
	InputLine.LayoutOrder = CurrentLine
end)
And that’s the main visual part of the terminal down. If you want to add the different cursor to when they’re typing like the terminal’s cursor, then you would detect the change of the input text and have a frame to represent the cursor get adjusted to its position. You can also use it to prevent the player from removing the directory part of the text (e.g., C:\Users\edozune\Desktop>) In this example, for sake of simplicity, I won’t do that.
Coding the Terminals Back-end
We’ve coded the front-end of the terminal, but now we need to code its core functionality. I suggest you use a module for this part. If that’s too advanced for you, you can just use another script. For the sake of “perfect” coding and simplicity, I will be using a module.
The terminal has a simple process that you will replicate. The client inputs the text and their texting ability gets locked. The terminal reads the text, tries to convert it into a command, and executes said command with its possibly passed parameters. Finally, it gives the client the ability to type again. So, we’ll be making functions to do exactly this process. We’ve already done the first part of the process, (by hiding InputLine after they entered) so we’ll be doing the other four parts of the process.
-
Processing the Text
There needs to be a command that will process the text to figure out what command the player is trying to input. How I would go around doing it is by using an array of commands to iterate from.
local Commands = {
	"help",
	"myping",
	"getplayers",
	"random [min] [max]",
}

local Terminal = {}

function Terminal:ProcessCommand(text)
	local splittedText = text:split(" ") -- we're splitting the text so that we can get the command and parameters passed to that command separated
	local input = splittedText[1]
	local parameters = table.remove(splittedText, 1)

	for _, command in Commands do
		if command == input then
			-- execute command function
		end
	end
end

return Terminal
What we would also need is a function to create any output text that the command might want to send to the player. We can use that same block of code from the InputLine event, just would have to change it to use text that was passed in the function’s parameter.
function Terminal:CreateOuputText(text)
	local OutputText = Instance.new("TextLabel")
	OutputText.Text = text
	OutputText.TextWrapped = true
	OutputText.Size = UDim2.fromScale(1, OutputText.TextBounds.Y / ContainerFrame.AbsoluteSize.Y)
	OutputText.LayoutOrder = CurrentLine
	OutputText.BackgroundTransparency = 1
	OutputText.Font = InputText.Font
	OutputText.Parent = ContainerFrame
end

function Terminal:ProcessCommand(text)
	local splittedText = text:split(" ")
	local input = splittedText[1]
	local parameters = table.remove(splittedText, 1)

	for _, command in Commands do
		if command == input then
			-- execute command
		end
	end

	-- decided to also create this little code incase the terminal couldn't find the right command
	self:CreateOuputText(string.string.format("'%s' is not recognized as an internal or external command.", command))
end
-
Running The Command’s Function
You would need a table or module to store each of the command’s functions when it finds a match. Within the ProcessCommand function, when command == input, you simply just load the command function from the CommandFunctions and pass the parameters as a tuple.
function Terminal:ProcessCommand(text)
	local splittedText = text:split(" ")
	local input = splittedText[1]
	local parameters = table.remove(splittedText, 1)

	for _, command in Commands do
		if command == input then
			-- execute command
			CommandFunctions[command](unpack(parameters))
		end
	end

	self:CreateOuputText(string.string.format("'%s' is not recognized as an internal or external command.", command))
end
And now you’re practically done with the module. Here’s the full reference module after these changes:
local Commands = {
	"help",
	"myping",
	"getplayers",
	"random [min] [max]",
}

local CommandFunctions = require(path.to.CommandFunctions)

-- If you plan on having some commands be executed on the server,
-- you would instead put the commands in a module as a table
-- for both the server and client to read. You would also need
-- to adjust your functions to detect whether the command is
-- supposed to be ran on the server or not.

local Terminal = {}

function Terminal:CreateOuputText(text)
	local OutputText = Instance.new("TextLabel")
	OutputText.Text = text
	OutputText.TextWrapped = true
	OutputText.Size = UDim2.fromScale(1, OutputText.TextBounds.Y / ContainerFrame.AbsoluteSize.Y)
	OutputText.LayoutOrder = CurrentLine
	OutputText.BackgroundTransparency = 1
	OutputText.Font = InputText.Font
	OutputText.Parent = ContainerFrame
end

function Terminal:ProcessCommand(text)
	local splittedText = text:split(" ") -- we're splitting the text so that we can get the command and parameters passed to that command separated
	local input = splittedText[1]
	local parameters = table.remove(splittedText, 1)

	for _, command in Commands do
		if command == input then
			-- execute command
			CommandFunctions[command](unpack(parameters))
		end
	end

	-- decided to also create this little code incase the terminal couldn't find the right command
	self:CreateOuputText(string.string.format("'%s' is not recognized as an internal or external command.", command))
end

return Terminal
Now, we go back to the script that handles the InputLine text and require the Terminal module. After that, we just plug the ProcessCommand into the enter function and it should be finished.
InputLine.ReturnPressedFromOnScreenKeyboard:Connect(function()
	local InputText = Instance.new("TextLabel")
	InputText.Text = InputLine.Text
	InputText.TextWrapped = true
	InputText.Size = UDim2.fromScale(1, InputLine.TextBounds.Y / ContainerFrame.AbsoluteSize.Y)
	InputText.Parent = ContainerFrame
	InputText.LayoutOrder = CurrentLine
	InputText.BackgroundTransparency = 1
	InputText.Font = InputLine.Font
	InputLine.Visible = false

	CurrentLine += 1

	Terminal:ProcessCommand(InputText.Text)
	CurrentLine += 1

	InputLine.Visible = true
	InputLine.LayoutOrder = CurrentLine
end)
Hopefully this helps. If it doesn’t you got me and the community.
If you want some help with figuring out how to have commands get executed from the server to the client, you can PM me and I’ll be happy to help.


