If you you’re an animator and still havent switched to Blender, I suggest you still read this!
Hello, welcome to this tutorial about how to create a first person cutscene, we’ll just be covering the camera for now but maybe if you get ca bit more advanced you can actually attach it to a rig of your own!
So to start of course you’re going to probably want to have a recent version of blender and then you’re going to want to head over to this resource I created!
Once youo have got the blender addon setup and you have got the roblox plugin installed you’re going to want to hop into blender but before that if you want to make the camera accurate height wise to a roblox character you’re going to want to export an obj of a roblox character and import it into your scene

After this, you’re going to want to add a camera to your scene and put it where the center of the head would be but then a bit forward, I mean it doesn’t have to be moved forward but just so we can see where it is also so it doesn’t clip into your height reference rig!

You’re going to then want to change the field of view of the camera to something like 70 since that’s the default one in Roblox

This next part is so that we have a more predefined course for the camera to follow, you could just keyframe it at the starting position you want and then keyframe it at the ending position but, doing it with a path handles the movement between each point I feel way better
So with that said you’re going to want to (shift+a) and add a path to your scene

After your path is created it should be located where the 3D Cursor is, your going to wantr to go into edit mode and then click the ‘Curve Edit Mode’ and click the checkbox next to normals and increase the slider so you know the path is pointing too more clearly!

After this in edit mode just flip your path so its facing the same direction that the camera and your reference character are facing and also move it up a bit so the first point is at the center of the character

You can then make the path how you see fit by dragging the circular points on it and moving them around kind of like a bezier curve, make sure you stay in top view though or else it’ll become wonky on the axis you dont want it moving

So after you’ve gotten your path how you want it to look you’re going to want to add a empty axis into your scene, I scaled mine up so they are more clear for you too see, it should also be at your world cursor

You’re going to want to go to the object constraints while sitll having the empty axis selected and then you’re going to want too add a follow path constraint and select the ‘NurbsPath’ as the target object also make sure ‘Follow Curve’ is selected
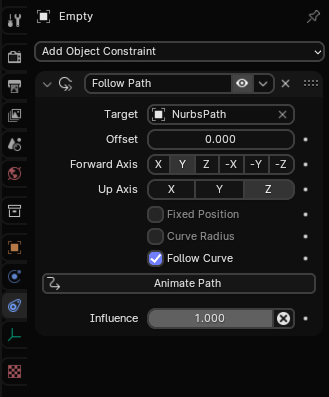
Depending on were you chose to face everything you might have to play around with the Forward Axis aswell as the Up Axis, I had everything in my scene facing the front so if you also do then my setting for the constraint should work properly
Open up the dope sheet and and at frame 0 and at offset 0 you’re going to want to click the white circle this will create a keyframe at that frame


After you’ve keyframed at the start now jump to the frame you want the animation to end at then set the offset to -100 and keyframe it at that point, you’ll see the empty jump to this point

I forgot about this earlier but set your scene FPS to 60 FPS

Back in the dope sheet with your keyframes you’re going to want to select all your keyframes and turn their handle type to vector, this basically eliminates the easing in and easing out effect, they keyframes should then turn square after you’ve done this

Now the fun part?
We can now add a copy location and copy rotation constraint inside of the camera which will follow the well location and rotation of the empty axis were created earlier

Again depending on where you made everything face you might have to change things, also in order the camera to stay at the height of our reference we need to disable the Z on the location!
Now the camera will be following our path, but it’s still missing something though… ah that’s right we need to add some noise to the rotation axis so it makes it feel more lifelike and real!
So first were going to need to make this into an action in Blender’s NLA Editor, so open up a new tab right over dope sheet, should look like this

After this were going to want to be bake the animations that the empty is providing our camera object, Object > Animation > Bake Action with the camera selected

So it’s going to come up with this menu you’re going to want to copy my settings and make sure Object is the one that is selected at the bottomm the start and end frame should automatically be good but if you need to adjust them then do so, then press okay

You’ll see that in the NLA Editor you got a new action for your camera, it will also show up in the dope sheet aswell


Just so you don’t get confused let’s click the arrow pointer in both the dope sheet and the action editor, what this will do is only show the keyframes for the selected object

Now it just shows the camera action

Pushing Down and Naming the Action
Alright, now we’re going to name the action and push it down in the NLA Editor, what pushing it down basically allows us to do is that it lets us actually be able to manipulate the action but theres alot more on the NLA Editor that’ll take too explain and im not expert so here a great video if you wanna know more about that
You can push it down using this button

")
After you push it down you’ll see the action as like a strip in your NLA Editor, I just called my Action walk foward but you can call it anything you’d like

Now comes probably the hardest part of the tutorial so basically now that we have the movement of walking forward were going to need some bobbing (up and down movement)
So in your dope sheet your going to want to switch the tab to ‘Action Editor’, and press the ‘New’, you can call this anything but I called mine Bobbing, at frame 1 your going to want to just make an up and down motion and keyframe just the location

Once you have your bobbing animation your going to while still in the dope sheet, press CTRL + Tab, this will open the Graph Editor where were going to want to remove the X and Z Location channels and also all the Rotation channels (if you have any) from our bobbing animation, you’ll find out why in just a moment

After you’ve done that press CTRL + Tab again, it’ll take you back to the action editor and you’re going to want to push down the action
So now your action editor should look something like this

Your bobbing action probably isnt as long mine so you’re going to want to make it repeat so click on your Bobbing action then open the right handed panel if it isnt open already by pressing N while your mouse is inside of the action editor and then click the strip tab and then go down until you see repeat and then increase it until its reach the length of your animation!
So if you’ve done everything correctly we should have bobbing and also the camera moving forward following the path we setup, now the were not done just yet as we still need to add a bit more realism to it so this is where modifiers on the axis comes in!
You’re going to want click on the WalkForward action and then your going to want press tab,
this will make it so we can edit the keyframes,

Now in your dope sheet press CTRL+Tab this will bring up the Curve Editor again

After this your going to want to select the X Rotation channel, and then it’ll bring up a panel on the side like this, and then go to the modifiers tab

Add a noise modifier and it’ll look something like this, your curve will have all these jagged things on it and if your go to your camera view on Blender to see what it will look like the camera will be going all crazy it’s because we need to edit the settings of the modifier to make it smoother
I suggest a higher scale and a small strength, because to me that looks the best but these are my settings for it though

After this do the same thing with the Z axis, I just honestly copied the modifier over to the Z axis rotation channel
Now go into your camera view mode and see how the animation is looking, if you’re happy with it then your going to want go to onto your side panel in the viewport and then click the export object panel and then export object animation (without scale)

After this paste the string it gives you into the roblox plugin and it’ll create a folder for you, which you’ll use the ObjectAnimation module to play the animation, you can get the module from my github for OAE
Then all you need to do is just setup the code something like this and, yeah you’ve got yourself first person cutscene, of this is the very basics but yeah!
Here an example of one I’ve made before (but attached to a rig though)

And here is the one I created in the tutorial also a code snippet of setting up the animation
local ObjectAnimation = require(game.ReplicatedStorage.ObjectAnimation)

task.wait(2)

local fp_anim = ObjectAnimation.new(workspace.fp_anim)
workspace.CurrentCamera.CameraType = Enum.CameraType.Scriptable
fp_anim:PlayAnimation({
   relativeTo = workspace.SpawnLocation,
   FPS = 60,
   partToAnimate = workspace.CurrentCamera,
   offset = Vector3.new(0, 0, 0),
})