Hi, hello! As mentioned in the title, this is part 2 of my previous tutorial. In this tutorial, you will learn how to:
- Make nice lighting
- Cool scenery
- Use terrain decently
- Make a main menu!
You will also need some type of scripting experience if you want to modify this.
Building
To start off, make a small scene, I will be recreating the previous tutorial, just this time, it will have a bit more effort put into it. To start off, let’s work on the terrain, first thing you do is change the terrain color! These are the water settings I used:

And this is the sand color:
![]()
Now, I used the same campfire from the previous tutorial, just recolored it slightly and modified the particles. Now I just add some details to the build to make it seem better, such as:
- Logs to sit on
- A fish which is getting cooked
- A few characters such as myself and a friend, etc.
Lighting
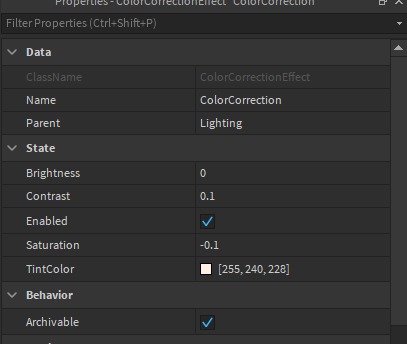
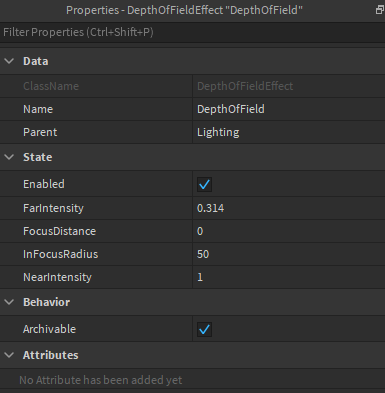
As for lighting, these are my lighting settings:


I also used some other lighting properties such as these:

And two sunrays with the same properties

UI Design
I quickly made the UI with a background that is sized 1 x 1, I added a gradient with a small bit of black on one side, and used the gradient transparency tool to make it seem cooler. I then added a textbutton with the fantasy font and a UI stroke. Added a few lines which will be necessary later, and some loading text.
Scripting
Alright, to start off, make sure that the character doesn’t load. 
Now, to script the camera. First thing you want to do is add a part called “CameraPart” into workspace. Now, to get scripting!
-- // Variables \\ --
local Player = game.Players.LocalPlayer
local Character = Player.Character
local Camera = workspace.CurrentCamera
local Mouse = game.Players.LocalPlayer:GetMouse()
local DefaultCFrame = workspace.CameraPart.CFrame
local Scale = 500

-- // Main Logic \\ --
repeat wait()
	Camera.CameraType = Enum.CameraType.Scriptable
until Camera.CameraType == Enum.CameraType.Scriptable

game:GetService("RunService").RenderStepped:Connect(function()
	Camera.Focus = DefaultCFrame
	local Center = Vector2.new(Camera.ViewportSize.X/2, Camera.ViewportSize.Y/2)
	local MoveVector = Vector3.new((Mouse.X-Center.X)/Scale, -(Mouse.Y-Center.Y)/Scale, 0)
	Camera.CFrame = DefaultCFrame * CFrame.Angles(math.rad(MoveVector.X), math.rad(MoveVector.Y), math.rad(MoveVector.Z))
	Camera.FieldOfView = 83
end)

Camera.CFrame = workspace.CameraPart.CFrame
Scripting the gui:
game:GetService("StarterGui"):SetCoreGuiEnabled(Enum.CoreGuiType.All, false) -- Disabling the ui

local Play = script.Parent.PlayButton
local ClickSFX = game.SoundService.Click
local HoverSFX = game.SoundService.Hover
local HoverLine = script.Parent.Line
local Line = script.Parent.Line1

Play.MouseEnter:Connect(function()
	HoverSFX:Play()
	Play.Text = ">Play<"
	HoverLine.Position = UDim2.new(0.487, 0,0.548, 0)
	HoverLine.Size = UDim2.new(0.004, 0,0, 0)
	HoverLine.Visible = true
	Play:TweenPosition(UDim2.new(0.408, 0,0.429, 0), Enum.EasingDirection.Out, Enum.EasingStyle.Elastic, 1.25, true) -- That "true" is to be able to override other tweens
	HoverLine:TweenPosition(UDim2.new(0.453, 0,0.548, 0), Enum.EasingDirection.Out, Enum.EasingStyle.Sine, 0.4, true)
	HoverLine:TweenSize(UDim2.new(0.08, 0,0, 0), Enum.EasingDirection.Out, Enum.EasingStyle.Sine, 0.4, true)
end)

Play.MouseLeave:Connect(function()
	Play.Text = "Play"
	Play:TweenPosition(UDim2.new(0.408, 0,0.449, 0), Enum.EasingDirection.Out, Enum.EasingStyle.Sine, 0.25, true)
	HoverLine:TweenPosition(UDim2.new(0.487, 0,0.548, 0), Enum.EasingDirection.Out, Enum.EasingStyle.Sine, 0.4, true)
	HoverLine:TweenSize(UDim2.new(0.004, 0,0, 0), Enum.EasingDirection.Out, Enum.EasingStyle.Sine, 0.4, true)
	wait(0.001)
	HoverLine.Visible = false
end)

Play.MouseButton1Click:Connect(function()
	game.SoundService.Click:Play()
	Line.Visible = true
	wait(0.001)
	Line:TweenPosition(UDim2.new(0.44, 0,0.501, 0), Enum.EasingDirection.In, Enum.EasingStyle.Linear, 0.25, true)
	wait(0.5)
	Line:TweenPosition(UDim2.new(-0.006, 0,-0.001, 0), Enum.EasingDirection.Out, Enum.EasingStyle.Sine, 0.5, true)
	Line:TweenSize(UDim2.new(1.109, 0,1, 0), Enum.EasingDirection.Out, Enum.EasingStyle.Sine, 0.5, true)
	wait(0.5)
	script.Parent.LoadingText.Visible = true
end)
Final product:


All of the code should be self-explanatory, I even added some text in the code as a way for you to learn what the code does. Thanks for reading, have an amazing day/night!