Why do we need to create tileable texture maps?
As we all know, textures are important to 3D game engines to ensure that material characteristics, like “brick wall” or “metal sheet” or “character’s skin”, look and feel right in the experience. In many cases, these textures may need to repeat to give the illusion that an entire object is textured, even if it’s referencing a smaller single image that is just repeated across the object’s surface.
Sometimes, a repeating texture that isn’t properly authored to seamlessly tile will have obvious, visible seams and repetitions. This lack of “tiling” makes a bad looking visual interruption every time the texture repeats across 3d surface. This article shows how to correctly author textures using Photoshop and Substance Sampler so they tile believably using some simple methods.

Let’s make a Tileable Texture using Photoshop
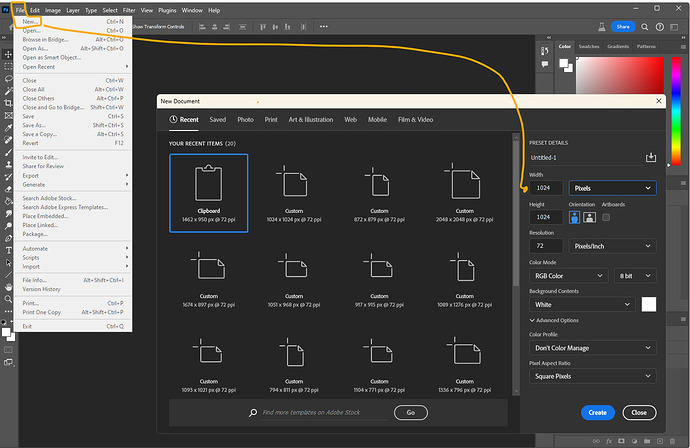
First up, open Photoshop. First thing we want to do is to create a new canvas. To do so, go to File → New and create a new document with 1024x1024 pixels. See the image below for a visual reference.

Once we have the new document created, we will have an empty white canvas. A Layer, that has no other information on it. Just like a new white blank paper sheet.

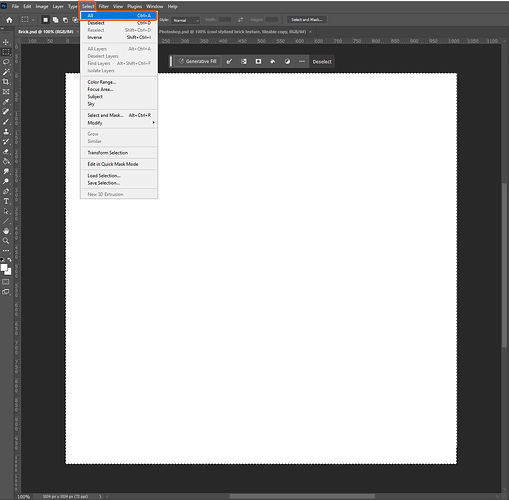
To save some time, we want to use a new feature from Photoshop called Generative Fill. Before we can use that feature, we need to select the entire blank document.
We can do that by using the Shortcut CTRL+A (Windows users) or by going to the Tab → Select → All as seen in the screenshot above.
Once we are at this point, we can now use the new Generative Fill Feature. It allows you to enter any text prompt you like, and describe an image you would like to create.

Enter the prompt to create the image you like and press the ‘Generate’ button
In our example, I created a Brick Texture. My prompt for this image was “cool stylized brick texture, tileable”.
Keep in mind, that every time you run a new prompt, you will get a completely new result.
The generated result is a stylized, cartoony, brick texture. Despite requesting in the prompt to make this texture seamless, the generative ai still falls short of being truly tileable.
How To Check if a Texture is Seamless
At first glance, it might appear as though the texture is tiling on both axes properly, but how can we confirm within Photoshop that the image is tiling on both X and Y axes (both up/down and left/right)?
This is easy by using the Offset Filter.

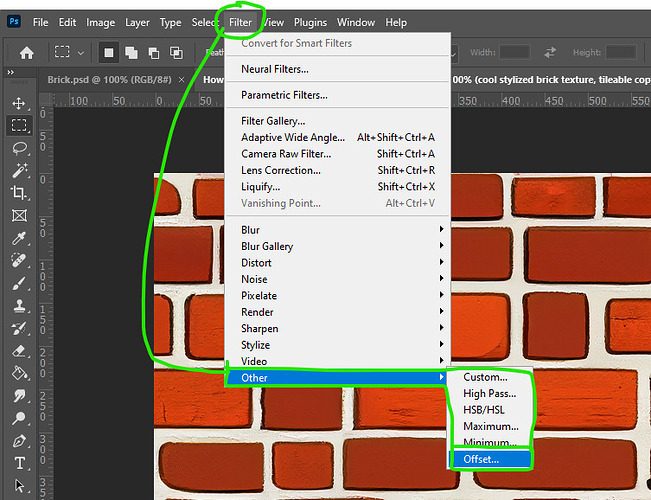
Let’s use the Offset Filter to check if our texture is tileable or not:
Go to → Filter → Other → Offset
Once you click the Offset Button, the Offset Property Window pops up. Here, we can enter any horizontal or vertical offset value we like. In our case, I just use +512 for both directions. As you can see in the screenshot below, we now moved 512 pixels to the right and the bottom. Now we can check if the edges of our texture map are seamless.

This texture map is not tileable
As we can see, they are not. We can see the seams, which means the overlapping edges on the end of each side do not match with the continuing other side of the edge. The edges on one side don’t smoothly connect with the edges on the other side. Bummer, right?
How to fix the Seams
There are several ways to fix seams. You can manually fix them by using any brush and manually paint over to remove the seams. With some patience and the right tools, you’ll be able to do that - but it can be very time consuming and results may vary.
There is even a better and faster way to do that using the Generative Fill tool again. With that, all we have to do is to select the area of the seams, and then use the Generative Fill tool on top of it.
So let’s try that. First, choose the Rectangular Marquee Tool from the Tool Bar on the left. And then, let’s create a selection that covers the seams. You can see my selection in the screenshot below.

Use the Rectangular Marquee Tool to select the areas of your seams
Once you have this done, we use again the magic Generative Fill Tool. This time, just leave the prompt field empty, don’t enter anything and click the Generate Button. Photoshop will create again three different options for you.

I liked the first version the best, as shown above
I liked the first variation the best and chose to go with that one. Our Texture Maps is 100% Tileable and all the seams are gone.
Now, let’s check again to confirm with certainty that the texture is tiling properly. Saved your .psd file and then export the texture. You can save it as a .png or .jpg image or any other format you want.
Then, let’s open the exported texture map again inside Photoshop. Now we can again use the Offset Filter and change the numbers as we like. No matter how many pixels you will offset your image, you should not see any seams anymore.

All the seams are gone
Some Advanced Tips
There are a few more things you can apply to fine-tune your texture. The first one I like to use is to check the Brick’s Form. After we applied the offset, we can also see that some Bricks are pretty long. And some bricks do also have some harsh border cuts.
This is super easy to fix. And again, we can use the powerful Generative Fill Tool. Below you can find a screenshot in which I highlighted the areas I would like to fix.

Finetuning Form and Shape
So this is totally up to your personal taste and creative wishes. Go ahead and make some selections over these areas and use again the Generative Fill Tool. Important: Make sure you do not make any changes directly on the edges. Otherwise, you will reintroduce seams again because the edges will not match.

The final result of our created Brick Texture using Photoshop
After some tweaks, I was pretty pleased with how quickly this came together. But, there was still one key enhancement I had in mind. Even if the texture map seems flawless in tiling, you might spot some repetition when it’s applied to larger areas. This tends to occur due to variations in brightness values. A significant contrast between dark and bright values can create a noticeable repeating pattern effect, so we may need to fine tune this texture map.
Finetuning a Tileable Texture Map with Substance Sampler
To tackle this issue, Substance Sampler offers a magical solution called Equalizing. This process works like a charm to balance out those pesky brightness variations, ensuring a smoother and more seamless result. It’s like waving a wand to eliminate any traces of repetitive patterns, leaving your textures looking flawlessly natural and immersive.
Moreover, in addition to the Equalizing feature, Substance Sampler has even more utility: the ability to automatically generate a set of PBR (Physically Based Rendering) Textures.
Furthermore, Substance Sampler works its magic by generating a base color map that smooths out any stark contrasts between bright and dark areas. This ensures that the tileable color pattern remains seamless and inconspicuous, guaranteeing a visually pleasing result without any noticeable repetition
Note:
After importing my Brick Texture into Substance Sampler. I used Plaster for the Shader Model. See the screenshot below for all the Parameter settings.

Category Plaster
Substance Sampler and the Power of the Equalizer Layer
As promised, there is this star tool inside Substance Sampler. The Equalizer Layer.
As mentioned earlier, think of the Substance Sampler Equalizer Layer as your texture’s best friend that evens out any brightness differences, smoothing things over for a seamless look. With this tool, your textures will look flawless, with less noticeable repeats or awkward contrasts.
You can add the Equalizer Filter by clicking the Add Layer Icon in the Layers Tab. See the screenshot below. Once done, change the Radius of the Basic Parameter Settings to your liking.

Adding the Equalizer Layer

Base Color - notice how nicely the equalizing effect smoothed out the contrast values

Normal Map

Roughness Map

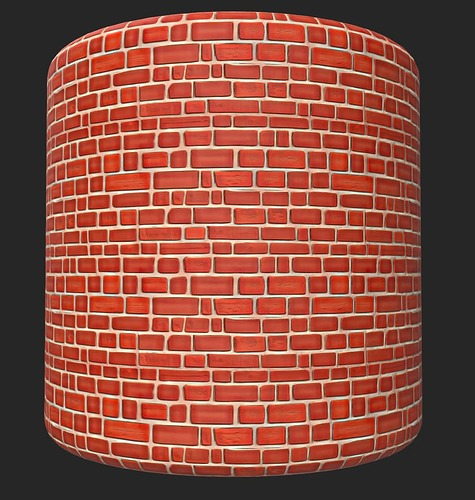
Our Final Tileable Stylized Brick Material including the PBR Texture Map Set
Mastering Tileable Textures from Photoshop to Substance Sampler
In summary, we explored Photoshop and Substance Sampler tools and utilities for tiling. We learned to create seamless textures in Photoshop and fine tuned those images in the Sampler tool - then generated a set of PBR textures from our initial image.
Let me know how these techniques work for you and if you have any questions!
Resources for Download:
Download .zip File that contains the following assets listed below:
- Photoshop File
- Substance Sampler File
- PBR Texture Set
- Roblox Place