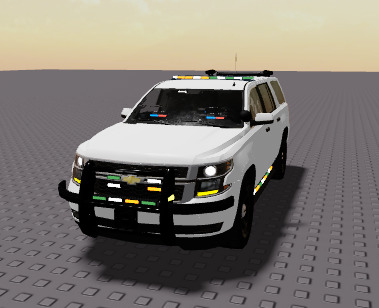
Hey! I’m Tony, today, I will be teaching you how to make your own police car easily! (Note: This is more of a “kit” but I will explain stuff about it. Also, this is my first tutorial, so feedback is appreciated).
Step 1:
First, we’re going to get our car.
You can use This or search “Department Ready” in tool box. Anything will work as long as it has the A-Chassis Tune script in it.

Step 2:
Great! Now that we have our police car, I am going to show you how to customize your ELS or Emergency Lights and Sirens.
First, Open Body>Lightbar
Now, you should see a punch of parts and scripts. To change the color of your lights, you can simply change the color of anything that’s titled something like this: “B4”
Here’s my example:

Also, if you want to know why my lights are brighter then yours, it’s probably because I have a bloom effect.
For scripting the light bars, just open any of the scripts inside of Lightbar and there should be some. You can come up with your own pattern by simply changing the transparency of the parts via the script, it should be pretty simple.
Step 3:
Great! Now we’re going to change the siren!
In “Lightbar”, find a part that’s called middle.
Inside middle, find the audios, you can listen to each one of them. If you like the sound of them, you can keep them. If not, I recommend finding some here.
Step 4:
In this step, I will teach you how to make your own skins or liveries for your vehicle. If you want to keep is undercover/unmarked but want to change the color, follow these steps.
First, search up “Color” and change the color of all those parts.
If you want your own skin, here’s how you do it. First, make sure you have the year and name of your vehicle. You may be able to find a template here. Or, you could go to lcpd:fr and find a livery for your car that matches the name and year. (Warning, some liveries are not to be reuploaded on other sites as they’re made for GTA, if anything happens to you, that’s on you, not me.)
Great! Now that you have you livery, you can upload it as a decal. Next, select all your color parts and put the decal id into “Texture ID”
![]()
Step 5:
Now that we have all of that done, it’s time for the fun stuff! c u s t o m i z a t i o n
If you would like to change the speed or any stuff like that, just open the A-Chassis Tune script and you can change the values there. Fair warning is that it can get quite complicated, so if you don’t know what anything is, just google it or something. Another cool thing is that you can add “Plugins”. Just look up A-Chassis Tune Plugins or A-Chassis Plugins. There should be some models that you can easily install.
Now, if you want to customize the interior, I have a pack that you can use here. Just make sure anything you add is in “Body”
Phew, we’re finally done. I know this was long and may be a bit confusing, just know that this is my first ever tutorial ever. If you have any questions, comments, or concerns, just let me know down below. Anyways, thanks!

