Today, I spent a couple hours messing around with vrms and roblox and finally was able to figure out how to import them.
(Remember to delete the default cube [Select it, press delete or x + enter])
IMPORTANT NOTICE: Before importing this model into your roblox game, please check to make sure the original creator permits porting.
Importing VRMS and MMD model:
The Addon for Blender:
- Install the Addon
Go to Edit → Preferences → Add-ons → Install → Then select the zip file of the extension → Press the checkmark next to it in the list of Addons.
It should look something like this:

- Importing Models
Go to File → Import → Pmd/Pmx
Select the model if it isn’t already
Go to File → Import → Vmd
Go to viewport shading to ensure all the textures are there and not missing.
There’s a chance that your model will not have the textures assigned,
In that scenario, expand the following section
Messed up textures
-
Select the mesh, it should have a little upside down triangle icon
-
Open the materials tab, it should be right above the checkerboard icon on the right properties panel
-
Select a material that is missing (or pink)
-
The surface property should be selected to MMDShaderDev, expand BaseTex
-
Hit ‘X’ next to the texture if there is one.
-
Hit ‘Open’ in the textures
-
Find the location of the texture and select it
It should be fixed now!
Converting to FBX
- Exporting
Go to File → Export → Fbx
Save it wherever you like, just remember where.
- Fixing up the model
Go to File → New → General
You can also hit undo and revert it to the default scene.
If you did not delete your previous light and camera before exporting, you will have to delete them.
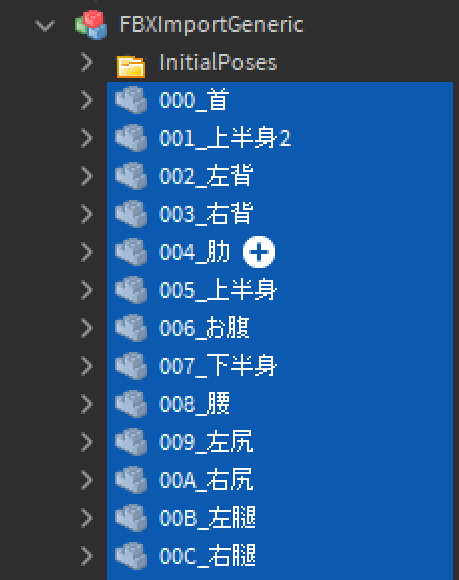
Now you’ll notice that the joints and rigid bodies are visible.
You can hide them by clicking on the eye.
IMPORTANT: To minimize effort, you can click, hold and drag over multiple eye icons, making them all non-visible.

Also you will notice the bones are visible, to hide them, got to ‘[Model Name]_arm’ and click the eye.
If you hit render right now, you’ll notice that all the textures are now white.
You’ll have to manually assign them.
-
Select the mesh, it should have a little upside down triangle icon
-
Open the materials tab, it should be right above the checkerboard icon on the right properties panel
-
Select a material that is white/blank
-
The surface property should be selected to ‘PrincipledBSDF’
-
Press the small circle next to BaseColor and select Image Texture.

-
The material will now turn black
-
Press ‘Open’ and select your texture
-
It will now appear!
If your model has a lot of arbitrary materials for hands, gloves, shirt, pants, etc, but the texture is the same, DO NOT manually import them all. Simply hit the minus sign when you select a texture, and remove all the extra ones.
-
Repeat above steps to assign texture images to all materials
-
You may notice that your eye texture is gone! When you assign the face texture to the eye material, it doesn’t show! Don’t worry! Your texture for the eye is part of your hair texture instead. (NOTE: this is only the case in certain scenarios)
I previously had around 30 textures btw

If you head over to viewport shading, you’ll see that the textures are in place.
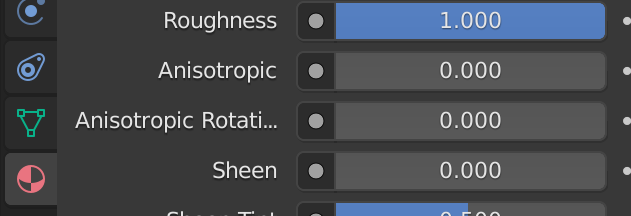
There’s a very large chance that your surface is really shiny/glossy right now. In that scenario, follow the steps below:
-
Select a material from the materials panel
-
Edit the materials roughness and change it to 1.
Before:

After:

Properties:
You’re pretty much done now, (in blender at least). Go to the timeline at the bottom of the screen, it should have a play button.
Try pressing the play button and make sure your animation works.

Splitting the meshes:
Select the mesh, it should have a upside down triangle icon. You’ll find it under: [Model name] → [Model name]_arm. It’ll be named as [Model name]_mesh. You can also search for it if you can’t find it.
- Hit ‘TAB’, you’ll enter into edit mode.
- Hit ‘P’ and press ‘Material’
This’ll split your mesh based on materials, you will now have different meshes with a material each, INSTEAD of multiple materials in 1 mesh, this allows you to not need to bake the textures and spend time. - You’ll now notice that the hair is separated from the head, and possibly the eye.
- In order to fix this, exit edit mode by pressing ‘TAB’ once again.
Exporting!:
Export your file once again as a fbx. Be sure to name it something different so you don’t get it mixed up with the old file.
It’s also recommended to save your project as a .blend file so you can revisit it in case you need to change something.
Depending on how powerful your computer is, blender may or may not stop responding. Usually, it stops responding for around 2 seconds on a fast pc, and about 10 on a fairly new laptop. Up to a minute on an older laptop or pc.
IMPORTING THE MODEL TO STUDIO:
-
Open studio and whatever game/place you’d like.
-
Go to the plugins tab and hit ‘Avatar Importer’
-
Press custom, and find your FBX file.
-
Once imported, you’ll notice that the Rigid Bodies/Joints are now visible (whatever they were again)
-
Find all of them, select them, and delete them.
DO NOT DELETE THE MESHES CALLED [Model name]_mesh or anything starting with that.
-
Hit Animation Editor, then select the model/rig.
-
Name it whatever you’d like, it doesn’t matter.
-
Hit the 3 dots next to the name of the animation on the top left of the animation editor window.
-
Hit Import → From FBX Animation then find your FBX file you just imported and select it. (This’ll probably make roblox studio crash for a bit(
-
It should now be done! Hit the Play button in the animation editor to check out the animation!
FINAL RESULT:
(Btw, credits for this model: MiHoYo)
QUESTIONS:
If you have any questions or need clarification, please reply, I’ll try my best to help 


