How to install wally
introduction
Wally is a package manager for roblox. Which allows you to insert packages directly into your project with ease. You can install stuff like Knit, Roact, and more!
Although wally is a good recourse, the docs are extremely limited. They dont explain anything about Wally and assume you have all the software needed to install it. So today, I’ll show you how to install Wally.
tutorial
installing foreman
Forman is a tool chain manager which allows you to install command line tools. Like rojo and wally. It’s made by roblox themselves and is meant to simplify installing these tools.
We need to install foreman in order to actually install wally.
First, we need to download foreman on our pc, go to this and click on the zip release for your OS.
Personally, I’m on windows so i’ll select the windows option.

Once the zip file installs, click the “extract” button at the top

Once you do, you should see a ui like this:

Now, dont click extract just yet. Inside of the path textbox, enter “C:\Program Files” as your path(change C: to your drive’s name). Keep in mind, you need to be an administrator to do this. But if you dont have those perms, just put it in documents(the rest of the process should remain the same with slight differences if you do put it in documents).
Now click the “extract” button and wait.
Now you should see a “foreman.exe” file inside of your program files directory(or where ever you placed it). For the rest of the process to work, create a new folder(right click → new → folder) and call it “Foreman.” Now move your foreman.exe file into there.
Now, click on foreman.exe and run the file. Once you run it, you see nothing happens. Well that’s because foreman behind the scenes created some new files for us to use as our command line.
To make sure these files installed correctly, go to your users directory and click on your user. Now when you go here, you should see a “.foreman” file. If so then you did this correctly!
Now when you open up command prompt and type “foreman”, it’ll return with an error. This is because we have to add foreman to our system variables.
So inside your search, type “edit environment variables for your account.” Click on the first result, now this may look overwhelming but dont worry. You’re going to need to click on "Path "and then “Edit”

Once you click on path, another UI should pop up
Now go to the right hand side and click “New.” This will create a new text box for you to enter the path in.

For simplicity, click on the side click “browse…”

Once you do, a file prompt will pop up.
Now, go to your program files(This PC → disk → Program Files) and click on the “Foreman” folder. Then click on “Ok.”
Finally, we need to do this one more time. Click on “new” again and then “browse” again. Now go to your .foreman folder(under your user object) and click on the arrow there and select “bin.” Now click on “ok”.
Once you finish that, restart command prompt and type “foreman.” Once you do, you should now see something other than the error. If so then congrats! You just installed foreman!
Now that we’ve gotten that out of the way, lets install wally!
installing wally
Make sure you have foreman installed, if not check out the tutorial above.
Now, go to your user(C:\Users\YOURNAME) and click on the .foreman file.
![]()
Once you do, you should see a “foreman.toml” file. This file is where we will list our tools. Click on this file and open it using your favorite code editor. Personally i’ll use VS code, but if you dont have that you can use notepad.

Once you do, you should see something like this(dw if u dont have syntax highlighting btw):

Comments are done similarly to how python is(using the # symbol.)
Now remove the “#” from the line rojo is on and change the version to 6.2.0(not required btw)
Your file should be something like this:
# This is Foreman's configuration file. You can edit it to tell Foreman about
# new tools that you'd like to install, or to change versions of tools you
# already have.

# When adding new tools, make sure to run `foreman install` so that their
# binaries are installed.

[tools]
# Put any tools you want to install here. To install Rojo 7, you'd use:
rojo = { github = "rojo-rbx/rojo", version = "6.2.0" }
Now under rojo, add in the following:
wally = { source = "UpliftGames/wally", version = "0.3.1" }
Your file should look something like this:
# This is Foreman's configuration file. You can edit it to tell Foreman about
# new tools that you'd like to install, or to change versions of tools you
# already have.

# When adding new tools, make sure to run `foreman install` so that their
# binaries are installed.

[tools]
# Put any tools you want to install here. To install Rojo 7, you'd use:
rojo = { github = "rojo-rbx/rojo", version = "6.2.0" }
wally = { source = "UpliftGames/wally", version = "0.3.1" }
Once you do this, save the file with ctrl + s and open up command prompt. Once you do, type in “foreman install.” Once this is done, type in “foreman list.” This will list all of your tools you have installed.
Once you do, you should see Wally inside that list, if so then congrats! You just installed wally!

To make sure it’s running correctly, type in “wally” inside the command prompt. It should look something like this:

If so then you have successfully installed wally!! Good job!
setting up a project with wally
Now that we’ve installed wally, lets create a new project using it. I assume you already have VS code installed, if not then install it right now.
First, create a new folder, by right clicking then click new → folder.
Name this folder something like “wally test.” Press enter.
Now go to the top and click “File”

Then click “Open Folder”

Now select the new folder you created. Now you have an empty project.
To initialize wally, click on terminal

Then click on “new terminal”
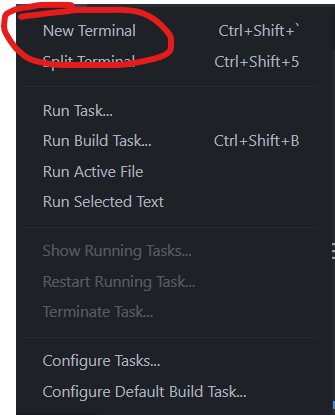
Now you should see a new terminal session appear at the bottom(or anywhere doesn’t matter).
Then type in “wally init.” Now you should see a new file called “wally.toml”
Open up this new file and now you should see something like this:

Under the [package] section is where you’ll list data about your package(if your making on.) If not then ignore it.
Under the [dependencies] is where you’ll list your packages that you want.
So let’s add a package. For this, let’s add in Roact. To do this we can do the following:
[package]
name = "urusername/wally test"
version = "0.1.0"
registry = "https://github.com/UpliftGames/wally-index"
realm = "shared"

[dependencies]
Roact = "roblox/roact@1.4.0"
In order to add in a package, you do it as a lua table. Where you add an index with the value.
The index is the package name, you can name it whatever you want. The value is where wally will download this package and it’s version. In this case, the value will be “roblox/roact@1.4.0”.
Now, in order to install this package, we can run “wally install” inside of our terminal. BUT WAIT make sure your name(under the [package] section) doesn’t include any spaces. Wally requires that your “package” doesn’t contain any spaces. Otherwise it’ll error. An easy fix for this is to replace the spaces with dashes. As wally supports those.
Example:
[package]
name = "urusername/wally-test" # replaced space with a dash
version = "0.1.0"
registry = "https://github.com/UpliftGames/wally-index"
realm = "shared"

[dependencies]
Roact = "roblox/roact@1.4.0"
Now run “wally install” inside of your terminal.
Once you do, you should see 2 new stuff. A wally.lock file and a Packages folder.
All we care about is the packages folder. The wally.lock file is automatically generated by wally and isn’t meant to be manually edited.
Now, lets create a new rojo project in order to use wally.
This part assumes you already have rojo installed and know how to use it.
To do so, create a new file inside of your directory(rightclick → new file) and name it default.project.json. This is where we all add all our project data.
So let’s add some base code:
{
    "name": "wally test",
    "tree": {
        "$className": "DataModel"
    }
}
I wont go into too much detail on this code as this tutorial is on how to use wally, not how to use rojo.
Next, we can then add in our packages folder into replicated storage. To do so, we can do the following:
{
    "name": "wally test",
    "tree": {
        "$className": "DataModel",
        "ReplicatedStorage": {
            "$className": "ReplicatedStorage",
            "$ignoreUnknownInstances": true,
            "Packages": {
                "$path": "Packages"
            }
        }
    }
}
This code will create a new folder called “Packages” inside of Replicated storage. With it’s path being the Packages folder created by wally.
Now lets start rojo. Since we installed rojo inside of foreman we can type “rojo serve” inside of the terminal and get rojo up and running.
Now you should see something like this:

Now inside of studio, click the “connect” button inside of your rojo plugin. Make sure the version of rojo u have installed and the plugin’s version matches. Otherwise this wont work.
And now you should have a “Packages” folder inside of replicated storage!

Now, lets go back to VS code and start writing some code!
Lets start off by creating a starterplayer scripts folder inside of our project.
To do so, right click and press “new folder.” Name the folder “StarterPlayerScripts.” Now go to your default.project.json file and add in the following:
{
    "name": "wally test",
    "tree": {
        "$className": "DataModel",
        "ReplicatedStorage": {
            "$className": "ReplicatedStorage",
            "$ignoreUnknownInstances": true,
            "Packages": {
                "$path": "Packages"
            }
        },
        "StarterPlayer": {
            "$className": "StarterPlayer",
            "StarterPlayerScripts": {
                "$className": "StarterPlayerScripts",
                "$path": "StarterPlayerScripts"
            }
        }
    }
}
Now create a new file inside of your starter player scripts folder. Name the file “ui.client.lua”
And let’s create some ui using roact.
local Players = game:GetService("Players")
local ReplicatedStorage = game:GetService("ReplicatedStorage")

local Roact = require(ReplicatedStorage:WaitForChild("Packages"):WaitForChild("Roact"))

local ui = Roact.createElement("ScreenGui", {}, {
    message = Roact.createElement("TextLabel", {
        Size = UDim2.fromOffset(200, 50),
        Text = "Hello Roact and Wally!"
    })
})

Roact.mount(ui, Players.LocalPlayer.PlayerGui)
One thing to note:
you usually do not want to modify the _index folder. As this contains the source code to your dependencies. Instead directly require the package from the Packages folder.
Now, if you have the Roblox LSP extension installed, you should notice that there’s way better auto complete. With the types of instances you could use and the properties of the specified instance.


You also can see the methods inside of the module directly inside the auto complete.

And much more.
Once you hit play in studio, you should see something like this:

outro
I hope this could help you out! Wally is a really powerful tool which can help you out in developing. I haven’t seen anyone make a tutorial on how to use wally/install wally. Sorry if this was a long one, there was a LOT to type. If you want to support me you can press the little heart button below. PEACE and have a good day!
edit: thx for 10 hearts btw glad i could help
