This tutorial will go over everything needed to make a 2D game without the use of any UI whilst still feeling like there is no third dimension, similar to paper in a way because paper takes up some space in the third dimension but it’s so thin that paper can seem 2D. This works when playing solo however I do not know if it works with multiple players. This tutorial is not perfect and has a few issues. Some players have fallen through the entire map however I have no idea what might be causing it.
Camera & Movement Scripts
First you will need a 2D camera script.
A script like the following should set the camera to be stuck in 1 position.
local camera = game.Workspace.CurrentCamera
local player = game.Players.LocalPlayer
local Character = player.Character or player.Character:Wait()
camera.CameraType = Enum.CameraType.Scriptable
camera.CameraSubject = player.Character.Head

local part = Instance.new("Part", player.Character.Torso)
part.Orientation = Vector3.new(0, 180, 0) --change
part.Name = "CameraPart"
part.Size = Vector3.new(1,1,1)
part.Anchored = true
part.CanCollide = false

game:GetService("RunService").Stepped:Connect(function()
	part.Position = Character.Torso.Position + Vector3.new(0, 3, -20) --3 makes it so the camera follows the player's head and -20 is the distance from the player the camera is.
	camera.CFrame = part.CFrame

end)
Note that this script should be a local script under StarterCharacterScripts.
Next get the PlayerModule scripts. This can be done by testing the game in Roblox Studio, going under StarterPlayerScripts, copying the entire PlayerModule, stop testing the game, and pasting the scripts into StarterPlayerScripts.
Next find the ControlModule under the PlayerModule. Next under the ControlModule find the Module Script called “Keyboard”. Then delete the parts that allow the player to move left and right. These are lines 100 - 111.
I have also provided that script without the left and right movement if you choose to just copy and paste it over the normal Keyboard script.
Keyboard Script Without Left & Right Movement
--!nonstrict
--[[
	Keyboard Character Control - This module handles controlling your avatar from a keyboard

	2018 PlayerScripts Update - AllYourBlox
--]]

--[[ Roblox Services ]]--
local UserInputService = game:GetService("UserInputService")
local ContextActionService = game:GetService("ContextActionService")

--[[ Constants ]]--
local ZERO_VECTOR3 = Vector3.new(0,0,0)

--[[ The Module ]]--
local BaseCharacterController = require(script.Parent:WaitForChild("BaseCharacterController"))
local Keyboard = setmetatable({}, BaseCharacterController)
Keyboard.__index = Keyboard

function Keyboard.new(CONTROL_ACTION_PRIORITY)
	local self = setmetatable(BaseCharacterController.new() :: any, Keyboard)

	self.CONTROL_ACTION_PRIORITY = CONTROL_ACTION_PRIORITY

	self.textFocusReleasedConn = nil
	self.textFocusGainedConn = nil
	self.windowFocusReleasedConn = nil

	self.forwardValue  = 0
	self.backwardValue = 0
	self.leftValue = 0
	self.rightValue = 0

	self.jumpEnabled = true

	return self
end

function Keyboard:Enable(enable: boolean)
	if not UserInputService.KeyboardEnabled then
		return false
	end

	if enable == self.enabled then
		-- Module is already in the state being requested. True is returned here since the module will be in the state
		-- expected by the code that follows the Enable() call. This makes more sense than returning false to indicate
		-- no action was necessary. False indicates failure to be in requested/expected state.
		return true
	end

	self.forwardValue  = 0
	self.backwardValue = 0
	self.leftValue = 0
	self.rightValue = 0
	self.moveVector = ZERO_VECTOR3
	self.jumpRequested = false
	self:UpdateJump()

	if enable then
		self:BindContextActions()
		self:ConnectFocusEventListeners()
	else
		self:UnbindContextActions()
		self:DisconnectFocusEventListeners()
	end

	self.enabled = enable
	return true
end

function Keyboard:UpdateMovement(inputState)
	if inputState == Enum.UserInputState.Cancel then
		self.moveVector = ZERO_VECTOR3
	else
		self.moveVector = Vector3.new(self.leftValue + self.rightValue, 0, self.forwardValue + self.backwardValue)
	end
end

function Keyboard:UpdateJump()
	self.isJumping = self.jumpRequested
end

function Keyboard:BindContextActions()

	-- Note: In the previous version of this code, the movement values were not zeroed-out on UserInputState. Cancel, now they are,
	-- which fixes them from getting stuck on.
	-- We return ContextActionResult.Pass here for legacy reasons.
	-- Many games rely on gameProcessedEvent being false on UserInputService.InputBegan for these control actions.


	local handleMoveLeft = function(actionName, inputState, inputObject)
		self.leftValue = (inputState == Enum.UserInputState.Begin) and -1 or 0
		self:UpdateMovement(inputState)
		return Enum.ContextActionResult.Pass
	end

	local handleMoveRight = function(actionName, inputState, inputObject)
		self.rightValue = (inputState == Enum.UserInputState.Begin) and 1 or 0
		self:UpdateMovement(inputState)
		return Enum.ContextActionResult.Pass
	end

	local handleJumpAction = function(actionName, inputState, inputObject)
		self.jumpRequested = self.jumpEnabled and (inputState == Enum.UserInputState.Begin)
		self:UpdateJump()
		return Enum.ContextActionResult.Pass
	end

	-- TODO: Revert to KeyCode bindings so that in the future the abstraction layer from actual keys to
	-- movement direction is done in Lua
	ContextActionService:BindActionAtPriority("moveLeftAction", handleMoveLeft, false,
		self.CONTROL_ACTION_PRIORITY, Enum.PlayerActions.CharacterLeft)
	ContextActionService:BindActionAtPriority("moveRightAction", handleMoveRight, false,
		self.CONTROL_ACTION_PRIORITY, Enum.PlayerActions.CharacterRight)
	ContextActionService:BindActionAtPriority("jumpAction", handleJumpAction, false,
		self.CONTROL_ACTION_PRIORITY, Enum.PlayerActions.CharacterJump)
end

function Keyboard:UnbindContextActions()
	ContextActionService:UnbindAction("moveForwardAction")
	ContextActionService:UnbindAction("moveBackwardAction")
	ContextActionService:UnbindAction("moveLeftAction")
	ContextActionService:UnbindAction("moveRightAction")
	ContextActionService:UnbindAction("jumpAction")
end

function Keyboard:ConnectFocusEventListeners()
	local function onFocusReleased()
		self.moveVector = ZERO_VECTOR3
		self.forwardValue  = 0
		self.backwardValue = 0
		self.leftValue = 0
		self.rightValue = 0
		self.jumpRequested = false
		self:UpdateJump()
	end

	local function onTextFocusGained(textboxFocused)
		self.jumpRequested = false
		self:UpdateJump()
	end

	self.textFocusReleasedConn = UserInputService.TextBoxFocusReleased:Connect(onFocusReleased)
	self.textFocusGainedConn = UserInputService.TextBoxFocused:Connect(onTextFocusGained)
	self.windowFocusReleasedConn = UserInputService.WindowFocused:Connect(onFocusReleased)
end

function Keyboard:DisconnectFocusEventListeners()
	if self.textFocusReleasedConn then
		self.textFocusReleasedConn:Disconnect()
		self.textFocusReleasedConn = nil
	end
	if self.textFocusGainedConn then
		self.textFocusGainedConn:Disconnect()
		self.textFocusGainedConn = nil
	end
	if self.windowFocusReleasedConn then
		self.windowFocusReleasedConn:Disconnect()
		self.windowFocusReleasedConn = nil
	end
end

return Keyboard
Building
Now you will need an area for the player to move around in. First create a background. I made my background 1 stud thick and 2,000 studs in the other directions to make a giant square. Next you may center the part by setting it’s position to (0,0,0). Now move the background 5,000+ studs up. This is so that if you add on other background parts on the side (Maximum part size 2048) then it won’t go into the void. Make sure to anchor your background part! Now you can adjust the background to however you like. Personally I made my background’s material Neon and made it’s color (100,100,100). You may lock the background part to make it easier on yourself and name the background part something like “Background”.
Now create a part and put it somewhere near the center of the background. Make sure to anchor the part as well. Next make the part 0.1 studs or less thick. This is to stop ambient occlusion and to help with the 2D effect. Scale the part to your liking however keep it at most 0.1 studs thick. Make sure the part is still up against the background. You may change the part’s material and color to your liking however I made all of mine Smooth Plastic and their color (110,110,110). I make all of the parts like this except for a few because I’m making a silhouette effect.
Now that you have made your base part you need to make a part for the player to actually walk on. This is very simple to do. First copy the part you just made and paste it into workspace at it’s original location. Then scale it however many studs out until it is 3 studs thick (2.9 studs if the original part was 0.1 studs thick). Then set the part’s transparency to 1. Now you have created an area for the player to walk on.
You should create a SpawnLocation next to those parts you just made. Then set the SpawnLocation’s transparency to 1 and it’s decal’s transparency to 1. Next make the spawn location 1 stud in depth or more and 3 studs in the other directions. Now you may add a Base Part like the one before to match the SpawnLocation’s size. You may scale the part’s depth more to match the other Base Part. I’m calling the 0.1 stud thick parts that you can actually see Base Parts and the transparent parts Collision Parts.
Now you may add a Base Part and a Collision Part on the side of the other to make a wall. Now that you have that you should add another Collision Part. This Collision Part should be 1 stud thick or more. Now place this Collision part on the side furthest from the background of the wall Collision Part. Now make this Collision Part only overlap 1 stud onto the other one. Now make it over lap 1 stud onto the floor Collision Part. Then scale it to match the length of the floor Collision Part. Now you have a full area for the player to move in.
StarterCharacter
Now you must create a StarterCharacter. You can either find a blank StarterCharacter from the creator marketplace or use a plugin such as Character Inserter. I would make the StarterCharacter R6 because that’s what works at least for me. Now make everything on the StarterCharacter have a transparency of 1. Now find a white decal on the creator marketplace and put it on every single side of each part of the StarterCharacter. Then change the decal’s color to your likings. This is to stop ambient occlusion.
Now name your StarterCharacter the name “StarterCharacter” if not already. Now put the StarterCharacter under StarterPlayer. Make sure your StarterCharacter is unanchored. Now go under Game Settings. Next find the tab called “Avatar” Then set the Avatar Type to R6 (If you chose to make your StarterCharacter R6 otherwise choose R15). Now hit the save button.
Lighting
Set your Lighting properties to match these properties below.
Ambient: [255,255,255]
Brightness: 0
ColorShift_Bottom: [0,0,0]
ColorShift_Top: [0,0,0]
EnviromentDiffuseScale: 1
EnviromentSpecularScale: 1
GlobalShadows: False
OutdoorAmbient: [255,255,255]
ShadowSoftness: 0.2
Technology: ShadowMap
Archivable: True
ClockTime: 0
GeographicLatitude: 0
TimeOfDay: 00:00:00
ExposureCompensation: 0.5
UseCurrentLighting: False
Set your Atmosphere properties to match the properties below.
Density: 0
Offset: 0
Glare: 0
Haze: 0
Set your SunRay property Enabled to False as well.
Some things here may be adjusted but this helps with the 2D effect. In order to change the color of everything you may add ColorCorrection and use scripts like the following to change is as needed.
ColorCorrection Change Script
local ColorCorrection = game.Lighting.ColorCorrection
ColorCorrection.Parent = game.Lighting
local Part = script.Parent
local ChangeTime = false

local function ColorChange()
	if ChangeTime == false then
		ChangeTime = true
		ColorCorrection.TintColor = Color3.fromRGB(0,190,100)
		task.wait(0.1)
		ColorCorrection.TintColor = Color3.fromRGB(0,180,100)
		task.wait(0.1)
		ColorCorrection.TintColor = Color3.fromRGB(0,170,100)
		task.wait(0.1)
		ColorCorrection.TintColor = Color3.fromRGB(0,160,100)
		task.wait(0.1)
		ColorCorrection.TintColor = Color3.fromRGB(0,150,100)
		task.wait(0.1)
		ColorCorrection.TintColor = Color3.fromRGB(0,140,100)
		task.wait(0.1)
		ColorCorrection.TintColor = Color3.fromRGB(0,130,100)
		task.wait(0.1)
		ColorCorrection.TintColor = Color3.fromRGB(0,120,100)
		task.wait(0.1)
		ColorCorrection.TintColor = Color3.fromRGB(0,110,100)
		task.wait(0.1)
		ColorCorrection.TintColor = Color3.fromRGB(0,100,100)
		task.wait(0.1)
		ColorCorrection.TintColor = Color3.fromRGB(0,90,100)
		task.wait(0.1)
		ColorCorrection.TintColor = Color3.fromRGB(0,80,100)
		task.wait(0.1)
		ColorCorrection.TintColor = Color3.fromRGB(0,70,100)
		task.wait(0.1)
		ColorCorrection.TintColor = Color3.fromRGB(0,60,100)
		task.wait(0.1)
		ColorCorrection.TintColor = Color3.fromRGB(0,50,100)
		task.wait(0.1)
		ColorCorrection.TintColor = Color3.fromRGB(0,40,100)
		task.wait(0.1)
		ColorCorrection.TintColor = Color3.fromRGB(0,30,100)
		task.wait(0.1)
		ColorCorrection.TintColor = Color3.fromRGB(0,20,100)
		task.wait(0.1)
		ColorCorrection.TintColor = Color3.fromRGB(0,10,100)
		task.wait(0.1)
		ColorCorrection.TintColor = Color3.fromRGB(0,0,100)
	end
end

Part.Touched:Connect(ColorChange)
The Final Result
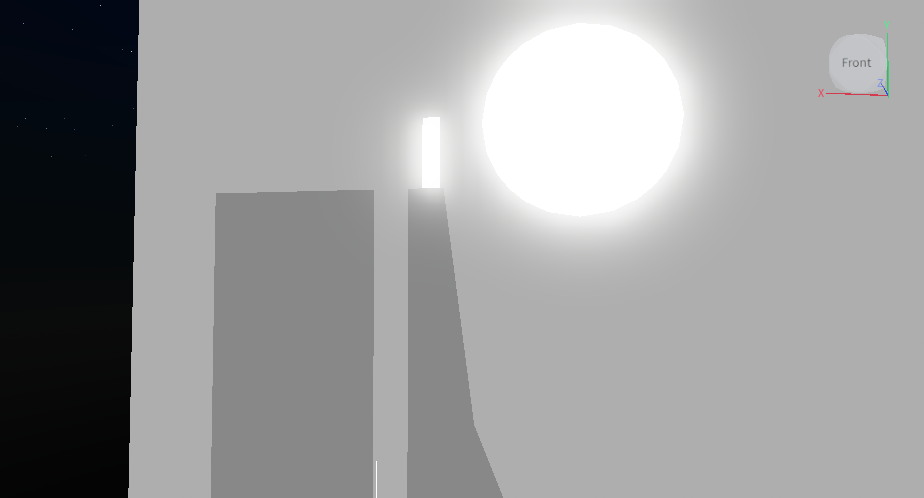
The final result will vary from person to person however the following screenshots show what my game looks like.


This concludes the tutorial on how to make a 2D game without UI. If you have any suggestions or comments then you may reply to this topic. Many things could have been better about this however I am inexperienced so the more experienced of people may find some things that somebody could do to improve on this.
If you want to play my game yourself and see how it turned out I will leave a link to it. The game is called Hypnagogia.