HOW TO MAKE A DYNAMICAL CUSTOM CHAT BUBBLE
Let´s begin!
Creating the Custom Chat bubble
First things first, we need to create the chat bubble design that we will be using. For this I am using BillboardGui.
To start, we add a Rig to our workspace to use as a reference to where the custom chat bubble will appear on. Remember this does not always have to be a Humanoid character, it can just be a [Basepart](https://create.roblox.com/docs/reference/engine/classes/BasePart).
First, add a rig (NPC) or any part into your game. This will be the object that will display chat bubbles.

To make the chat bubble look clean, we need to hide the NPC’s default name display.
- Select the NPC in the Explorer.
- Go inside it and find Humanoid then select it.
- Go to Properties and set DisplayDistanceType to None (this prevents the name from showing above the NPC).
(https://create.roblox.com/docs/reference/engine/classes/Humanoid#DisplayDistanceType)

Next, we’ll create the UI that will display speech and thought bubbles.
- Go to the NPC´s head and select it.
- Right click the Head, then click Insert Object > BillboardGui.
- Rename the BillboardGui to DialogChat.
- Set the
LightInfluenceproperty to0(so the UI isn’t affected by lighting). - Set the
Sizeproperty to{5,0,1,0}. - Set the
StudsOffsetWorldSpaceproperty to{0,1.5,0}(positions the bubble slightly above the NPC’s head).

Add a Frame for the Chat Box
- Inside
DialogChat, insert a Frame. - Rename the Frame to Main.
- Set the
BackgroundColor3property to{46,46,46}(dark gray for the chat box). - Set the
Sizeproperty to{1,0,1,0}(fills the entireBillboardGui).
- Inside
Main, insert a UICorner. - Set the
CornerRadius={1,0}(makes the chat bubble rounded).


Add a Text Label for the Message
- Inside
Main, insert a TextLabel. - Rename the TextLabel to MessageText.
- Set the
BackgroundTransparencyproperty to1(removes the background). - Set the
Sizeproperty to{1,0,1,0}(makes it fill the entire frame). - Set the
FontFaceproperty toFredokaOne(you can use any font, but this looks nice). - Set the
TextColor3property to{255,255,255}(white text). - Set the
TextScaledproperty totrue(ensures the text resizes properly).

Add Padding to the Chat Box. This makes sure the text inside has some spacing and doesn’t touch the edges.
- Inside
Main, insert a UIPadding. - Set the
PaddingBottom,PaddingLeft,PaddingRight,PaddingTopall to{0.1,0}.

For testing purposes, we will do the following:
- Set the
Visibleproperty of the MessageText to false (to hide it).- Set the
Sizeproperty of theDialogChat(BillboardGui) to{2,0,1,0}(this will resize the BillboardGui to a thinking state size).This will help us visualize how the BillboardGui will look when the NPC is thinking (when it is loading).
Add a Loading Icon for “Thinking” Mode. This will be used for the “thinking” effect, where the NPC shows a loading animation.
- Inside
Main, insert a newFrame. - Rename the Frame to loading.
- Set the
AnchorPointproperty to{0.5,0.5}(keeps it centered). - Set the
BackgroundTransparencyproperty to1(makes it transparent/invisible). - Set the
Positionproperty to{0.5,0,0.5,0}(places it in the center of the chat box). - Set the
Sizeproperty to{0.308, 0, 0.617, 0}.
- Inside
loading, insert an ImageLabel. - Set the
AnchorPointproperty to{0.5,0.5}(keeps it centered). - Set the
BackgroundTransparencyproperty to1(removes the background). - Set the
Positionproperty to{0.5,0,0.5,0}(centers it). - Set the
Sizeproperty to{1,0,1,0}(fills the loading frame). - Set the
Imageproperty to (set this to a spinning loading icon from the Toolbox, in my case I used17021132616).

Creating the Localscript
We will need to put the DialogChat(BillboardGui) somewhere and only occupy it when needed, in this case we will put it inside a Localscript. This does not do any magic but it serves as an easy access for when we are scripting and as well hide it.
- In
StarterPlayerScripts, insert aLocalScript. - Rename the Localscript to
DialogChatHandler. - Drag the
DialogChat(BillboardGui) inside theLocalScript.

We will start editing this script later.
Choosing the Typing sound
For the typing sound, choose one that seamlessly loops, meaning it should sound continuous without any noticeable delay at the beginning or end of the sound. So take your time to find one that suits your sound choice and gets its Sound Id.
- Inside
DialogChatHandler, insert a Sound. - Rename the Sound to typing.
- Set the
Loopedproperty totrue(so it plays continuously while the NPC is talking). - Set the
RollOffMaxDistanceproperty to60(so the sound isn’t heard from too far away). - Set the
SoundIdproperty to a typing sound effect (in this case, the one I used was5416502002).


Setting Up the Remote Events
These will allow the server to trigger speech and thought bubbles dynamically on the selected clients (clients are players).
We use RemoteEvents because some functions, like GetTextSize, only work on the client. Since we need
GetTextSizeto dynamically adjust the chat bubble’s size based on the text, we handle this logic on the client.
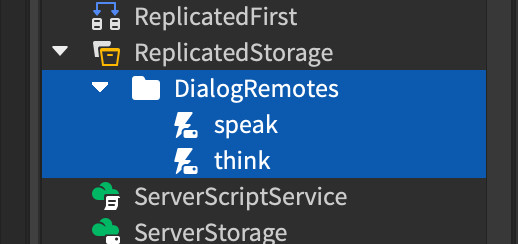
- In
ReplicatedStorage, create aFolder. - Rename the folder to DialogRemotes.
- Inside
DialogRemotes, create two RemoteEvents. - Rename one of the
RemoteEventsto speak and the other to think.

Now that everything is set up, your NPCs (or any parts) should be able to speak dynamically with resizable chat bubbles and “think” using a spinning loading icon once we finish the scripting part!
Scripting
This is the fun part where we begin to create the magic, and by magic I mean scripting, creating the full functionality of the system through code. Open the DialogChatHandler(Localscript) we created and start scripting!
First we are going to declare the services we will be using.
----------  SERVICES ----------
local TextS = game:GetService("TextService")
local TS = game:GetService("TweenService")
local RS = game:GetService("ReplicatedStorage")
-
TextService (
TextS) - Used to calculate the size of the text in the chat bubble. -
TweenService (
TS) - Helps create smooth animations when the chat bubble appears and disappears. -
ReplicatedStorage (
RS) - Stores remote events that allow the server to tell the client when an NPC should speak or think.
Then we declare the variables we will be using.
---------- VARIABLES ----------
local remotes = RS:WaitForChild("DialogRemotes")
local SpeakingThreads = {}-- Stores all the ongoing speaking threads according to each part
-
remotes- A folder insideReplicatedStoragecontaining events that trigger speaking or thinking. -
SpeakingThreads- Stores information about active speech or thought bubbles for each part.
local MaxXOffset = 560 --Max X Offset Size of the billboard
local MaxXScale = 7 -- Max X Scale Size of the billboard
local MinXScale = 2 --Min Y Scale Size of the billboard

local MaxYOffset = 600 --Max Y Offset Size of the billboard
local MinYOffset = 24 --Min Y Offset Size of the billboard
- These will let us know the minimum and maximum sizes that DialogChat(BillboardGui) can get to.
local DialogDuration = 10
- The number of seconds a speech bubble stays visible before closing.
We will now create the functions we will be using.
We will create a function that will reset the DialogChat(BillboardGui) just in case if we were for some reasons testing and sizing it manually for accomodations.
----------  FUNCTIONS ----------
local function reset_dialogBillboard(billboard) -- function that resets the billboard dialog, removes all text and sizes it to empty state
	billboard.Size = UDim2.fromScale(0,0)
	billboard.Main.loading.Visible = false
	billboard.Main.MessageText.Visible = false
	billboard.StudsOffsetWorldSpace = Vector3.new(0,0,0)
end
- This function resets the billboard to a hidden state.
- It makes sure the chat bubble starts empty and disappears when needed.
We will create a function that will cancel or delete a speaking thread, so that when we want to create a new thread for a part and if by any chance it already has one, it cancels and deletes all assets created for it like sounds etc. This functions like Garbage Collector.
local function cancel_speakThread(data) -- function that will end/cancel a speaking thread
	if data.Thread then
		task.cancel(data.Thread)
	end
	if data.Billboard then
		data.Billboard:Destroy()
	end
	if data.Sound then
		data.Sound:Destroy()
	end
	data = nil
end
- If a part is already speaking or thinking, this function cancels the old thread and delete the billboard UI and sound if they still exist.
- This prevents overlapping text bubbles when a new speech/thought starts.
Now its time to create the function that will make the NPC or part speak. For this we must assure the function stops any previous speaking thread of the part, create a new one for the part, and dynamically size the new chat bubble according to the text.
local function speak(part,text)-- function that will make the part speak
	--// if there is a speaking thread for this part, cancel it
	if SpeakingThreads[part] then
		cancel_speakThread(SpeakingThreads[part])
	end

	local data = {}
	data.Thread = task.spawn(function()-- creates the new thread which can be cancelled at any time
		-- cloning and setting up the new bilbboard dialog
		local billboard = script.DialogChat:Clone()
		billboard.Parent = part
		reset_dialogBillboard(billboard)
		billboard.Main.MessageText.Visible = true
		data.Billboard = billboard

		-- clones the sound and plays it
		local sound = script.typing:Clone()
		sound.Parent = part
		data.Sound = sound
		sound:Play()
		-- start looping through each letter in the text
		for i = 1,#text do
			local newtext = string.sub(text,1,i)
			local newsize = TextS:GetTextSize(newtext,MinYOffset,billboard.Main.MessageText.Font,Vector2.new(MaxXOffset,MaxYOffset))
			billboard.Main.MessageText.Text = newtext
			local x = math.clamp((newsize.X * MaxXScale)/MaxXOffset,MinXScale,MaxXScale)
			local y = math.clamp(newsize.Y/MinYOffset,1,1000)
			TS:Create(billboard,TweenInfo.new(0.2,Enum.EasingStyle.Back),{Size = UDim2.fromScale(x,y),StudsOffsetWorldSpace = Vector3.new(0,(y/2)+1,0)}):Play()
			task.wait(0.01)
		end
		--once it finishes, destroy the sound
		if sound then
			sound:Destroy()
		end
		task.wait(DialogDuration) -- wait for some time before ending the dialog
		if data.Billboard then-- a smooth closing animation
			TS:Create(billboard,TweenInfo.new(0.5,Enum.EasingStyle.Back,Enum.EasingDirection.In),{Size = UDim2.fromScale(0,0),StudsOffsetWorldSpace = Vector3.new(0,0,0)}):Play()
		end
		task.wait(0.5)
		-- delete the thread after the closing animation has finished
		data.Thread = nil
		cancel_speakThread(data)
	end)

	SpeakingThreads[part] = data -- stores it in the variable so we can access it later to cancel it
end
- Stops any previous speech for the part.
- Creates a new chat bubble and attaches it to the NPC or part.
- Plays a typing sound while the text appears.
- Types out each letter one by one to make it look like the NPC is speaking.
- While each letter is typed out, adjust the chat bubble size based on text length.
- After a few seconds, it disappears smoothly.
Now to create the function that will make the NPC or part think, basically showing a spinning loading icon.
local function think(part)
	--// if there is a speaking thread for this part, cancel it
	if SpeakingThreads[part] then
		cancel_speakThread(SpeakingThreads[part])
	end

	local data = {}
	data.Thread = task.spawn(function()-- creates the new thread which can be cancelled at any time
		-- cloning and setting up the new bilbboard dialog
		local billboard = script.DialogChat:Clone()
		billboard.Parent = part
		reset_dialogBillboard(billboard)
		billboard.Main.loading.Visible = true
		data.Billboard = billboard

		TS:Create(billboard,TweenInfo.new(0.2,Enum.EasingStyle.Back),{Size = UDim2.fromScale(MinXScale,1),StudsOffsetWorldSpace = Vector3.new(0,1.5,0)}):Play()
		while true do
			billboard.Main.loading.ImageLabel.Rotation += 5
			task.wait()
		end
	end)

	SpeakingThreads[part] = data -- stores it in the variable so we can access it later to cancel it
end
- Stops any previous speech or thought.
- Creates a new chat bubble with a only the loading frame visible.
- Rotates the loading icon continuously until it is stopped by a new thread, making it look like the NPC is thinking.
To finalize, we will create listeners that will listen for when the speak or think RemoteEvents are fired.
---------- EVENTS ----------
remotes:WaitForChild("speak").OnClientEvent:Connect(speak)
remotes:WaitForChild("think").OnClientEvent:Connect(think)
- When
speakis fired, the NPC will speak out the provided text. - When
thinkis fired, the NPC will start thinking.
At the end our final Code for the DialogChatHandler will be the following:
----------  SERVICES ----------
local TextS = game:GetService("TextService")
local TS = game:GetService("TweenService")
local RS = game:GetService("ReplicatedStorage")

---------- VARIABLES ----------
local remotes = RS:WaitForChild("DialogRemotes")
local SpeakingThreads = {}-- Stores all the ongoing speaking threads according to each part

local MaxXOffset = 560 --Max X Offset Size of the billboard
local MaxXScale = 7 -- Max X Scale Size of the billboard
local MinXScale = 2 --Min Y Scale Size of the billboard

local MaxYOffset = 600 --Max Y Offset Size of the billboard
local MinYOffset = 24 --Min Y Offset Size of the billboard

local DialogDuration = 10

----------  FUNCTIONS ----------
local function reset_dialogBillboard(billboard) -- function that resets the billboard dialog, removes all text and sizes it to empty state
	billboard.Size = UDim2.fromScale(0,0)
	billboard.Main.loading.Visible = false
	billboard.Main.MessageText.Visible = false
	billboard.StudsOffsetWorldSpace = Vector3.new(0,0,0)
end
local function cancel_speakThread(data) -- function that will end/cancel a speaking thread
	if data.Thread then
		task.cancel(data.Thread)
	end
	if data.Billboard then
		data.Billboard:Destroy()
	end
	if data.Sound then
		data.Sound:Destroy()
	end
	data = nil
end

local function speak(part,text)-- function that will make the part speak
	--// if there is a speaking thread for this part, cancel it
	if SpeakingThreads[part] then
		cancel_speakThread(SpeakingThreads[part])
	end

	local data = {}
	data.Thread = task.spawn(function()-- creates the new thread which can be cancelled at any time
		-- cloning and setting up the new bilbboard dialog
		local billboard = script.DialogChat:Clone()
		billboard.Parent = part
		reset_dialogBillboard(billboard)
		billboard.Main.MessageText.Visible = true
		data.Billboard = billboard

		-- clones the sound and plays it
		local sound = script.typing:Clone()
		sound.Parent = part
		data.Sound = sound
		sound:Play()
		-- start looping through each letter in the text
		for i = 1,#text do
			local newtext = string.sub(text,1,i)
			local newsize = TextS:GetTextSize(newtext,MinYOffset,billboard.Main.MessageText.Font,Vector2.new(MaxXOffset,MaxYOffset))
			billboard.Main.MessageText.Text = newtext
			local x = math.clamp((newsize.X * MaxXScale)/MaxXOffset,MinXScale,MaxXScale)
			local y = math.clamp(newsize.Y/MinYOffset,1,1000)
			TS:Create(billboard,TweenInfo.new(0.2,Enum.EasingStyle.Back),{Size = UDim2.fromScale(x,y),StudsOffsetWorldSpace = Vector3.new(0,(y/2)+1,0)}):Play()
			task.wait(0.01)
		end
		--once it finishes, destroy the sound
		if sound then
			sound:Destroy()
		end
		task.wait(DialogDuration) -- wait for some time before ending the dialog
		if data.Billboard then-- a smooth closing animation
			TS:Create(billboard,TweenInfo.new(0.5,Enum.EasingStyle.Back,Enum.EasingDirection.In),{Size = UDim2.fromScale(0,0),StudsOffsetWorldSpace = Vector3.new(0,0,0)}):Play()
		end
		task.wait(0.5)
		-- delete the thread after the closing animation has finished
		data.Thread = nil
		cancel_speakThread(data)
	end)

	SpeakingThreads[part] = data -- stores it in the variable so we can access it later to cancel it
end

local function think(part)
	--// if there is a speaking thread for this part, cancel it
	if SpeakingThreads[part] then
		cancel_speakThread(SpeakingThreads[part])
	end

	local data = {}
	data.Thread = task.spawn(function()-- creates the new thread which can be cancelled at any time
		-- cloning and setting up the new bilbboard dialog
		local billboard = script.DialogChat:Clone()
		billboard.Parent = part
		reset_dialogBillboard(billboard)
		billboard.Main.loading.Visible = true
		data.Billboard = billboard

		TS:Create(billboard,TweenInfo.new(0.2,Enum.EasingStyle.Back),{Size = UDim2.fromScale(MinXScale,1),StudsOffsetWorldSpace = Vector3.new(0,1.5,0)}):Play()
		while true do
			billboard.Main.loading.ImageLabel.Rotation += 5
			task.wait()
		end
	end)

	SpeakingThreads[part] = data -- stores it in the variable so we can access it later to cancel it
end

---------- EVENTS ----------
remotes:WaitForChild("speak").OnClientEvent:Connect(speak)
remotes:WaitForChild("think").OnClientEvent:Connect(think)
Feel free to copy and paste with no problem ![]()
The End
Well that will be, if there are any corrections or anything you will like to point out, do so down below. Remember if you do not want to follow the tutorial above, you can just get the file (.rbxm) on my Patreon![]() as a way to support me for doing this tutorials, you can also find other scripting stuffs I have done there aswell. Thanks
as a way to support me for doing this tutorials, you can also find other scripting stuffs I have done there aswell. Thanks ![]()