Hello there Roblox! This is a tutorial on how to make a nametag system using BillboardGuis and some little scripting magic!  In this tutorial, I will guide you through every step and clearly explain what I am doing so you can catch up with me! For people who are here just for the script, I will paste the whole code in the end so scroll down to find it! ^-^
Expected result:
This is how your game will look like by the end of the tutorial!

Note: We will also mess around with some MarketplaceService to create a rainbow tag and rainbow nametag for VIP users!
Getting Started
To get started, we will need 6 things!
- 3 Billboard Gui’s
- 2 scripts
- 1 gamepass (Optional)
Let’s load a dummy into the workspace first!
How to load a dummy!
In order to load a dummy head to Plugins > Rig Builder > R15 > Block Rig

After we have loaded the dummy head to the explorer! (View > Explorer) For someone who has little experience with studio, it might seem like a mess in there!  Don’t worry though! I will safely navigate through this!
Click the little arrow next to the dummy and it should open up a bunch of other stuff. It should look something like this:

Great! So, we want to find the head. Once you do, click on the little plus next to it and insert a ![]() in it. Then click on the BillboardGui and add a
in it. Then click on the BillboardGui and add a ![]() . Now, for now we do not need to use the other 2. Let’s configure these!
. Now, for now we do not need to use the other 2. Let’s configure these!
Configuring
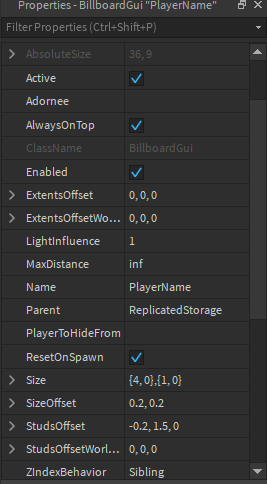
Click on the BillboardGui. Go to Properties (View > Properties) and modify them accordingly.
It should go from this:

To this:
So to catch you up! All we did was make the Gui not scale up infinitely as we zoom out. Else you would have this:
Pretty sure you don’t want that!
Let’s move on! Now here comes the fun part! It’s time to configure the text label! As long as you change some necessary properties, the rest is your imagination!
- Make sure the BackroundTransparency is set to 1 for a more clean look!
My suggestions on what to use:
Fonts: Use a clean font according to your needs. For example, if you have a low-poly game, Cartoon is a great font choice! For a more futuristic game, Jura gives the ultimate modern style. Or if you want a compact and easily read label, my favorite is Source Sans!
TextColor3: Make sure the color is easily read by the player and is not too bright nor too moody! usually, go with plain ol’ white but it’s your game! 
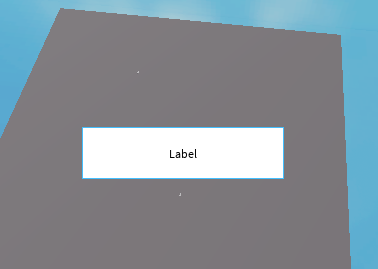
Mine came in to look like this:

If you made it this far, spectacular job! We are halfway-ish through! 
Let’s name your BillBoard Gui, shall we? How about a cool name, like PlayerName? Okay! Now we duplicate this GUI twice (Click on the BillboardGui and then press Ctrl + D) Rename the other two to something like RankState and PlayerRank. RankState will provide the client of the general hierarchy. For example, if a player’s rank is Supervisor+, it will display the MIDDLE RANK title above them! PlayerRank will display the specific player’s rank!
Let’s move the other 2 billboards up and down so they do not collide with the one we just made!
-
PlayerRank:

-
RankStage:

-
PlayerName:

Okay! It’s time for things to get cody!
Scripting
Head into ServerScriptService and insert a script inside it! Erase all the code that’s inside it. Let’s get started!
For people who have script knowledge, I am explaining what I am doing. For others, the full script will be down below:
Let’s create our variables!
local rep = game:GetService("ReplicatedStorage")
local rep = game:GetService("ReplicatedStorage")
local nametag = rep.PlayerName
local status = rep.RankState
local rank = rep.PlayerRank
local speed = 100
local groupId = 123456 -- Paste your actually groupID here!
local marketplaceService = game:GetService("MarketplaaceService")
Let’s move on by duplicating the labels into the player’s head!
local rep = game:GetService("ReplicatedStorage")
local rep = game:GetService("ReplicatedStorage")
local nametag = rep.PlayerName
local status = rep.RankState
local rank = rep.PlayerRank
local speed = 100
local groupId = 123456 -- Paste your actually groupID here!

game.Players.PlayerAdded:Connect(function(plr)
	plr.CharacterAdded:Connect(function(char)
		local head = char.Head
		local newtext = nametag:Clone()
		local newtext1 = status:Clone()
		local newtext2 = rank:Clone()
		local humanoid = char.Humanoid
		humanoid.DisplayDistanceType = "None"

		newtext.Parent = head
		newtext2.Parent = head
		if plr:GetRankInGroup(7599919)>= 7 then -- Replace this with the minimum rank ID that has this title!
			newtext1.Parent = head
			newtext1.TextLabel.Text = "MIDDLE RANK"
			newtext1.TextLabel.TextColor3 = Color3.fromRGB(255, 0, 0)
		end
		newtext.TextLabel.Text = plr.Name
		newtext2.TextLabel.Text = plr:GetRoleInGroup(7599919)
end
end
Great! Now let’s add the marketplace service stuff!
local rep = game:GetService("ReplicatedStorage")
local nametag = rep.PlayerName
local status = rep.RankState
local rank = rep.PlayerRank
local speed = 100
local groupId = 123456 -- Paste your actually groupID here!
local marketplaceService = game:GetService("MarketplaceService")

game.Players.PlayerAdded:Connect(function(plr)
	plr.CharacterAdded:Connect(function(char)
		local head = char.Head
		local newtext = nametag:Clone()
		local newtext1 = status:Clone()
		local newtext2 = rank:Clone()
		local humanoid = char.Humanoid
		humanoid.DisplayDistanceType = "None"

		newtext.Parent = head
		newtext2.Parent = head
		if plr:GetRankInGroup(groupId)>= 7 then -- Replace this with the minimum rank ID that has this title!
			newtext1.Parent = head
			newtext1.TextLabel.Text = "MIDDLE RANK"
			newtext1.TextLabel.TextColor3 = Color3.fromRGB(255, 0, 0)
		end
		newtext.TextLabel.Text = plr.Name
		newtext2.TextLabel.Text = plr:GetRoleInGroup(groupId)
if marketplaceService:UserOwnsGamePassAsync(plr.UserId, 3141033532) -- Replace with Gamepass ID
end
end
Great! Now your nametag system should work just fine!
Leaderstats
Leaderstats are really easy to make with just a 10 line script. Insert a script in ServerScriptService and follow as I go.
local groupId = 325423524 -- Replace with groupID.

game.Players.PlayerAdded:Connect(function(plr)
local leaderstats = Instance.new("Folder")
leaderstats.Name = "leaderstats"
leaderstats.Parent = pl

local Rank = Instance.new("StringValue")
Rank.Name = "Rank"
Rank.Value = plr:GetRoleInGroup(groupId)
Rank.Parent = leaderstats
end)
And there you have it! 
A fully functional working nametag with leaderstats included! If you’ve made it so far, congrats! Let me know down below of your nametag designs! If you have any questions or problems, don’t be afraid to ask! Stay safe, everyone! 
