This tutorial is showing you how I made a Pixel platformer game!
Game here: [Pixle Platform [ 2D ] - Roblox]
BTW the game is still unfinished, since I have many other 2D pixelated project. But I am making a tutorial on it anyways!
First things first, you need to draw your 2D textures. I recommend using Pixilart, it’s free to use!
Website:
[Pixilart - Free online pixel art drawing tool]
If you don’t know how to draw pixelated objects then you should watch a tutorial on YouTube, I will also make tutorials on how to draw it soon.
Example of the textures
Layer Information
- 18x18 / Width x Height
![]()
![]()
![]()
![]()
![]()
![]()
One you’ve drawn all your textures, open Roblox studio and Create your Roblox game.
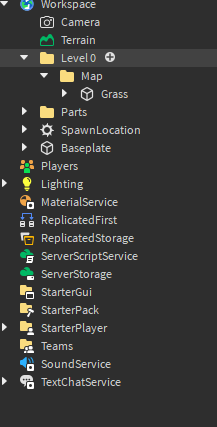
Step 1: Add a Folder into workspace and name it “Level 0”. Add a Folder inside of Level 0 and name that “Map”. Add a part inside of map and name its “Grass”
:Grass Part Properties:
- Size (4,4,4)
- Transparency = 1
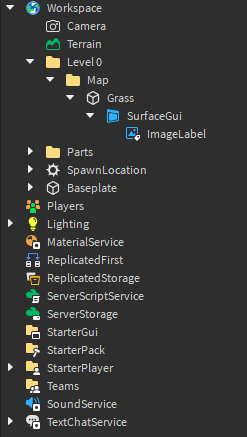
Step 2: Inside your Grass part, add a SurfaceGui > Then add a ImageLabel inside the SurfaceGui.
:ImageLabel Properties:
- Size (1,01,0)
*- Image = “Your Image ID” * / Or My example one (rbxassetid://14768096169)
- ResampleMode = Pixelated
- ScaleType = Crop
Step 3: Do the same thing you did with your grass on all of your textures.

Step 4: Create your first level for your game, by place each part besides each other.

Creating the health system
![]()
![]()
![]()
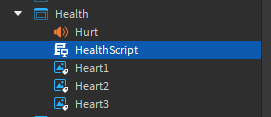
Step 1: add a ScreenGui into StarterGui and name it “Health”
Step 2: add a sound into the Health Gui and name it “Hurt”
Step 3: add a local script into the Health Gui and name it “HealthScript”
Step 4: Create 3 ImageLabels and each image label will be a heart.
Paste this into the HealthScript:
local player = game.Players.LocalPlayer

local Health = player:WaitForChild("DeathCounter")

Health.Changed:Connect(function()
	script.Parent.Hurt:Play()
	if Health.Value == 1 then
-- 3 lives
		script.Parent.Heart1.Image = "Your half heart Image ID" -- Half Heart
		script.Parent.Heart2.Image = "Your Full heart Image ID" -- Full Heart
		script.Parent.Heart3.Image = "Your Full heart Image ID"	-- Full Heart
	elseif Health.Value == 2 then
-- 2 lives
		script.Parent.Heart1.Image = "Your No heart Image ID" -- No Heart
		script.Parent.Heart2.Image = "Your half heart Image ID" -- Half Heart
		script.Parent.Heart3.Image = "Your Full heart Image ID" -- Full Heart
	elseif Health.Value == 3 then
-- 1 live
		script.Parent.Heart1.Image = "Your No heart Image ID"	-- No Heart
		script.Parent.Heart2.Image = "Your No heart Image ID" -- No Heart
		script.Parent.Heart3.Image = "Your half heart Image ID" -- Half Heart
	elseif Health.Value == 4 then
-- player died
		script.Parent.Heart1.Image = "Your No heart Image ID" -- No Heart
		script.Parent.Heart2.Image = "Your No heart Image ID" -- No Heart
		script.Parent.Heart3.Image = "Your No heart Image ID" -- No Heart
	end
end)
Spikes : Optional
![]()
If you have spikes in your game then, add a script into the spike and copy and paste this code into a normal script.
script.Parent.Touched:Connect(function(hit)
	local humanoid = hit.Parent:FindFirstChildWhichIsA("Humanoid")

	if humanoid then
		hit.Parent:WaitForChild("Cube").BillboardGui.ImageLabel.ImageColor3 = Color3.new(1, 0, 0)
		humanoid.Health = humanoid.Health - 100
		wait(0.2)
		hit.Parent:WaitForChild("Cube").BillboardGui.ImageLabel.ImageColor3 = Color3.new(1, 1, 1)
		end

end)
Water script: Optional
![]()
If you have water that is supposed to kill players on touch then copy and paste this code into a normal script.
script.Parent.Touched:Connect(function(hit)
	local humanoid = hit.Parent:FindFirstChildWhichIsA("Humanoid")

	if humanoid then
		hit.Parent:WaitForChild("Cube").BillboardGui.ImageLabel.ImageColor3 = Color3.new(1, 0, 0)
		humanoid.Health = humanoid.Health - 100
		wait(0.2)
		hit.Parent:WaitForChild("Cube").BillboardGui.ImageLabel.ImageColor3 = Color3.new(1, 1, 1)
		end

end)
Coin script: Optional
![]()
If you have coins in you platformer game then paste this code into a normal script.
function coinPickup(partTouching)
	local player = game.Players:GetPlayerFromCharacter(partTouching.Parent)
	if partTouching.Parent:FindFirstChild("Player") then
		player.leaderstats.Coins.Value = player.leaderstats.Coins.Value + 15
		game.SoundService["Collect coin"]:Play()
		script.Parent:Destroy()
	end
end

script.Parent.Touched:Connect(coinPickup)
Creating the player leaderstats (Only if your making coin grabs)
Step 1: Add a script into the ServerScriptService | Name it “leaderstats”
Paste this script into the leaderstats server script:
game.Players.PlayerAdded:Connect(function(player)
	local DeathCounter = Instance.new("IntValue") --- This counter will be used when finding if the player lost all their lives later.
	DeathCounter.Name = "DeathCounter"
	DeathCounter.Value = 0
	DeathCounter.Parent = player

	local leaderstats = Instance.new("Folder") --- This is the folder that will hold the player stats.
	leaderstats.Name = "leaderstats"
	leaderstats.Parent = player

	local Coins = Instance.new("IntValue") --- This is the coins value for the coin script.
	Coins.Name = "Coins"
	Coins.Parent = leaderstats
	Coins.Value = 0

end)
Finding the players lives
Step 1: Add a script into ServerScriptService | Name it “Counter”
Paste this script into the Counter Script:
game.ReplicatedStorage:WaitForChild("PlayerDied").OnServerEvent:Connect(function(player)
	local DeathCounter = player:WaitForChild("DeathCounter")
	DeathCounter.Value = DeathCounter.Value + 1
end)
Step 2: Add a RemoteEvent into ReplicatedStorage | Name the RemoteEvent “PlayerDied”.
![]()
Step 3: Add a local script inside of PlayerCharacterScripts | Name it “PlayerDied”
Paste this code into the PlayerDied local script:
local player = game.Players.LocalPlayer
local counter = player:WaitForChild("DeathCounter")
counter.Changed:Connect(function()
	if counter.Value == 4 then
		player:Kick("You Lost All Your Lives")
	end
end)
Step 4: Add a local script inside of PlayerCharacterScripts | Name it “DeathChecker”
Paste this code into the DeathChecker local script:
local player = game.Players.LocalPlayer
local humanoid = script.Parent:WaitForChild(“Humanoid”)
while true do
	wait(1)
	if humanoid.Health == 0 then
		game.ReplicatedStorage:WaitForChild("PlayerDied"):FireServer()
	end
end
Making the camera for the game
Step 1: Add a local script into the StarterCharacterScripts | Name it “CameraHandler”.
Paste this code into the CameraHandler Script:
-- Services
local rS = game:GetService("RunService")
local tS = game:GetService("TweenService")

-- Variables
local camera = game.Workspace.CurrentCamera
local root = script.Parent:WaitForChild("HumanoidRootPart")
local cameraPart = Instance.new("Part")
local newPos

-- Script
cameraPart.Anchored = true
cameraPart.CanTouch = false
cameraPart.CanCollide = false
cameraPart.Transparency = 1
cameraPart.Parent = game.Workspace
cameraPart.CFrame = CFrame.lookAt(root.CFrame.Position + Vector3.new(0, 90, 90), root.Position)
cameraPart.Orientation = Vector3.new(0,180,0)

camera.CameraType = Enum.CameraType.Scriptable

rS.PostSimulation:Connect(function(dt)
	cameraPart.Position = cameraPart.Position:Lerp(root.Position + Vector3.new(0, 0, -35), dt * 7)-- You can adjust the speed and "smoothness" by increasing or decreasing the "0.8", just make sure its a value between 0 and 1
	camera.CFrame = cameraPart.CFrame -- camera.CFrame = cameraPart.CFrame -- Set the camera's CFrame to the part's Cframe AFTER you have moved the part, so the camera gets moved correctly
end)
Making the player movement for the game
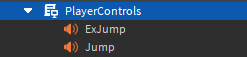
Step 1: Add a local script into the StarterCharacterScript | Name it “PlayerControls”.
Paste this script into the PlayerControls script:
local UserInputService = game:GetService("UserInputService")
local player = game.Players.LocalPlayer
local humanoid = player.Character:FindFirstChildOfClass("Humanoid")
local Cube = player.Character:WaitForChild("Cube")
local HumanoidRootPart = player.Character:WaitForChild("HumanoidRootPart")
UserInputService.InputBegan:Connect(function(input, processed)


	if input.KeyCode == Enum.KeyCode.A then
		Cube.BillboardGui.ImageLabel.Image = "Your character walking left Image ID"

	end

	if input.KeyCode == Enum.KeyCode.D then
		Cube.BillboardGui.ImageLabel.Image = "Your character walking right Image ID"
	end

	if input.KeyCode == Enum.KeyCode.Space then
		script.Jump:Play()
		Cube.BillboardGui.ImageLabel.Image = "Your character jumping Image ID"
	end

end)

UserInputService.InputEnded:Connect(function(input, processed)
	local Cube = player.Character:WaitForChild("Cube")
	if input.KeyCode == Enum.KeyCode.A then
		Cube.BillboardGui.ImageLabel.Image = "Your character idle facing left Image ID"
	end

	if input.KeyCode == Enum.KeyCode.D then
		HumanoidRootPart.Attachment.ParticleEmitter.Rate = 0
		Cube.BillboardGui.ImageLabel.Image = "Your character idle facing right Image ID"
	end

	if input.KeyCode == Enum.KeyCode.Space then
		Cube.BillboardGui.ImageLabel.Image = "Your character idle Image ID"
	end
end)
Step 2: Find sound for jumping | put the sound inside the PlayerControls script | Name the sound “Jump”.
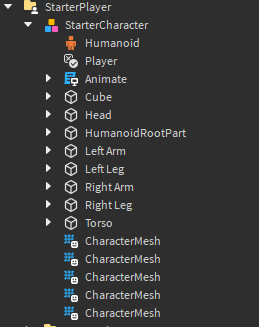
Creating the character for the PlayerControls script
Step 1: Add a rig into workspace using Rig Build | Name the rig “StarterPlayer”
Step 2: Add a part | Name the part “Cube” | Resize the cube to fit the rig’s torso.
Step 3: Weld the Cube to the HumanoidRootPart | Add a BillboardGui into the Cube.
BillboardGui Properties
- AlwaysOnTop = Enabled
Max Distance = 120 — This numbered depends on how far your camera is from the character.
Step 4: Add a ImageLabel to the BillboardGui | Change the Image Label to your Character’s Idle Texture.
ImageLabel Properties
Size = (1,01,0)
ResampleMode = Pixelated
ScaleType = Fit
Step 5: Disable AutoRotate in the HumanoidRootPart, This will stop the character from turning around. Change the Health and Max Health to 60.
Step 6: Select each part of the character and make the Transparency 1.
Making the Double Jump for the game (Optional)
Step 1: Add a local script into the StaterPlayerScripts | Name the local script “DoubleJump”
Paste this code into the Double Jump Script:
local UserInputService = game:GetService("UserInputService")
local localPlayer = game.Players.LocalPlayer
local character
local humanoid
local canDoubleJump = false
local hasDoubleJumped = false
local oldPower
local TIME_BETWEEN_JUMPS = 0.1 -- bigger numbers, makes the delay between clicking jump twice longer.
local DOUBLE_JUMP_POWER_MULTIPLIER = 1 -- bigger numbers, makes the player jump further
function onJumpRequest()
	if not character or not humanoid or not character:IsDescendantOf(workspace) or
		humanoid:GetState() == Enum.HumanoidStateType.Dead then
		return
	end

	if canDoubleJump and not hasDoubleJumped then
		hasDoubleJumped = true
		humanoid.JumpPower = oldPower * DOUBLE_JUMP_POWER_MULTIPLIER
		humanoid:ChangeState(Enum.HumanoidStateType.Jumping)
	end
end
local function characterAdded(newCharacter)
	character = newCharacter
	humanoid = newCharacter:WaitForChild("Humanoid")
	hasDoubleJumped = false
	canDoubleJump = false
	oldPower = humanoid.JumpPower

	humanoid.StateChanged:connect(function(old, new)
		if new == Enum.HumanoidStateType.Landed then
			canDoubleJump = false
			hasDoubleJumped = false
			humanoid.JumpPower = oldPower
		elseif new == Enum.HumanoidStateType.Freefall then
			wait(TIME_BETWEEN_JUMPS)
			canDoubleJump = true
		end
	end)
end
if localPlayer.Character then
	characterAdded(localPlayer.Character)
end

localPlayer.CharacterAdded:connect(characterAdded)
UserInputService.JumpRequest:connect(onJumpRequest)
Making the Disabler for the game (Optional if you want to disable things like the leader board or backpack)
Add a script into StarterCharacterScripts | Name the script “Disable”.
Paste this code into the Disable script.
wait()

game.StarterGui:SetCoreGuiEnabled(Enum.CoreGuiType.PlayerList, false) --change this to false if you want to delete Player list the player Names That appear top right
game:GetService("StarterGui"):SetCoreGuiEnabled(Enum.CoreGuiType.Backpack, false) --change this to false to disable player backpack(and gear)
game.StarterGui:SetCoreGuiEnabled(Enum.CoreGuiType.Health, false) --change this to false to delete players health bar
game.StarterGui:SetCoreGuiEnabled(Enum.CoreGuiType.Chat, false) --change this to false to delete the chat
game.StarterGui:SetCoreGuiEnabled(Enum.CoreGuiType.EmotesMenu, false) --change this to false to delete Emotes Menu(/e dance,/e point,/e wave etc.)
game.StarterGui:SetCore("ResetButtonCallback",false)
Making the Left and Right Controls
Step 1: Push play to test the game. | Go into the StarterPlayerScripts and find [ PlayerModule ] |
Step 2: Stop the Game and Copy and Paste the [ PlayerModule ] into | StarterPlayer > StarterPlayerScripts
We only need the player to walk Left and Right
Player Module Script:
--!nonstrict
--[[
	Keyboard Character Control - This module handles controlling your avatar from a keyboard

	2018 PlayerScripts Update - AllYourBlox
--]]

--[[ Roblox Services ]]--
local UserInputService = game:GetService("UserInputService")
local ContextActionService = game:GetService("ContextActionService")

--[[ Constants ]]--
local ZERO_VECTOR3 = Vector3.new(0,0,0)

--[[ The Module ]]--
local BaseCharacterController = require(script.Parent:WaitForChild("BaseCharacterController"))
local Keyboard = setmetatable({}, BaseCharacterController)
Keyboard.__index = Keyboard

function Keyboard.new(CONTROL_ACTION_PRIORITY)
	local self = setmetatable(BaseCharacterController.new() :: any, Keyboard)

	self.CONTROL_ACTION_PRIORITY = CONTROL_ACTION_PRIORITY

	self.textFocusReleasedConn = nil
	self.textFocusGainedConn = nil
	self.windowFocusReleasedConn = nil

	self.leftValue = 0
	self.rightValue = 0

	self.jumpEnabled = true

	return self
end

function Keyboard:Enable(enable: boolean)
	if not UserInputService.KeyboardEnabled then
		return false
	end

	if enable == self.enabled then
		-- Module is already in the state being requested. True is returned here since the module will be in the state
		-- expected by the code that follows the Enable() call. This makes more sense than returning false to indicate
		-- no action was necessary. False indicates failure to be in requested/expected state.
		return true
	end

	self.leftValue = 0
	self.rightValue = 0
	self.moveVector = ZERO_VECTOR3
	self.jumpRequested = false
	self:UpdateJump()

	if enable then
		self:BindContextActions()
		self:ConnectFocusEventListeners()
	else
		self:UnbindContextActions()
		self:DisconnectFocusEventListeners()
	end

	self.enabled = enable
	return true
end

function Keyboard:UpdateMovement(inputState)
	if inputState == Enum.UserInputState.Cancel then
		self.moveVector = ZERO_VECTOR3
	else
		self.moveVector = Vector3.new(self.leftValue + self.rightValue, 0)
	end
end

function Keyboard:UpdateJump()
	self.isJumping = self.jumpRequested
end

function Keyboard:BindContextActions()

	-- Note: In the previous version of this code, the movement values were not zeroed-out on UserInputState. Cancel, now they are,
	-- which fixes them from getting stuck on.
	-- We return ContextActionResult.Pass here for legacy reasons.
	-- Many games rely on gameProcessedEvent being false on UserInputService.InputBegan for these control actions.


	local handleMoveLeft = function(actionName, inputState, inputObject)
		self.leftValue = (inputState == Enum.UserInputState.Begin) and -1 or 0
		self:UpdateMovement(inputState)
		return Enum.ContextActionResult.Pass
	end

	local handleMoveRight = function(actionName, inputState, inputObject)
		self.rightValue = (inputState == Enum.UserInputState.Begin) and 1 or 0
		self:UpdateMovement(inputState)
		return Enum.ContextActionResult.Pass
	end

	local handleJumpAction = function(actionName, inputState, inputObject)
		self.jumpRequested = self.jumpEnabled and (inputState == Enum.UserInputState.Begin)
		self:UpdateJump()
		return Enum.ContextActionResult.Pass
	end

	-- TODO: Revert to KeyCode bindings so that in the future the abstraction layer from actual keys to
	-- movement direction is done in Lua
	ContextActionService:BindActionAtPriority("moveLeftAction", handleMoveLeft, false,
		self.CONTROL_ACTION_PRIORITY, Enum.PlayerActions.CharacterLeft)
	ContextActionService:BindActionAtPriority("moveRightAction", handleMoveRight, false,
		self.CONTROL_ACTION_PRIORITY, Enum.PlayerActions.CharacterRight)
	ContextActionService:BindActionAtPriority("jumpAction", handleJumpAction, false,
		self.CONTROL_ACTION_PRIORITY, Enum.PlayerActions.CharacterJump)
end

function Keyboard:UnbindContextActions()
	ContextActionService:UnbindAction("moveLeftAction")
	ContextActionService:UnbindAction("moveRightAction")
	ContextActionService:UnbindAction("jumpAction")
end

function Keyboard:ConnectFocusEventListeners()
	local function onFocusReleased()
		self.moveVector = ZERO_VECTOR3
		self.forwardValue  = 0
		self.backwardValue = 0
		self.leftValue = 0
		self.rightValue = 0
		self.jumpRequested = false
		self:UpdateJump()
	end

	local function onTextFocusGained(textboxFocused)
		self.jumpRequested = false
		self:UpdateJump()
	end

	self.textFocusReleasedConn = UserInputService.TextBoxFocusReleased:Connect(onFocusReleased)
	self.textFocusGainedConn = UserInputService.TextBoxFocused:Connect(onTextFocusGained)
	self.windowFocusReleasedConn = UserInputService.WindowFocused:Connect(onFocusReleased)
end

function Keyboard:DisconnectFocusEventListeners()
	if self.textFocusReleasedConn then
		self.textFocusReleasedConn:Disconnect()
		self.textFocusReleasedConn = nil
	end
	if self.textFocusGainedConn then
		self.textFocusGainedConn:Disconnect()
		self.textFocusGainedConn = nil
	end
	if self.windowFocusReleasedConn then
		self.windowFocusReleasedConn:Disconnect()
		self.windowFocusReleasedConn = nil
	end
end

return Keyboard
Making tools respawn when player dies (Because of the multiple lives)
Step 1: Add a script into the ServerScriptService | Name the script “ToolRespawn”
Paste this code into the ToolRespawn script:
local Players = game:GetService("Players")

local Tools = Instance.new("Folder")

Players.PlayerAdded:Connect(function(Player)
	Player.CharacterAdded:Connect(function(Character)
		local BackPack = Player.Backpack
		local Humanoid = Character:FindFirstChild("Humanoid")
		for _, V in pairs(Tools:GetChildren()) do
			V.Parent = Character
		end
		Humanoid.Died:Connect(function()
			if Character:FindFirstChildWhichIsA("Tool") then
				Character:FindFirstChildWhichIsA("Tool").Parent = Tools
			end
			for _, V in pairs(BackPack:GetDescendants()) do
				V.Parent = Character
			end
		end)
	end)
end)
Making the skybox into a plain color for the 2D look
Paste your plain color ID into each part of the skybox Image places OR use “rbxassetid://14782738683” – plain light blue color

Making the Enemys for the game

Step 1: Duplicate your character |Name it “Enemy” and change the ImageLabel Image inside the BillboardGui to your enemy texture.
Step 2: Add 2 parts and name them both “Point1” and “Point2”. These are the points the enemy will walk too.
Step 3: Add a script into the Enemy | Name the script “Tween”.
Paste this script into the Tween script:
while true do
	wait(3) -- how long it takes for the enemy to reach the point and wait a few seconds.
	script.Parent.Cube.BillboardGui.ImageLabel.Image = "rbxassetid://14770386142"
	script.Parent.Humanoid:MoveTo(script.Parent.Point1.Position)
	wait(3)
	script.Parent.Cube.BillboardGui.ImageLabel.Image = "rbxassetid://14770408023"
	script.Parent.Humanoid:MoveTo(script.Parent.Point2.Position)
end
Step 4: Add a script into the Enemy | Name the script “DamageScript”.
Paste this into the DamageScript:
local function damage(touched)
	if touched.Parent:FindFirstChild("Humanoid") then
		touched.Parent.Humanoid.Health = touched.Parent.Humanoid.Health - 100
	end
end

for key, object in pairs(script.Parent:GetChildren()) do
	if object:IsA("Part") or object:IsA("MeshPart") then
		object.Touched:Connect(damage)
	end
end
Making Checkpoints for the game
![]()
![]()
![]()
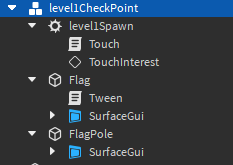
Step 1: Add a Spawn point into workspace | Name it level2Spawn.
Step 2: Add 2 parts | Name these parts “Flag” and “FlagPole”

Step 3: Add a script into level2Spawn |Name it “Touch” |and paste this into it:
script.Parent.Touched:Connect(function(hit)
	local player = game.Players:GetPlayerFromCharacter(hit.Parent)
	player.RespawnLocation = script.Parent
	wait(0.05)
	game.SoundService.Checkpoint:Play()
	script.Parent.AllowTeamChangeOnTouch = false
	script.Parent.Parent.FlagPole.SurfaceGui.ImageLabel.Image = "rbxassetid://14783690861"
	script.Parent.Parent.Flag:Destroy()
	script:Destroy()
end)
(Optional )Step 4: Add a script into the Flag |Name it “Tween”| and paste this into it:
while true do
	wait(0.3)
	script.Parent.SurfaceGui.ImageLabel.Image = "Your Flag Image 1 ID"
	wait(0.3)
	script.Parent.SurfaceGui.ImageLabel.Image = "Your Flag Image 2 ID"
end
Your all set! Decorate your platformer game however you want!
Notes:
If you want to make your game look like its inside of a computer, add scanlines and a border to the screen using imagelabels in StarterGui
If your images in Roblox studio are blurry just change the ResembledType in your Image to Pixlated.
When trying to make things interactive, use a BillboardGui but put it in StarterGui then Adornee it to a part. That will make the imagebutton interactable.
Don’t forget to add a forcefield to each Level so the player does not fall of the world while jumping.
If your trying to add clouds to the back of you level then you can use mine
“rbxassetid://14784535696” — ImageLabel Image ID
![]()

