This tutorial is designed for people who want to make detailed textures, but are annoyed at how obvious the tiling of textures is. This method only uses Roblox Studio’s features and does not rely on Blender in any way.
Polyhaven Tutorial
Polyhaven has good (and free) textures that can be imported into Roblox Studio with a few steps, the only requirement being downloading it (click on the purple button, green buttons are ads). I recommend 2K as anything above it is minimal increase in visuals with a huge increase in performance cost. However, if you plan on using this texture on a larger part, a slightly more detailed texture may be worth it, though probably avoid 8k as it is extremely taxing on devices (~18 times more taxing then a 2K texture). This is especially apparent on low-end or mobile devices. Once you have found a good texture, you can continue onto the tutorial.
This is the texture I will be using: Concrete Floor 02

What to Download
If you navigate over to the purple bar above the author and download count, you will see 4 things: a quality indicator, a Blender logo, a download button, and a hamburger menu (the three lines).![]()
As I talked about earlier 2K is probably enough for most textures, but use 4K if you plan on using it on a big part. Ignore the Blender logo and big download button.
For this tutorial, we only need a few files and not the other ones that your texture likely provides. Click on the hamburger menu and you should see a lot of files to download, a normal map standard switch, and Thumbnail / Preview and Offline Access buttons.

Make sure the normal map standard is on GL mode.
![]()
We only care about the files to download. The ones to download are: Diffuse, Normal, and Rough. (If you have a Metal file listed, download that to.) Open them all as a JPG (you can use PNG but it is a way larger files size). You should be greeted with a webpage with only an image that matches the file you click on.
Diffuse map for the texture I am using:

Right click on the image and click “Save Image As…”. Save it as a jpg either in a folder for the texture files or anywhere in your file explorer/Finder. Repeat this process for all the files I listed above.
In-depth Explanation of Files (Not Necessary to Read)
A normal map does what a displacement map does but instead of actually creating the geometry, it creates the illusion of depth using shadows or something (I don’t really know how they work). This creates a slightly less realistic look for depth with the benefit of less costly textures. A roughness map basically determines how reflective a part of a texture should be (ex: marble should be more reflective and shiny while rusty metal should be dull and rough. Hence the name “roughness map”). Finally, a diffuse map is basically the color and texture (image) of the texture. It’s the main course, the one you need for a texture to be visible. The other maps enhance the diffuse map’s appearance.
Creating the Texture
The first thing to do is create a part. Make it what ever shape or mesh you need for your use case.
My part:

The next step is to go to MaterialService.

You may have never heard of this before because it is not a very commonly talked about feature of Roblox Studio, but it is the backbone of this entire tutorial. The reason is because Roblox Studio’s materials have a way of making the tiling basically nonexistent by using something called stochastic texturing. This is a method of tiling that randomly rotates and positions tiles to seem random. The math behind it is brain numbingly difficult. Thankfully, Roblox Studio does it all for us. (Here’s the math if you are interested: Reddit Post and Code. This is in C# which is not Roblox Studio’s language (Luau) but it is the language of Unity, another game creation engine.)
(By the way if you don’t see MaterialService it is probably because you removed it from your Explorer in which case right click on a blank space in the Explorer and click Show services..., then find MaterialService, click on it, then click Insert).
Under MaterialService insert a MaterialVariant.
![]()
Optionally, you can insert a Folder and name it whatever the base material you plan on using for this part will be. Mine is concrete, so I will name my folder “Concrete” Then, name your material variant whatever you want it to be called. This is important because its name is how it will be selected in the future.

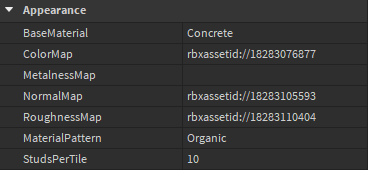
You should see many properties underneath the MaterialVariant's “Appearance” section.

The first property (which I had previously mentioned) is BaseMaterial. This is the material that you feel most closely matches your final product you have in mind. Theoretically this could be any material, but it will get confusing if you make a MaterialVariant intended to look like worn down bricks with a BaseMaterial of plastic as an example. If none of the materials seem to fit what you want, then choose any material you want and make it a standard one for MaterialVariants that don’t fit any categories. A good one is foil because there is not a use (that I can think of) where using foil as a BaseMaterial is useful. Again, it is up to you.

How to insert images into Studio
First step is to find a property that requires an image. My example will be ColorMap. There are 2 ways to go about this, manually upload images to the website from the Creator Hub. The easier option is to simply click on the property, click on Add Image... and select the image from your file browser. This method will automatically upload it to Roblox and give it an asset ID which is automatically inserted into the property.
Now for the properties that effect the look of your texture. The main one is ColorMap. This is also known as a diffuse map in most engines, but they are both just the image and color of the texture. Add the diffuse/color map into this property. See dropdown above for how to do that.

Repeat this process for RoughnessMap and NormalMap with “rough” and “nor_gl” (or other normal maps) respectively. By the way, normal maps are very obvious as they are this strange purple pinkish greenish color, so don’t worry if you didn’t use Polyhaven, normal maps cannot be mistaken for another map. (Make sure to select the jpg/png files and not any other (like .exr) as Roblox Studio only supports .jpg, .jpeg, .png, .bmp, and .gif).

Normal map example:

If you have a metalness map (don’t worry if you don’t), apply it now.
IMPORTANT: change the MaterialPattern property of the MaterialVariant to “Organic”. This is what removes the tiling effect present on normal textures.
Now back to our part. Click on the part and set its Material property to the base material of your MaterialVariant. Now head on over to the MaterialVariant of the part (right under Material at the time of writing this) and change it to the name of the MaterialVariant we created earlier. (If you click on the arrow on the far right of the textbox, it should show you a list of all MaterialVariants with the BaseMaterial of the material of your part, making this a little easier.)

Now your part should have your created material with a pseudorandom texture.
If you need to you can change the color of your part and that will change the color of the material on the part.
But wait, is the texture way too big or small for your liking? Don’t worry, I saved this until last for a reason. There is a property called StudsPerTile under your MaterialVariant which determines how big each section of the textures is. The reason this is last is because it is 1000x times easier to adjust this while actively looking at the part you want the material to be on. Generally, the bigger the part, this bigger this number should be and vice versa. Obviously, change it to fit your use case the best.

It is important to note that your texture may still look obviously repeated to you. However, once you add detail to your scene, it will become a lot less obvious. Also keep in mind that if you actively look for something, you are more likely to find it. The average player isn’t looking around for tiled textures.
Comparison:

As you can see, before the tiles had a very obvious repeating pattern to them. Whereas now, they appear random with no easily noticeable pattern. The main reason for this however is the extra detail that can be achieved using MaterialVariants over normal Texture objects with the use of normal and roughness (and metalness) maps. Another thing, you can’t see this in my screenshot but using MaterialVariants applies it to all sides of a part rather than just one like a Texture does. Yet another reason why I love this method of texturing.
Hopefully this gave your game a little extra realism. Thank you for reading this tutorial. I hope I helped you because I could not find information about this anywhere for Roblox Studio. Feel free to ask questions or ask for additions/changes to the article. Goodbye. ![]()
![]()
![]()
Sources and Further Reading: