And I want the TextLabel to follow the corners of the frame bottom (I want the two up corners of the text to be round, and round as the Corners at the botom of the GUI) and keep the two sharp corners at the bottom of the TextLabel, can somebody help me ?
Set the width of your text TextBox to be the CornerRadius*2 smaller. (so you’re taking CornerRadius off both sides making it equal on both sides with gaps there).
Create a white images of 1/4 of a circle on a transparent background.
Add them as image labels into each corner. (Size should be a CornerRadius x CornerRadius square)
Change the ImageColor3 to whatever colour your GUI is!
I made some images for you (download these and upload them to roblox, then skip step 2):
You can utilize ClipsDescendants to simply cut off the bottom of the darker blue area. You can use a frame, make sure it’s sized to the light blue frame, and contain it within a frame with ClipsDescendants enabled.
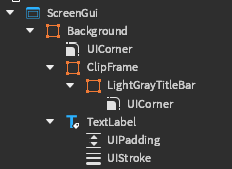
The frame called LightGrayTitleBar is sized the same as the darker background. I set the clip frame’s Y scale to 0.2, and the title bar frame’s Y scale to 5 to counteract it (1/0.2) so that it matches the Background frame. This cuts the bottom of the light gray frame off.
They both have identical UICorners.
You could also parent the title text label to the clip frame, I just threw this together very quickly to demonstrate.
Lastly, if you want to apply an outline to both the title frame and the bar and have it render correctly, you just need to apply the UIStroke to both the clip frame and the background and enable ClipsDescendants on the background. Here is what this looks like with just the UIStroke on the clip frame:
The background frame clips the rest of the UIStroke that you don’t want because it sits outside of the frame it is applied to. The only part immediately outside of the clip frame that sits within the background frame is the edge just below the clip frame. This allows you to apply a UIStroke to the background frame (which clips its descendants) without creating floating square edges and stuff. Without ClipsDescendants on the background frame, the UIStroke would appear like this:
Lastly, just to demonstrate, the lighter gray frame is being clipped by the clip frame, this is what it looks like if the clip frame has ClipsDescendants disabled:
You can see that it completely covers the darker background frame, so the corner sizing matches, and everything appears exactly as you would expect. The clip frame simply cuts the bottom off.
Hopefully this helps visualize what’s going on here and why this works the way that it does…