game:GetService"RunService"

local tool = script.Parent

local connection

tool.Equipped:Connect(function()
	local hinge = tool.HingeConstraint
	local handle = tool.Handle

	local deg = math.deg
	local xAxis = Vector3.xAxis
	local zero = Vector3.zero
	local y0Axis = Vector3.new(1, 0, 1)
	local yAxis = Vector3.yAxis

	connection = game["Run Service"].PostSimulation:Connect(function()
		local angle = deg(xAxis:Angle((zero - handle.Position).Unit * y0Axis, yAxis))
		print(angle)

		hinge.TargetAngle = angle
	end)
end)

tool.Unequipped:Connect(function()
	if connection then connection = connection:Disconnect() end
end)
And here is a video showcasing both problems starting with the character shaking when the compass is equipped:
If I destroy the HingeConstraint and weld the needle to the handle using a WeldConstraint then there isn’t any shaking when I equip the compass, so that issue might be happening because of the HingeConstraint. Here’s a screenshot showing how it’s configured:
Increasing and decreasing the AngularResponsiveness
Increasing and decreasing the AngularSpeed
Increasing and decreasing the ServoMaxTorque I meant to say I tried setting ServoMaxTorque to large values like 100,000 & 10,000 and small values like 1000 & 10 instead of infinity
What is the softlockservo thingy? I don’t know much about hinges but why don’t you just make an arrow (image or part) then weld it then rotate the angle? Wouldn’t it be easier? Or are you trying to achieve the exact thing from your video?
You should code into a local script at first, not a server script.
There is a collision bug because Hinge constraint is a physical constraint, it would be better for you to use a Weld instead, then rotate the Weld.C0.
Exemple:
Handle is the main cylinder of your compass.
Middle is the same duplicated cylinder, but invisible, smaller and at the middle of Handle, it is also weld to handle.
Part is the arrow location, that is weld to the Middle part.
local Tool = script.Parent
local Middle = Tool:WaitForChild("Middle")
local Weld = Middle and Middle:WaitForChild("Weld")

local Active = false

local function Start()
	Active = true

	repeat
		Weld.C0 = CFrame.fromOrientation(--[[Your orientation]], 0, 0)
		task.wait(0.1)
	until
	Active == false
end

local function End()
	Active = false
end

Tool.Equipped:Connect(Start)
Tool.Unequipped:Connect(End)
The result is the same, just easier to do and no physic bugs.
The SoftLockServo is a new property that was added in a beta most likely, I’m not quite sure exactly what it does because the documents haven’t added an explanation yet but it doesn’t seem to make a difference whether it’s true or false
I did previously try to make the compass by welding the needle to the handle then using CFrame (also experimented with PivotTo) to rotate the needle, but it caused a whole bunch of problems with one of them being the character being teleported around every time the needle moved
I’m using a server script so that the needle is shown moving for every player in the game, if I use a LocalScript the needle would only move for me and will be in the default position for everyone else
Also, what’s shown in the video you provided isn’t what I want my compass to do. As I stated here in the main post:
I want the compass to point at a Vector3 position, not spin around in a loop
Then you have to put the local script into the CharacterScript or PlayerScript, and run the code into a new coroutine thread each time any player character is equiping the compass.
It is just an exemple to show you that the rotation is working, now you just have to change the X orientation to make it pointing in the choosen direction.
I never said I had a problem with the server script not working, it is working but I’m just having problems finding the right way of calculating the correct angle to use
As I said here on the main post:
1/2 of the reason why I made this post is because I need help calculating the angle correctly, I would only have mentioned the shaking problem if it was the only problem I had
Everything visual that handle no important things to the core gameplay or game security, (like particle effects, maps animations, your compass ect…) have to be handled on client, it is what we are calling “Frontend”.
Using a server script to replicate visual effects to other players while its not required is the lazy way to do it, and result to a overuse of server ressource, which will make your experience become more and more laggy by the time.
Alright, then i found a solution to fix one of your problem, let me some minutes maybe i can help you to get it pointing toward your choosen location.
I agree 100% with this and do usually keep it in mind. I’m making this compass for a game I made to play with friends and family though, which is why I’m taking some liberties in order not to over complicate things
I did more testing and I discovered something quite unexpected. I decided to try using the formula I’m already using to calculate the angle, but on a fixed turret instead and with these tweaks:
Note: The yellow attachment arrow is now pointing up and the orange attachment arrow is now pointing left
And using this script which essentially uses the same exact formula but separated into different parts and with a negative direction:
local part0 = workspace.Part0
local hinge = part0.HingeConstraint

local target = Vector3.zero

--workspace.Part:SetNetworkOwner(nil)

game["Run Service"].PostSimulation:Connect(function()
	local direction = (target - part0.Position).Unit
	local flatDirection = -direction * Vector3.new(1, 0, 1)

	local angle = math.deg(Vector3.xAxis:Angle(flatDirection, Vector3.yAxis))
	print(angle)

	hinge.TargetAngle = angle
end)
And the turret’s pointer did correctly point to my desired target, even when I tried moving the assembly to different locations. Unfortunately though, when I converted the turret into a Tool the formula started to give me incorrect results once again and I promise I did my absolute best not to modify anything unless absolutely necessary when doing so, as I only did these steps:
Changed the name of Part0 to Handle
Set Part0/Handle and Part (the pointer) to unanchored
Dragged and dropped the whole assembly into the Tool
Edited the script like so in order to make it work in a Tool:
local tool = script.Parent

local part0 = tool.Handle
local hinge = part0.HingeConstraint

local target = Vector3.zero

--workspace.Part:SetNetworkOwner(nil)

game["Run Service"].PostSimulation:Connect(function()
	local direction = (target - part0.Position).Unit
	local flatDirection = -direction * Vector3.new(1, 0, 1)

	local angle = math.deg(Vector3.xAxis:Angle(flatDirection, Vector3.yAxis))
	print(angle)

	hinge.TargetAngle = angle
end)
Edit to summarize: Essentially something is causing the formula break only when being used in a Tool, otherwise it works as I want it to
I took note of your and @MilkyFiend’s suggestions to use a Weld instead of a HingeConstraint and ran tests. First by mistake I tried using WeldConstraints since I was under the impression that Welds are depreciated so I incorrectly assumed you both meant to use WeldConstraints but were shortening the name to weld, but then I realised that WeldConstraints unfortunately don’t allow you to edit its CFrame so I consulted the docs and found that Welds aren’t depreciated as I initially thought so I ran test using it like you both suggested and here’s my results:
Shaking when equip no longer a problem
Rotating the needle still is problematic, with one of the issues being in my compass’ case the needle needs to rotate from an offset instead of the needle part’s origin. An easy solution to this problem would be to use an illusion where I’m actually rotating an invisible part in the center of the compass’s handle, then weld the visible needle to that invisible part, but I’d still appreciate if someone would explain an alternative method to use that doesn’t require a new part and weld to be added to the compass
Firstly, I changed the axis of Angle() to the Z-Axis because why would you get the Y-Axis when your compass rotates only in the x-z plane (horizontal plane)?
When I tried it out, it worked, but only in a specific angle.
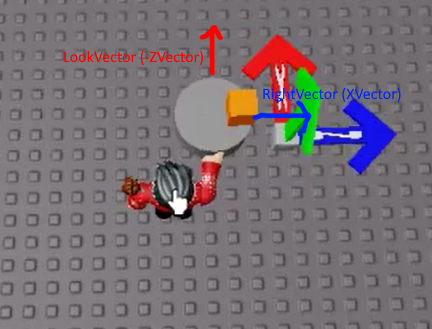
I noticed that it only works when the LookVector (-ZVector) of the handle is equivalent to the X-Axis and the RightVector (XVector) of the handle is equivalent to the Z-Axis. (i put a model of the x-y-z axes/vectors to compare it to the x-y-z vectors of the handle)
So I changed the xAxis to handle.CFrame.LookVector and zVector to -handle.CFrame.RightVector (negative to make it work)
local RunService = game:GetService("RunService")

local tool = script.Parent

local connection: RBXScriptConnection?

tool.Equipped:Connect(function()
	local hinge = tool.HingeConstraint
	local handle = tool.Handle

	local deg = math.deg
	local targetPos = Vector3.zero
	local y0Axis = Vector3.new(1, 0, 1)

	connection = RunService.PostSimulation:Connect(function()
		local angle = deg(handle.CFrame.LookVector:Angle((targetPos - handle.Position).Unit * y0Axis, -handle.CFrame.XVector))
		print(angle)

		hinge.TargetAngle = angle
	end)
end)

tool.Unequipped:Connect(function()
	if connection ~= nil then
		connection = connection:Disconnect()
	end

	connection = nil
end)
and this is the result (sorry for the crappy video)
for the collision, i tried to fix it but didn’t work so gl with that