When my mouse hovers over a part (using cast.Instance), I add a bunch of effects to the part (such as changing the color and reflectance), but when my mouse leaves, those effects still persist. I literally cannot come up with a simple solution. Please help! Thanks!
1 Like
Can you send the script you are using? It’s hard to help without it. You might be able to use mouse.Target.
1 Like
local mouseLocation = UserInputService:GetMouseLocation()
local unitRay = camera:ViewportPointToRay(mouseLocation.X, mouseLocation.Y)
local cast = workspace:Raycast(unitRay.Origin, unitRay.Direction * 1000, castParams)
if cast then
	if cast.Instance.Parent:IsA("BasePart") then
		print(cast.Instance)
		print(cast.Instance.Parent)
		cast.Instance.Color = Color3.new(0,0,1)
	end
end
this is run every frame using RunService:BindToRenderStep
1 Like
Hello!
You could try adding a variable for the last object you hovered! And when the ray target changes you can remove the effects from the old instance by referring to the variable ![]()
Here is an example script to demonstrate what I mean
-- Localscript
local RunService = game:GetService("RunService")

local Player = game.Players.LocalPlayer
local Mouse = Player:GetMouse()

local LastHover: Instance? = nil

RunService.Heartbeat:Connect(function(delta)
	local Results = workspace:Raycast(Mouse.Origin.Position, Mouse.UnitRay.Direction * 200)
	if Results and Results.Instance then
		if LastHover ~= Results.Instance then
			if LastHover then
				-- Cleanup effects
				local Found = LastHover:FindFirstChildOfClass("ParticleEmitter")
				if Found then
					Found:Destroy()
				end
			end

			script.ParticleEmitter:Clone().Parent = Results.Instance
		end

		LastHover = Results.Instance
	end
end)
Hope this helps! ![]() If you have any more questions feel free to ask!
If you have any more questions feel free to ask!
2 Likes
Yep, I got more questions ![]()
I’m not at all experienced in coding, so I’m not very sure what this does, and I eventually want to replace the if cast.Instance.Parent:IsA("BasePart") then line in my code with if cast.Instace.Name == "selectable". Is there any way to incorporate that into the code I sent above? Thanks!
Sure thing! ![]()
So I’m assuming you wish to return the previous color to the part when you are no longer hovering? I’ve made you 2 versions. First of them colors them the way you intended:
local RunService = game:GetService("RunService")
local UserInputService = game:GetService("UserInputService")

local camera = workspace.CurrentCamera

local castParams = RaycastParams.new()

local LastHover: BasePart? = nil

RunService.Heartbeat:Connect(function()
	local mouseLocation = UserInputService:GetMouseLocation()
	local unitRay = camera:ViewportPointToRay(mouseLocation.X, mouseLocation.Y)
	local cast = workspace:Raycast(unitRay.Origin, unitRay.Direction * 1000, castParams)

	if cast then
		if cast.Instance.Name == "selectable" then
			-- We need to remember the Original color of the part before we change it!
			if cast.Instance:GetAttribute("OriginalColor") == nil then
				cast.Instance:SetAttribute("OriginalColor", cast.Instance.Color)
			end
			cast.Instance.Color = Color3.new(0,0,1)
			if LastHover and LastHover ~= cast.Instance then
				LastHover.Color = LastHover:GetAttribute("OriginalColor")
			end
			LastHover = cast.Instance
		elseif LastHover then
			LastHover.Color = LastHover:GetAttribute("OriginalColor")
			LastHover = nil
		end
	else
		if LastHover then
			LastHover.Color = LastHover:GetAttribute("OriginalColor")
		end
		LastHover = nil
	end
end)
The second version might be more to your liking ![]() I’m utilizing the Highlight Instance to as the name suggests “Highlight the hovered part”
I’m utilizing the Highlight Instance to as the name suggests “Highlight the hovered part”
Using highlight the code also got a lot simpler
local RunService = game:GetService("RunService")
local UserInputService = game:GetService("UserInputService")

local camera = workspace.CurrentCamera

local castParams = RaycastParams.new()

local Highlight = script.Highlight

RunService.Heartbeat:Connect(function()
	local mouseLocation = UserInputService:GetMouseLocation()
	local unitRay = camera:ViewportPointToRay(mouseLocation.X, mouseLocation.Y)
	local cast = workspace:Raycast(unitRay.Origin, unitRay.Direction * 1000, castParams)
	if cast then
		if cast.Instance.Name == "selectable" then
			Highlight.Enabled = true
			Highlight.Adornee = cast.Instance
		else
			Highlight.Enabled = false
		end
	else
		Highlight.Enabled = false
	end
end)
Here is what the parameters for highlight I used look like

Hopefully this clears things up ![]() Let me know if you got anything else!
Let me know if you got anything else!
1 Like
Bro… this is exactly what I needed! Even better, I now know about this highlight thing :0
Awesome! Thank you so much!!!
No problem! Glad it worked out for you! ![]()
1 Like
One more thing: Is there a way to click it and keep it highlighted, and when I click off, it stops being highlighted, and when I press control and click on another, it selects them both?
And then eventually I want to be able to move and rotate the selected parts, soooo that’s gonna get quite complicated I imagine. I really bit off more than I can chew with my first project ![]()
Here’s my current code to help ya out ![]()
local HighlightPreset = nil
local HighlightCloneSelect = nil

local castParams = RaycastParams.new()
castParams:AddToFilter(script.Parent)

local function createMouseHoverEffects()

	Highlight = Instance.new("Highlight")
	Highlight.Parent = workspace.origin
	Highlight.Enabled = false
	Highlight.FillColor = Color3.fromRGB(0,240,0)
	Highlight.FillTransparency = 0
	Highlight.OutlineTransparency = 1

	HighlightCloneSelect = Highlight:Clone()
	HighlightCloneSelect.Parent = workspace.origin
end

local function MouseHover()
	local mouseLocation = UserInputService:GetMouseLocation()
	local unitRay = camera:ViewportPointToRay(mouseLocation.X, mouseLocation.Y)
	local cast = workspace:Raycast(unitRay.Origin, unitRay.Direction * 1000, castParams)
	if cast then
		if cast.Instance.Parent:IsA("Attachment") then
			Highlight.Enabled = true
			Highlight.Adornee = cast.Instance
		else
			Highlight.Enabled = false
		end
	end
end

local function MouseSelect(_name, inputState, _inputObj)
	if inputState == Enum.UserInputState.Begin then
		print(Highlight.Enabled)
		if Highlight.Enabled == true then
			HighlightCloneSelect.Enabled = true
			HighlightCloneSelect.Adornee = Highlight.Adornee -- this one only works becasue only one adornee can be at once, I think I need a different solution
		else
			HighlightCloneSelect.Enabled = false
		end

	end
end

createMouseHoverEffects()
RunService:BindToRenderStep("hoverMouse", Enum.RenderPriority.Camera.Value, MouseHover)
ContextActionService:BindAction("selectMouse", MouseSelect, false, Enum.UserInputType.MouseButton1)
Again, thank you so much!
If cast.Instance.Parent:IsA("Attachment") didn’t quite make sense, here’s what my parenting structure looks like:

The raycast sees the part that’s under the attachment, that’s how I click on it. The weld constraint is so that I don’t have to anchor the part.
Hello! Sorry for the slow response ![]()
Yes it is possible to highlight multiple elements at once, but it can get a bit tricky since you are only limited to 31 Highlight elements per game even if they are disabled. The trick is to use a single highlight on multiple objects at the same time by parenting the objects (or copies of them) you wish to highlight under the same model. As an example like this:


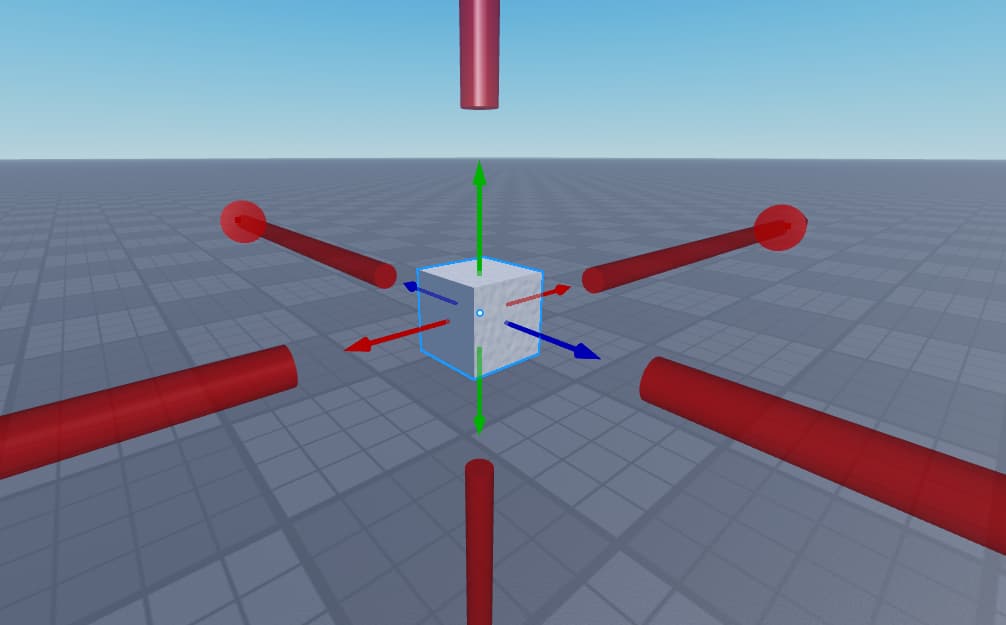
As for your moving / rotating future plans, I highly recommend taking a look at Handle instances:


Hopefully this gives you a better idea about how to figure out multi-highlighting and possible rotations and so on ![]()
2 Likes
Thank you! I’ll look into this! ![]()
Quick question: Any way to reduce the size of the handle’s arrows? I’ve looked around a little big and can’t really anything useful, but you clearly know way more than me (which I’m very thankful for)
Thanks!
I believe the main handles are not resizeable but you can try using ConeHandles and CylinderHandles which are resizeable to recreate the arrows. Hope that helps ![]()
wow! you’re super creative! I’ll test this out in a few hours ![]()
What if I want to move a few parts at a time? What would be best for performance? Put them all into a model? Folder?

here’s the script I plan on using btw. Thanks!
This topic was automatically closed 14 days after the last reply. New replies are no longer allowed.