Hi,
My approach to this problem was to calculate two different angles to get the position of each planetary body. Here’s the outcome:
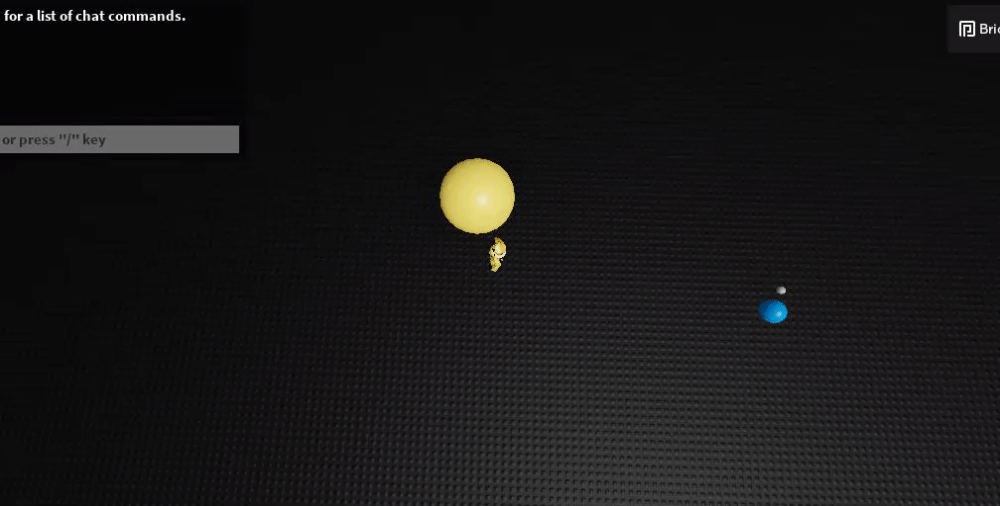
And here’s the code. I’ll take a moment to explain it so you can learn something from it. I’m positive this isn’t the only solution, nor is it necessarily accurate to how planets ACTUALLY move (I’m not a physicist), but I think this is what you were asking for:
local sun = workspace:WaitForChild("Sun")
local earth = workspace:WaitForChild("Earth")
local moon = workspace:WaitForChild("Moon")

local RunService = game:GetService("RunService")

local earthAngle, moonAngle = 0,0 --tracks the current rotation
local earthRotSpeed = 10 --arbitrary, degrees per second
local moonRotSpeed = 90 --arbitrary, degrees per second

local earthDistanceFromSun = 40
local moonDistanceFromEarth = 3

RunService.RenderStepped:Connect(function(dt)
	earthAngle += math.rad(earthRotSpeed)*dt
	moonAngle += math.rad(moonRotSpeed)*dt
	if earthAngle >= 2*math.pi then
		earthAngle -= 2*math.pi
	end
	if moonAngle >= 2*math.pi then
		moonAngle -= 2*math.pi
	end

	earth.CFrame = sun.CFrame * CFrame.Angles(0, earthAngle, 0) * CFrame.new(earthDistanceFromSun, 0, 0)
	moon.CFrame = earth.CFrame * CFrame.Angles(0, moonAngle, 0) * CFrame.new(moonDistanceFromEarth, 0, 0)
end)
The code can be put anywhere, but it works best when in a LocalScript in StarterPlayerScripts (or anywhere on the client, really). So to briefly go over what I did here, you can see in the first two lines I simply defined sun, earth, and moon to be physical parts in the workspace.
Next, I define RunService which is a built-in service in Roblox that’ll help us with timing in this case.
The next three lines define the angles, and the rotation speed of the earth and moon. Those numbers are completely made up and can be whatever you want them to be. They represent degrees per second. earthAngle and moonAngle represent the initial rotation but it’s fine to keep them both zero.
After that on lines 11 and 12, we define the distance we want the earth to be from the sun, and the distance we want the moon to be from earth. Note that the center of each celestial body is how the distance is calculated, so if you leave the distance as 0 they will be occupying the same exact location.
The big part of this code is the call to the RunService.RenderStepped event, which runs every ‘step’, which for the purposes of this code is just a unit of time. We can get how long that ‘step’ took (the delta time, or dt as we name it), and add it to our earth and moon angles times the rotation speed to get a new angle for our current frame in time. The if statements are just there to clamp the rotation so that it never gets bigger than 2pi, which works because 2pi and 0 are the same angles on a circle (a full rotation). Lastly, we use CFrames to position the planet and moon by using a starting point (the sun for the earth, the earth for the moon). We multiply that starting CFrame by our rotation (in the Y-axis only) and then translate it by the distances we set on lines 11 and 12 in the X-axis.
That’s probably a lot to take in, I suggest taking some time to draw out a diagram of the situation with math to get a clearer picture of what’s going on.
To address your comment about solving this using sin, you totally can! You can write a set of parametric equations to get a circle:
x = rcos(t) and y = rsin(t)
although I didn’t go over it in my code, you can totally use those equations to solve this problem in a different way! Feel free to look up “Parametric Equations of a Circle”


