
Obby Rush: Community Maps
Initial Setup
Model Setup
Start off by grabbing the map kit and inserting it into a blank studio place. You’ll have two different models. “Interactable Parts,” which we’ll go over a little later, and “Obby Rush Map Template” which will be your map model.

You can rename the model to whatever you’d like your map to be called!

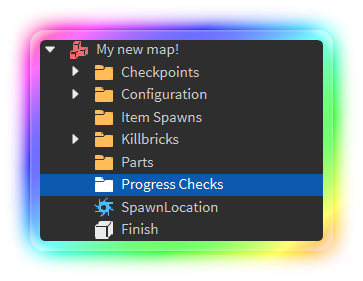
When you open up the map model, you’ll see a bunch of folders, which can seem overwhelming, but let’s go over them one-by-one to make it nice and simple. ![]()
Checkpoints

When you open the “Checkpoints” folder, you’ll see one called “Zone 1.” This name is arbitrary and can be re-named to whatever you’d like to make it easy to remember where it is (ie. “Cave System,” “First Valley,” etc.)
If you’d like more than one checkpoint you can duplicate the folder as many times as you want. Just remember to have different names for each folder. If you don’t want any checkpoints, simply delete the folder.
To set up the checkpoints, simply place the “Hitreg” part wherever you want your checkpoint to be! You’re allowed to change the colors of the particles, beams and pointlight to whatever you think fits your map the best. ![]()

The “Respawn Point” is where the players will respawn at after dying (as long as they’ve touched the “Hitreg” part.
High Detail Decoration

This folder is used for extra decoration parts that are not important to gameplay. Anything inside this folder will be hidden from players with “Low Detail Mode” enabled in their settings.

Things like the candy canes and gum drops circled in red do not affect gameplay and are put in the high detail folder.
Configuration

Obby Rush supports custom lighting zones. This means you can have different environment lighting throughout your map (ie have dark lighting inside caves/houses and brighter lighting outside)
Inside the “Lighting” folder, you’ll find a folder called “Default.” This will be the lighting that will be applied when players first spawn into your map. Do not change the name of this folder or delete it. If you want more zones, duplicate this folder and re-name it to something else.

Clicking on the “Default” folder will bring up this list of attributes in the “Properties” window. You’ll notice that “Lighting” has all these same properties. You can change these to match whatever you choose for lighting settings in your map. The “TransitionTime” attribute sets how long it takes to smoothly transition to the next lighting settings (if you have multiple lighting zones)
Note: This setting doesn’t do anything for the “Default” folder

If you have custom lighting objects you’d like for a lighting zone, place them in the folder. It should look like this:

Once you’ve placed the lighting items in the chosen folder, select them all and make sure they have the “Map Lighting” tag
To do this, first open the “Tag Editor” window

Click the “New Tag” button, type in “Map Lighting” and press enter

It should now look like this:
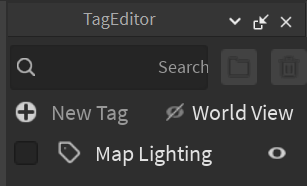
Next, select all the lighting objects in your folder(s) and check the box next to the tag you just created.

Clicking on the “Features” object will bring these attributes up in the “Properties” window. This part is pretty simple. Just tick each box if that mechanic is used in your map.

Clicking on the “Settings” object will bring these attributes up. Type your UserID into the “Creator” attribute. If you’re working with someone else, type their UserID in “Creator2” and if not, leave it at 0.
“Difficulty_Rating” is a number from 1-5. This can be determined during the testing process.
The “TimeLimit” attribute is how long your map will last(in minutes)

Killbricks
Opening the “Killbricks” folder will show a single part named “Killbrick.” This can be removed if you’d like.

To set up killbricks in your map, simply place them wherever you’d like and name them “Killbrick” (this is case-sensitive)
Next, drag all those parts into the “Killbricks” folder and you’re done. Easy right? ![]()
Parts

The “Parts” folder will be where you store every part in your map (obviously excluding your killbricks and checkpoints) This makes it much cleaner and easier to check when it’s put in game.
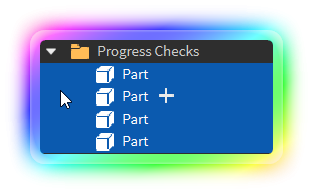
Progress Checks
These will be the parts used to determine a player’s progress through the map. The more you have the better.
To set them up, create a new part and make sure it’s anchored. Then, turn CanCollide off. Place these around your map (after each obstacle/jump is best) and make sure they’re big enough that it’s impossible for a player to miss them.

After placing these around your map, drag them into the “Progress Checks” folder.
SpawnLocation and Finish
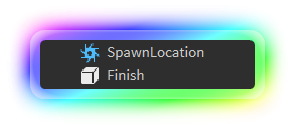
“SpawnLocation” will be the starting spawn for players when they’re loaded into the map. Place this at the start of your map.
“Finish” will be the part that players touch when they beat the map. This can either be big and invisible or smaller with particle effects/glowing.
Interactable Parts
Model Overview

Opening the “Interactable Parts” model will show every single mechanic that’s currently ingame! You can ungroup this model.
Lighting Change

This part is what will control the different atmosphere changes that you set up in the map model. When placing this, make sure that it is large enough that it’s impossible for a player to miss.
Once it’s positioned where you’d like it, make it invisible.

To control which lighting folder is being added to the player, select the part and scroll all the way down to its attributes in the property window. Rename the “FolderName” attribute to the name of your lighting zone folder.
Climbing Walls

Not a whole lot going on with this part. Just place it wherever you’d like the player to climb on it. You can adjust HorizontalPower and VerticalPower to control the player’s movement after they jump from the wall in the same way that sticky walls work.

Note: Make sure your alignment is perfect if you have multiple walls or it will bug out. Example of what not to do:

Conveyers
Place the conveyer wherever you’d like. To adjust the speed, scroll all the way down to its attributes and adjust the “Speed” value.

Keep in mind that rotation does matter on these. The front face should be pointing in the direction that the player will be moving to.
Sticky Walls
You might notice that there are two different “Sticky Wall” variations in the kit.

The texture on the left should be used for sticky walls with the “Slippery” attribute enabled.

“HorizontalPower” is how far the player will be flung horizontally when the player is jumping off the wall (its value cannot be lower than 0)
“VerticalPower” is how far the player will be flung vertically when the player jumps off (this can be less than 0 if you want the player to be flung downwards)
“Particles” controls whether or not a smoky particle effect will be shown when a player is sliding if the “Slippery” attribute is enabled
Levitation Zone

This part will slowly pull a player to the top of it while they remain in the zone. This can be used for fans or vents that are pushing a player up.
The attribute, “LiftPower,” controls how fast the player rises

Speed Ladders

These ladders work the same as “Flood Escape 2” ladders. Holding space while climbing them will move the player vertically extremely fast instead of bouncing them off the ladder.
Note: Particles are required.
Speed Boost

This model will change a player’s walkspeed for a specified duration. Feel free to change the part and particle colors to whatever you want!
Selecting this model will bring up these attributes:

“BoostTime” is how long the speed boost will last.
“Speed” is the new WalkSpeed that you want the player to have.
Trampoline

This part only has a single attribute, “Power,” that controls how far the player is bounced into the air.

TimeBlock

This part, sometimes referred to as a Beat Block, will transition between fully visible and collidable to invisible and un-collidable.

“ActiveTime” controls how long the part is visible for
“InactiveTime” controls how long the part is invisible for
“TimeOffset” is how long to wait before starting the cycle
“TransitionTime” is how long it takes for the part to change from visible to invisible and vice versa
Falling Brick

This part will fall when touched by a player!
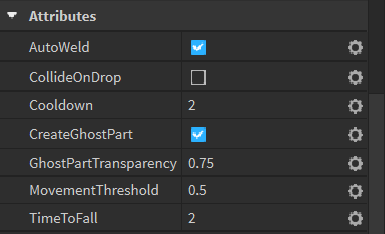
“CreateGhostPart” will leave behind a semi-transparent part after the parts inside the model fall.
“GhostPartTransparency” is how transparent the ghost part will be.
“MovementThreshold” is how intense the model shakes when the player touches the “Hitreg” part
“AutoWeld” controls if the model is kept together when it falls. If this is unchecked the model will “shatter” and all its pieces will fall individually
“CollideOnDrop” controls the CanCollide property of the model when it falls
“Cooldown” is how long the model takes to respawn after falling
“TimeToFall” is how long it takes for the model to fall after being touched by a player
Note: “Hitreg” has to be the PrimaryPart of the model and will be the part that, when touched, triggers the model to fall. Making this large and invisible is good practice.
Map Testing
Due to Roblox’s privacy safe-guards, I have to own the map model in order to use it in the testing place.
When you’re ready to test your map, DM me a link to the model and I’ll take it and let you know so you can take it off-sale.
After the model is in my inventory, I’ll send you an encrypted code that you can use to load your map in Community Maps.
Once you enter the community maps place, walk into the green circle and type in your code when prompted

Submission
Once you’re finished with your map, let me know so I can do a final run-through with our testing team before the map is accepted. Upon having your map accepted you’ll be given the “Map Builder” role in Stunning Studios and our social media server (link found on group page)
Whew! Finally done with this tutorial. Hope you all understood everything and be sure to DM me if you have any more questions. Good luck!