Hello! Recently I’ve been getting into the fantastic art of GFX, and I want to share what I’ve learned so other people can start making GFX too!
In this first tutorial, we’re going to cover the basics, and make ourselves a nice profile picture too!
What you’ll need:
Blender, download here: Download — blender.org
PaintRig 3.0, download: PaintRigV3.blend (801.4 KB)
Roblox Studio, I’m assuming everyone has this.
Load Character Plugin, download the free version here: Load Character Lite - Roblox
Part 1: Setting up our character
To get started, go ahead and open up a new place in Roblox Studio. Using the Load Character plugin, spawn your avatar, and make sure Spawn at Origin is checked and make sure you spawn it as R6, otherwise the rig will not work. Once you’ve done that, right click your character model, and click the Export Selection… button, like below:
Save the .obj file to your Downloads folder, make sure you don’t save it to your desktop otherwise it will not save.
Part 2: Rigging
Open up blender, then navigate to File > Open… then select the PaintRigV3.blend file.
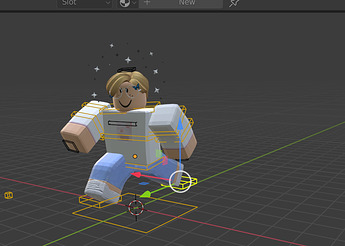
Once it is open, it should look somewhat like this:
As you’ll notice, the character is pink right now. To put your avatar’s texture on it, do the following:
Click the file icon and navigate to your username.mtl file, e.x:

My .mtl file:

Double click your texture file and it should apply it! Mine looks like this now, your texture should have applied too:
It looks great and all, but all the accessories are missing! To put them on, do:
Navigate to File > Import > Wavefront(.obj).
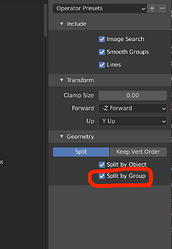
Find your avatar .obj that we saved earlier. On the right-hand side, open the Geometry drop-down, and check the Split by Group box, like so:
Double click your file, and it will import into the workspace. You’ll notice it’s in the same place as the rig, so move it aside by hitting G, then X for the axis, then 5 to move it 5 meters along the X axis. Mine looks like this now:
Select all your head accessories, the right click > Join. This will merge those objects into one layer. Hit G, X for the axis, and -5 to put the accessories on top of the head. In the Outliner, select your head accessories, hold shift, drag them up to the A_HeadAttachments layer, and release. It should have looked something like this:
Then, if applicable, select your Torso attachments, follow the same steps, but put it in A_TorsoAttachments.
Now your character is rigged! Mine looks like this:
Part 3: Posing and Rendering
The rig uses a mesh deform called an Armature to pose your avatar. You can do any pose you want, But I’m going to do a running position. To start posing your rig, select the outlines around your avatar like so:
Then, at the bottom left you’ll see a box that says Object Mode inside it. Click it, then click Pose mode from the dropdown.
It’ll now look something like this:
Now, you can click the different outlines to pose at different places. Say I wanted to raise my right arm, it would look something like this:
Using this knowledge, let’s create our pose!
This is my final position:
Now, to make it into an image, Tab out of Pose mode into Object mode, hit Shift + A, then add a Camera object.
Go to View(at the bottom) > Viewpoint > Camera or hit 0 on your numpad. This will put it in the view of the camera. To move the camera around, hit Shift + ` , then use WASD to position and your mouse to aim the camera. Once, you have the desired camera view, click the screen to set the position. Mine now looks like this:
Now, at the bottom right, you’ll see four sphere icons. The third one should be highlighted, meaning we’re in material mode. You should now click the fourth one, to go into Rendered mode. Next, you need to make sure you’re in Eevee renderer, and you can do so by clicking this button in the bottommost right panel:
If you’re already in Eevee, great! No need to do that. After this, you’re going to want to put some lighting into the scene so it doesn’t look so dark. First, we’ll turn up the ambient lighting, by following the picture below:
See the strength value? Turn that up a bit and experiment to get your desired result. Then, we’re going to spotlight out avatar using a spot light. Hit Shift + A and add a Spot light. Play around with the Power and Radius controls in the light properties. This is my setup:
Then, go to the render properties and make the camera square, as seen below:
Now, depending if you want the background to be transparent, you can go to the render settings, and turn it to transparent like so:
Just Check the Transparent box and it will render a png. But I want mine with a background, so I wont turn on that setting.
If you’re happy with it, go ahead and click Render > Render Image at the top. Since we’re doing it in Eevee, it should render very fast.
This is my final result!
I hope that you guys liked the tutorial, and maybe even learned something from it! Next part we’ll be going over lighting, Cycles renderer, and other cool effects!

~stqrrydev


